How I Improved My Photos (And You Can Too!)
/Since I started blogging over 2 years ago, I have put a lot of effort into improving my brand's photography. It's been a series of trial and error, some frustration, and even a little cursing. But I can honestly say, without a doubt, that I am so proud of the achievements I have made in my brand's photography! Blogging has been one of the most amazing challenges I have ever put myself through. There's been good times (like landing my first paid guest posting spot!) and bad times (like, my shop failing) but honestly I would not go back and change the decision to start- despite all the efforts and time it has taken that I didn't even account for. And so much of my success can be attributed to the images I put forth on my blog.
Today, I want to take a trip down memory lane and show you a few before and afters to show you how my photography improved over the years. And, I want to show you some real-time before and afters- aka, how bad weather or editing can drastically change the quality of a photo! So, strap on your seatbelt. It's gonna be a bumpy ride.
Humble Beginnings: Donuts
For the first stop on our journey, I'm taking you way back to April of 2016. I did my first ever (and still the most popular!) DIY's- a Donut Party Platter. Overall, the photos were ok. But, they were kinda shadowy, small, and a little out of focus. It was really difficult to get the lighting to be even- you can see that the left side is brighter than the right! I can't remember how exactly I did this, but I know that back then I was working with white poster board, 2-3 desk lamps with regular incandescent bulbs (yikes!) and whatever sun I could find. I recently re-took the photos of the donut platter so I'd have a new pinnable image on Pinterest. You can definitely see the improvement in the photography! The photo is crisper and cleaner, and definitely matches my aesthetic better. Plus, now I don't rely on text to get people to stop and see what my pin is about. The images speak for themselves, and the details are in the captions. This makes my Pinterest boards look much cleaner than they were before!

Fake it 'til you make it.
I'm going to let you in on a blogging secret- most party posts are staged! And there's a good reason for that- it's pretty much impossible to get a real party set up with enough time to photograph it and get yourself ready. Plus, parties are based on what time is best for your guests NOT for photography! Well, back in my early days of blogging I didn't know this. So, I had a Sugar Sweet Birthday Party and tried to take photos... at night... without external lighting. And well, you can see the results for yourself. Also, the party table was set up in my kitchen, and just a few feet away from the party table was my kitchen island, which nearly blocked every effort to take a good photo! More recently, I had an Ice Cream Party and I used my improved photo skills. You can see the photos are less grainy, and there is a clear focus on specific items rather than the whole table randomly!

If at first you don't succeed, try try again.
Ok guys, now I am taking you on an exclusive, behind the scenes tour of a failed blog post that has never been shown before. In 2016, I had a genius idea to make some cute Christmas stirrers. I literally did an entire photoshoot for these. The whole post was DONE. But when I sat down to edit, I was appalled by my photos. I straight up could not get them to edit properly, and couldn't bring myself to post such hideousness on my blog. I didn't have time to re-do the whole post (#TisTheSeason) so I decided that it would have to wait, because these photos were too dang horrible to put forth into the world. Fast forward to 2017 and I re-did the whole shoot, start to finish. And I LOVED the results! The photos were bright and clean with a special holiday spirit. And I was SO glad I had waited.

Honestly, holiday posts are some of my favorites and I knew I couldn't put forth work I wasn't proud of. One of the reasons why this post was so awful was because I was playing around with backdrops, trying to infuse some color into my photos instead of having the backdrop always be white. And while I applaud myself for trying, this was a massive fail. The color of the backdrop wasn't even on brand, but I don't regret it. This was a big risk for me, photo-wise, and it helped me to create a new look for my blog. Now I LOVE my angled wrapping paper look, because it has that pop of color I was looking for while still being really clean. Don't be afraid to try new things, like backdrops. They may be a fail the first time, but you eventually can find a look you love- and that, my friends, is SO worth it.
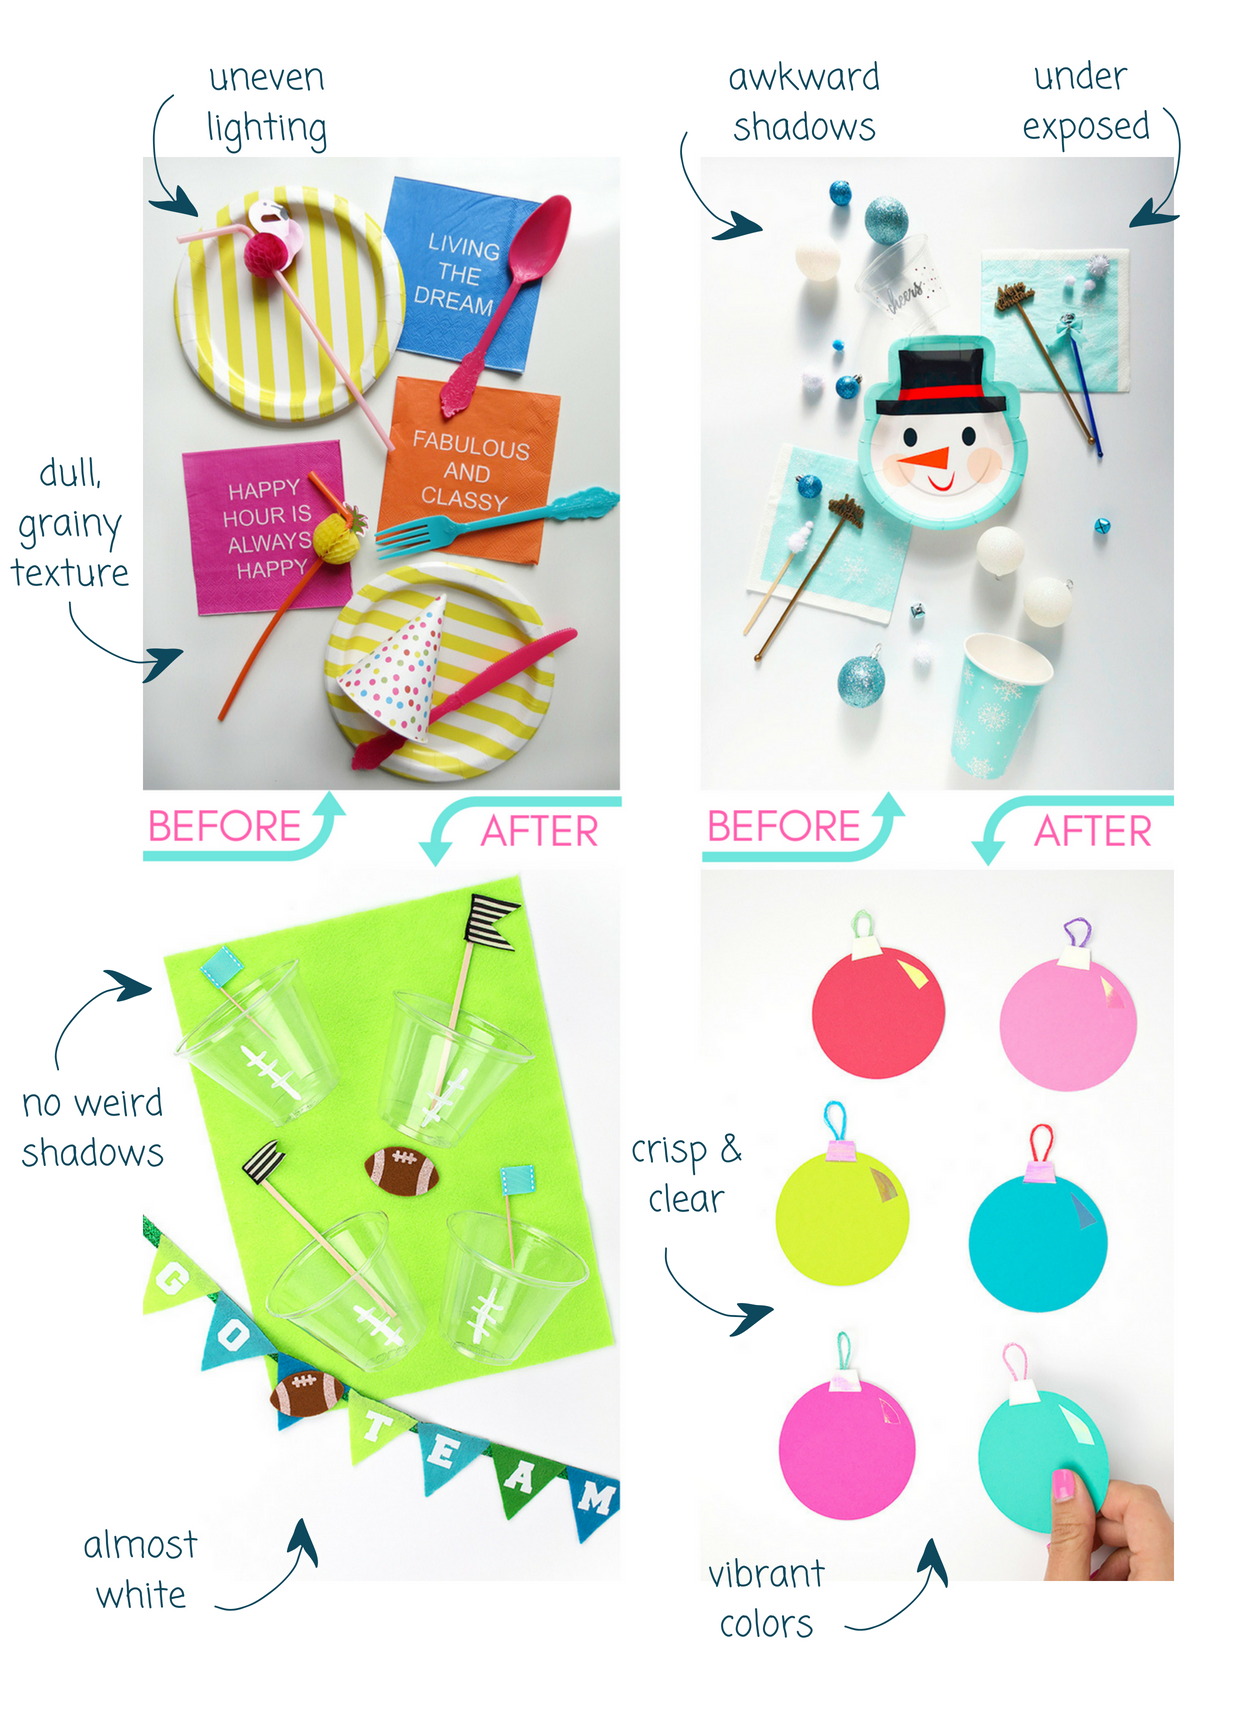
The art of the flatlay.
A popular photo setup sweeping the nation is the flatlay. I don't remember them being quite so popular when I was younger but hey, I was an oblivious kid. Nonetheless, a killer flaylay is a surefire way to get noticed. But, they can be kinda hard to get right. First off, you have to arrange things nicely. Then, you have to light them up nicely. And lastly, you have to shoot them from overhead at a straight angle. YEA... good luck with that! I actually broke my toe trying to shoot a flat lay. Did you know that? I was standing on a chair to get just the right angle (hint: it wasn't) and just the right lighting (another hint: it wasn't) and as I was stepping off the chair, the whole thing freakin flipped over and I landed on the chair, scraped my back the whole way down, and landed with a loud THUD. I was pissed at myself (as we all are when we fall!) and got myself up. And I thought, huh... I fell on my back but my toe feels funny. A nice long trip to the ER later, I discovered that I fractured my toe and had to wear a boot for 2 months. So believe you me when I say that flatlays are HARD to get right, and it's really important to protect yourself from their evilness! Anyway...
The first trick I learned was to have consistent lighting for my flatlay (using these lights!) so that there aren't any weird shadows. The second trick was investing in a horizontal camera mount so that the photos could be nice and straight! There's obviously more to it than just that, but those were two HUGE improvements for me when it came to flatlays. And the proof is in the pudding.
If you're looking to improve your photos, I've created a FREE photography e-course to help you do just that! Be sure to sign up and get your workbook by clicking the photo below!