How to Plan an End of Summer Backyard Smores Party

It's official guys- Summer 2016 is coming to a close! Since I finished school a few years ago, summers just haven't been the same. Instead of having 2 months off to frolic on the beach or go camping, I've been spending most of my time indoors, working. It's always caused me to feel a bit impartial towards the summer. This year, however was different. Since we purchased a house, we now have a yard to hang out in and relax. It's enabled me to spend more time outdoors, and be able to enjoy the summer again!

Since today is National Toasted Marshmallow Day, I've created this backyard smores party to close out the summer and start the fall off on the right foot. This party is perfect if you have a grassy yard, or even a small balcony. It's also great if you wanted to go camping, but just didn't have the time this summer. You can still enjoy a night under the stars with some tasty smores!

*This post contains affiliate links.

How to Plan an End of Summer Backyard Smores Party.

1. Geometric Lantern 2. Furry Throw Pillow 3. Fujifilm Instax Mini 8 Camera 4. Birch Paper Straws 5. Hello Sun Throw Pillow 6. Metal Camping Lantern 7. Picnic Blanket 8. Prism Party Plates 9. Birchwood Fancy Cutlery 10. Tufted Floor Pillow 11. Marshmallow Roasting Sticks

So, how exactly does one plan a Backyard Smores Party?

First things first, you have to have a great blanket to put down. This blanket has a waterproof backing so your butt doesn't get wet! It also folds up easily, which makes it perfect for picnics and camping adventures. The fun plaid pattern easily transitions from summer to fall, so you can continue to use it year round! 

Next, you need to make your blanket comfy. Add lots of throw pillows so you can lounge in style. These floor pillows are large enough to sit on, and the tufting makes them look fancy! This Mongolian faux fur pillow is soft and warm, which will help with chilly nights by the fire. Plus the pink color is adorable- it reminds me of a teddy bear. Adding this Hello Sun throw pillow will be a cheery reminder of all the summer fun you had!

Summertime activities are all about creating memories. The Fujifilm Instax instant camera will help you capture them! Something about these instant photos makes you instantly nostalgic- you realize that the moment is becoming a memory you'll never get back.

As it gets dark, you'll need some lanterns to light the way. This geometric lantern is battery operated and gives off a soft yellow light, while this metal camping lantern is LED and gives off tons of light. I have the camping lanterns and love them- they're functional and cute! They'll add some ambiance as the sun goes down. 

Since you don't make a mess on your picnic blanket, you should probably get some plates! These Prism Party Plates from Oh Happy Day are colorful, large and sturdy. Add this birchwood fancy cutlery so that you can scoop up any chocolaty, gooey bits that fall onto your plate. Finally, add these birch paper straws so that you can enjoy some milk (or a cocktail!) to wash down those smores.

And last, but certainly not least, you'll need a good set of skewers! These marshmallow roasting sticks are really cute- they're such a nice mint/aqua color. They have a telescoping handle, so they pack up easily for storage or bringing with you on camping trips. Plus, they have great reviews on Amazon!

Now all you need is some smores! Check out this amazing Smores post from Cooking Classy! No seriously, these are some of the tastiest smores I've ever seen. I want to make them all!

Trying to hold on to that last bit of summer? Check out my Summer Crafts and Decor Pinterest board for some last minute activities.

How to Plan a Pinterest Worthy Party

Raise your hand if you've ever wanted to throw a Pinterest Worthy party but had no idea where to start. Hey, maybe you even tried to throw one but it didn't really match the vision in your head. Don't worry- you can throw the party of your dreams with ease! Just follow these steps, and sign up for your FREE Anatomy of a Pinterest Worthy Party guide. This 10-page guide will walk you through the elements of a Pinterest worthy party, and even includes a shopping checklist at the end! So what are you waiting for? Let's get started!

With a few pointers, you can throw the party of your dreams with ease, whether it’s a bridal shower, baby shower, or a birthday party! Just follow these steps, and don't forget to sign up for your FREE Anatomy of a Pinterest Worthy Party guide. #par…

Pick a theme or color scheme.

Pinterest worthy parties have either a fun theme or a cohesive color scheme. If you choose to go with a simpler color scheme party, be sure to pick colors that complement each other. Pastels are always popular, but be creative! Try pairing one bold color, one neutral, and a few different shades of a third color to get a nice variety. 

Create a board and pin ideas.

Seems pretty obvious that you'll have to create a Pinterest board! Pin parties that inspire you, DIY tutorials you'll be making, or color palettes that you want to be your focus. If something inspires you, even if you're not quite sure how, pin it on the board and see if you can incorporate it. For example, check out my Sugar Sweet Party Pinterest board to see how I planned out my 27th birthday party.

Focus on the little details.

Pinterest parties are full of whimsical details that make you want to look closer. Fun favors, sweet treats, and cute banners can really enhance the theme. 

Create an epic party table.

Almost every party on Pinterest includes an elaborate party table. This table "sums up" the party, if you will. Place the table against a wall and create an interesting backdrop above it. Then cover the table with all your fun goodies and themed items. In this case, a smaller table might be better if you don't have too many items. Or, spread things out using larger platters to create the illusion of fullness. 

Start small and work your way up.

This can mean just creating one really elaborate display or focusing on the party table. Whatever it is, give it your all and make it the focus piece.

Take well-lit photos in natural lighting.

Unless absolutely necessary, using flash is discouraged. It makes photos seem glaring. Instead, opt to take photos in natural lighting for the best effect. If that's not an option, use a tripod and longer shutter speed to mimic the effect. 

Don't get discouraged.

Although it doesn't seem this way, throwing Pinterest worthy parties are hard! A lot of time, energy and especially money goes into them. And most parties you see online have hired a professional planner! Don't let someone else's end result discourage you from getting started. You could be as good as them someday!

Dying to learn more? Be sure to sign up and receive my FREE 10-page guide on how to plan a Pinterest Worthy Party! This guide is packed with advice to take your party to the next level, and even includes a shopping checklist so you don't forget anything.

You can also follow me on Pinterest for tons of amazing party ideas and DIY's!

Easy Pineapple Garland DIY

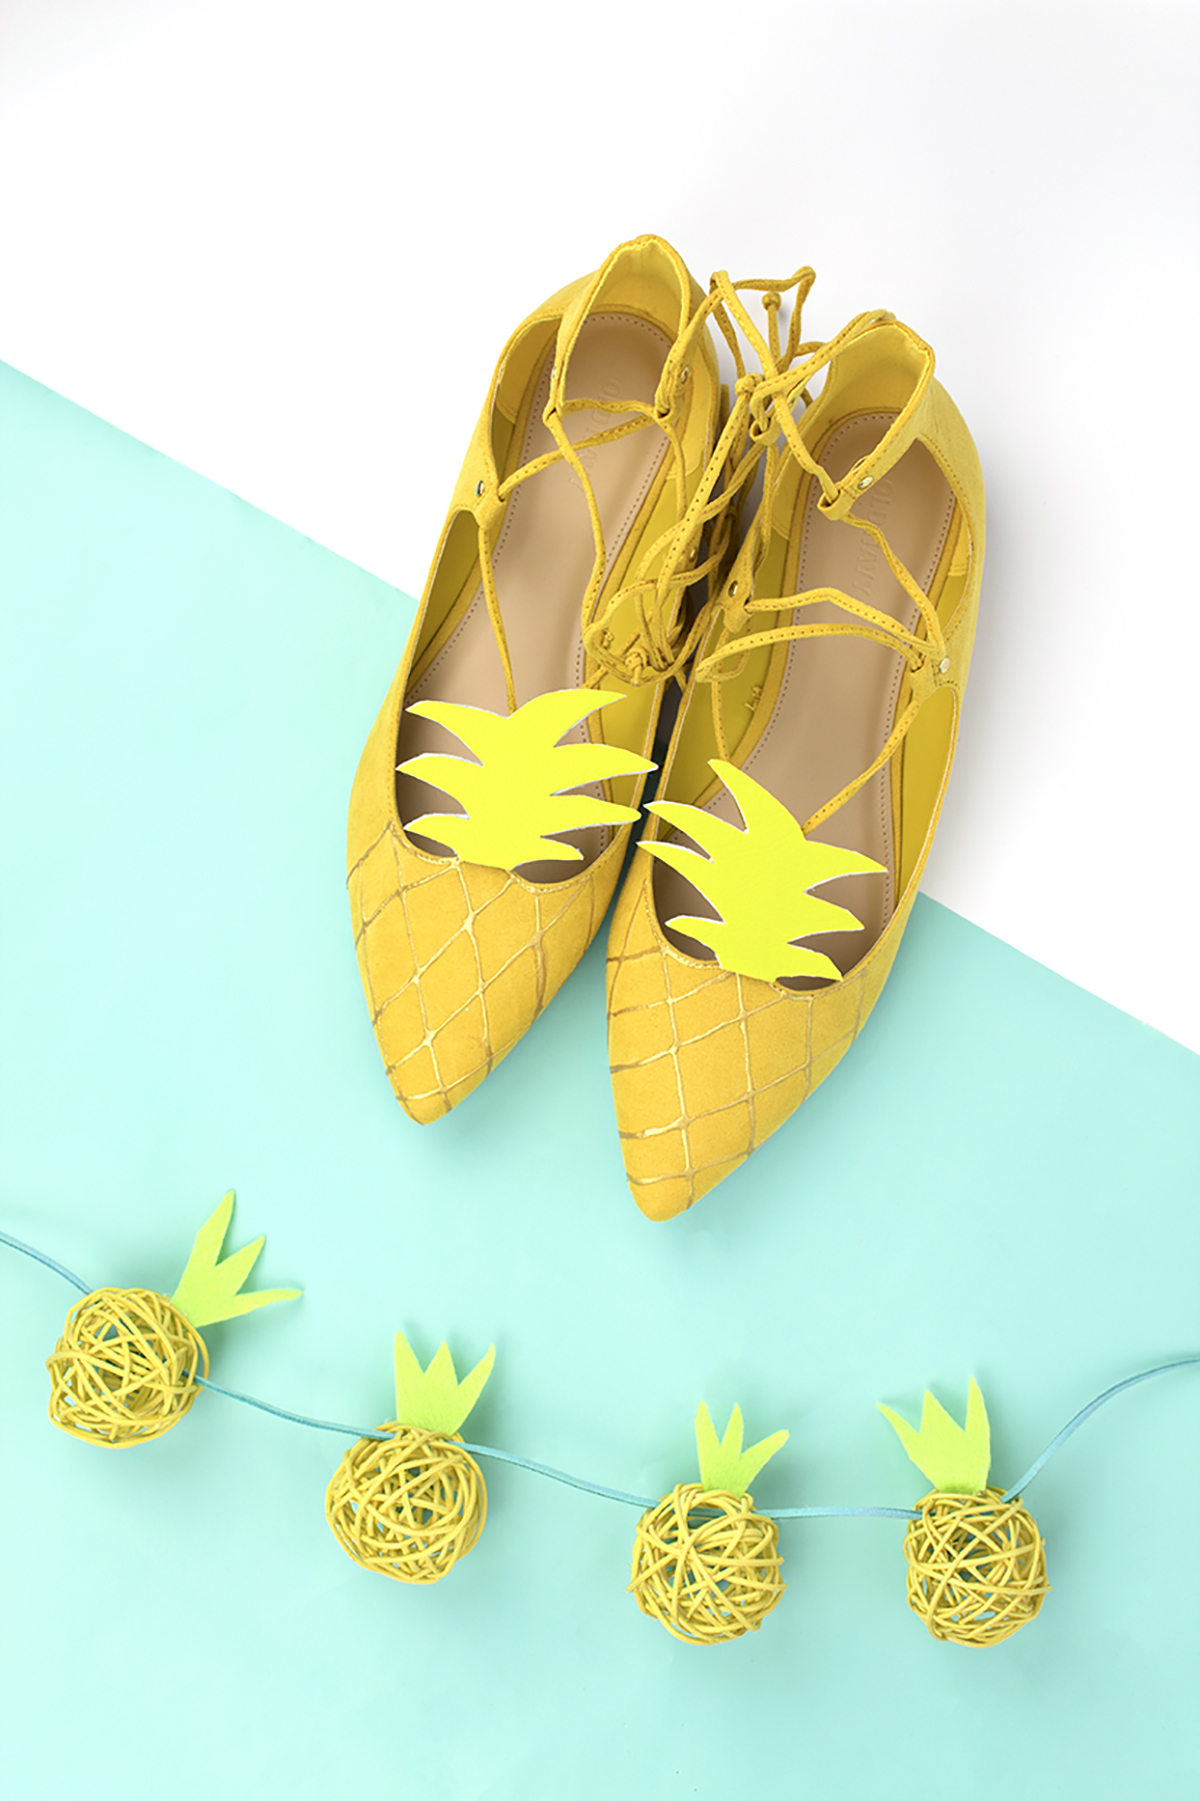
A few weeks ago, I did a Michael's party supplies haul and I picked up some awesome tropical party supplies! Did you see those decorative straw balls and wonder what they can be used for? Well, wonder no more! I've created a super cute and super easy tutorial for a pineapple garland made from those kooky straw balls you see everywhere. The best part? This is a super easy and super affordable project that anyone can do! 

*Contains affiliate links

The perfect summer craft idea for a BBQ, end of summer party, or backyard decor! This easy garland only needs a few supplies and can even be strung up in your dorm room! #pineapplecrafts #summercrafts #garland
DIY Pineapple Garland- Cute and Easy!

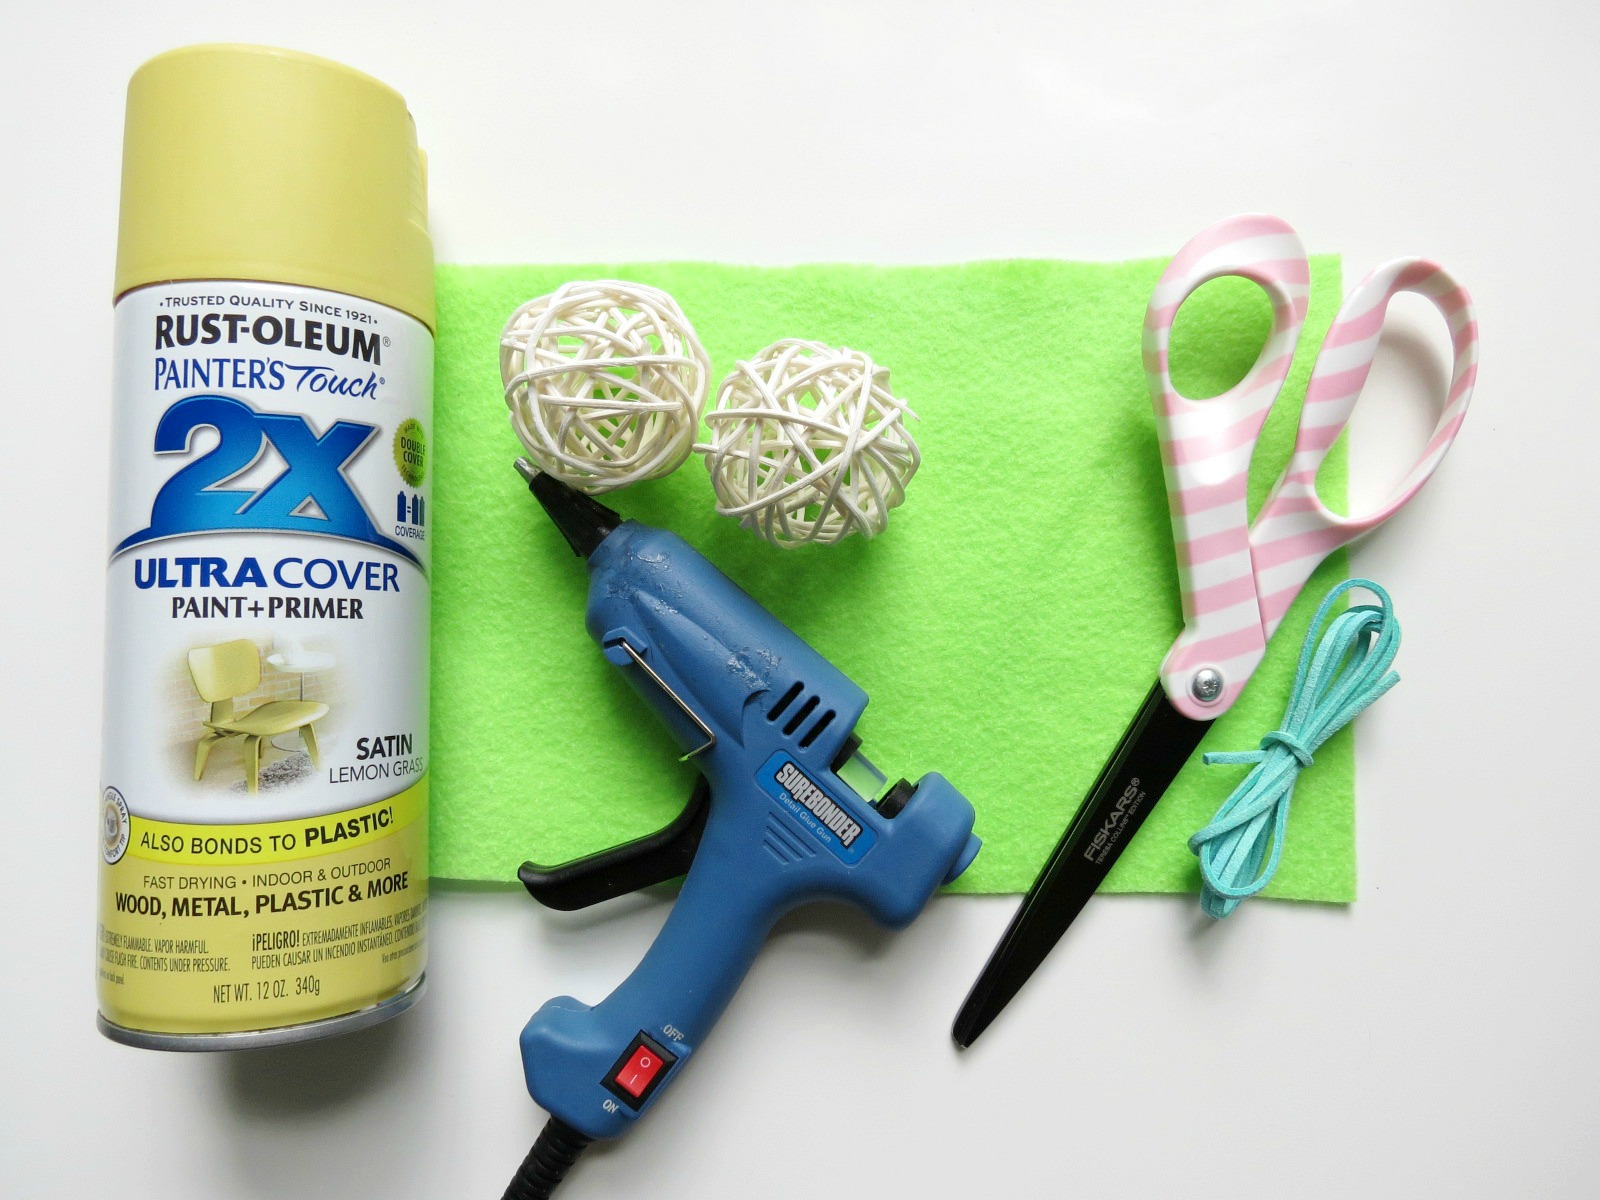
 For this project, you will need:

Spray paint (here)
Green felt (here)
Faux Suede cord (here)
Straw balls (similar here)
Tweezers
Scissors (here)
Glue gun 

DIY Pineapple Garland- Cute and Easy! | WellKeptChaos

Step 1: Spray paint the balls yellow. You can also use paint but it's harder to get the inside of the balls

DIY Pineapple Garland- Cute and Easy! | WellKeptChaos

Step 2: Cut pineapple toppers out of the green felt. To do this, I cut a long rectangle out of the felt, then cut 2 triangles out the middle. Finally, I angled the sides so that it was long and narrow. This helps you have enough surface area to glue it down. 

DIY Pineapple Garland- Cute and Easy! | WellKeptChaos
Try this super cute and super easy tutorial for a pineapple garland made from those kooky straw balls you see everywhere. The best part? This is a super easy and super affordable project that anyone can do! Click for the full how-to.

Step 3: Find the front of the ball by picking the part that looks most oval. Be sure there is a good spot to glue the topper on. 

DIY Pineapple Garland- Cute and Easy! | WellKeptChaos

Step 4: Put a thin line of glue on the ball and place the topper on. Hold a few seconds until it dries. 

DIY Pineapple Garland- Cute and Easy! | WellKeptChaos

Step 5: Thread the faux suede through the ball in the area near the topper. Use tweezers to carefully pull the end through the holes. 

DIY Pineapple Garland- Cute and Easy! | WellKeptChaos

Step 6: Hang up and enjoy!

DIY Pineapple Garland- Cute and Easy! | WellKeptChaos

This is a super cute and easy DIY project that's perfect for summer. I think this project would also be adorable if you made the pineapples in all kinds of colors too! 

DIY Pineapple Garland- Cute and Easy! | WellKeptChaos

Dying to make more garlands? Check out my Pinterest board