How to Improve Your Photography on any Budget
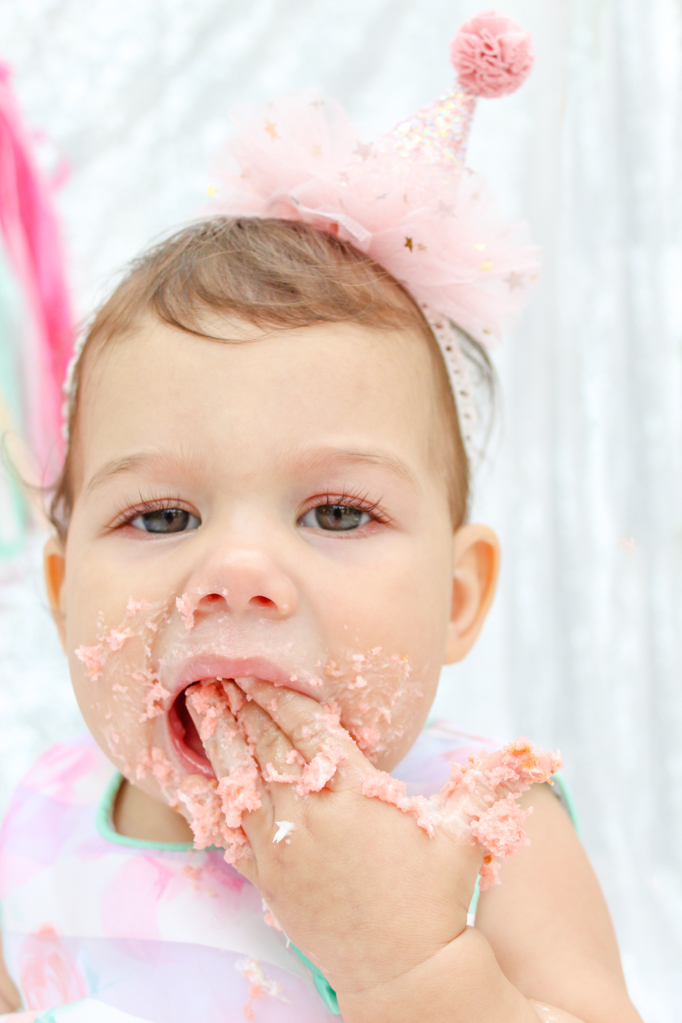
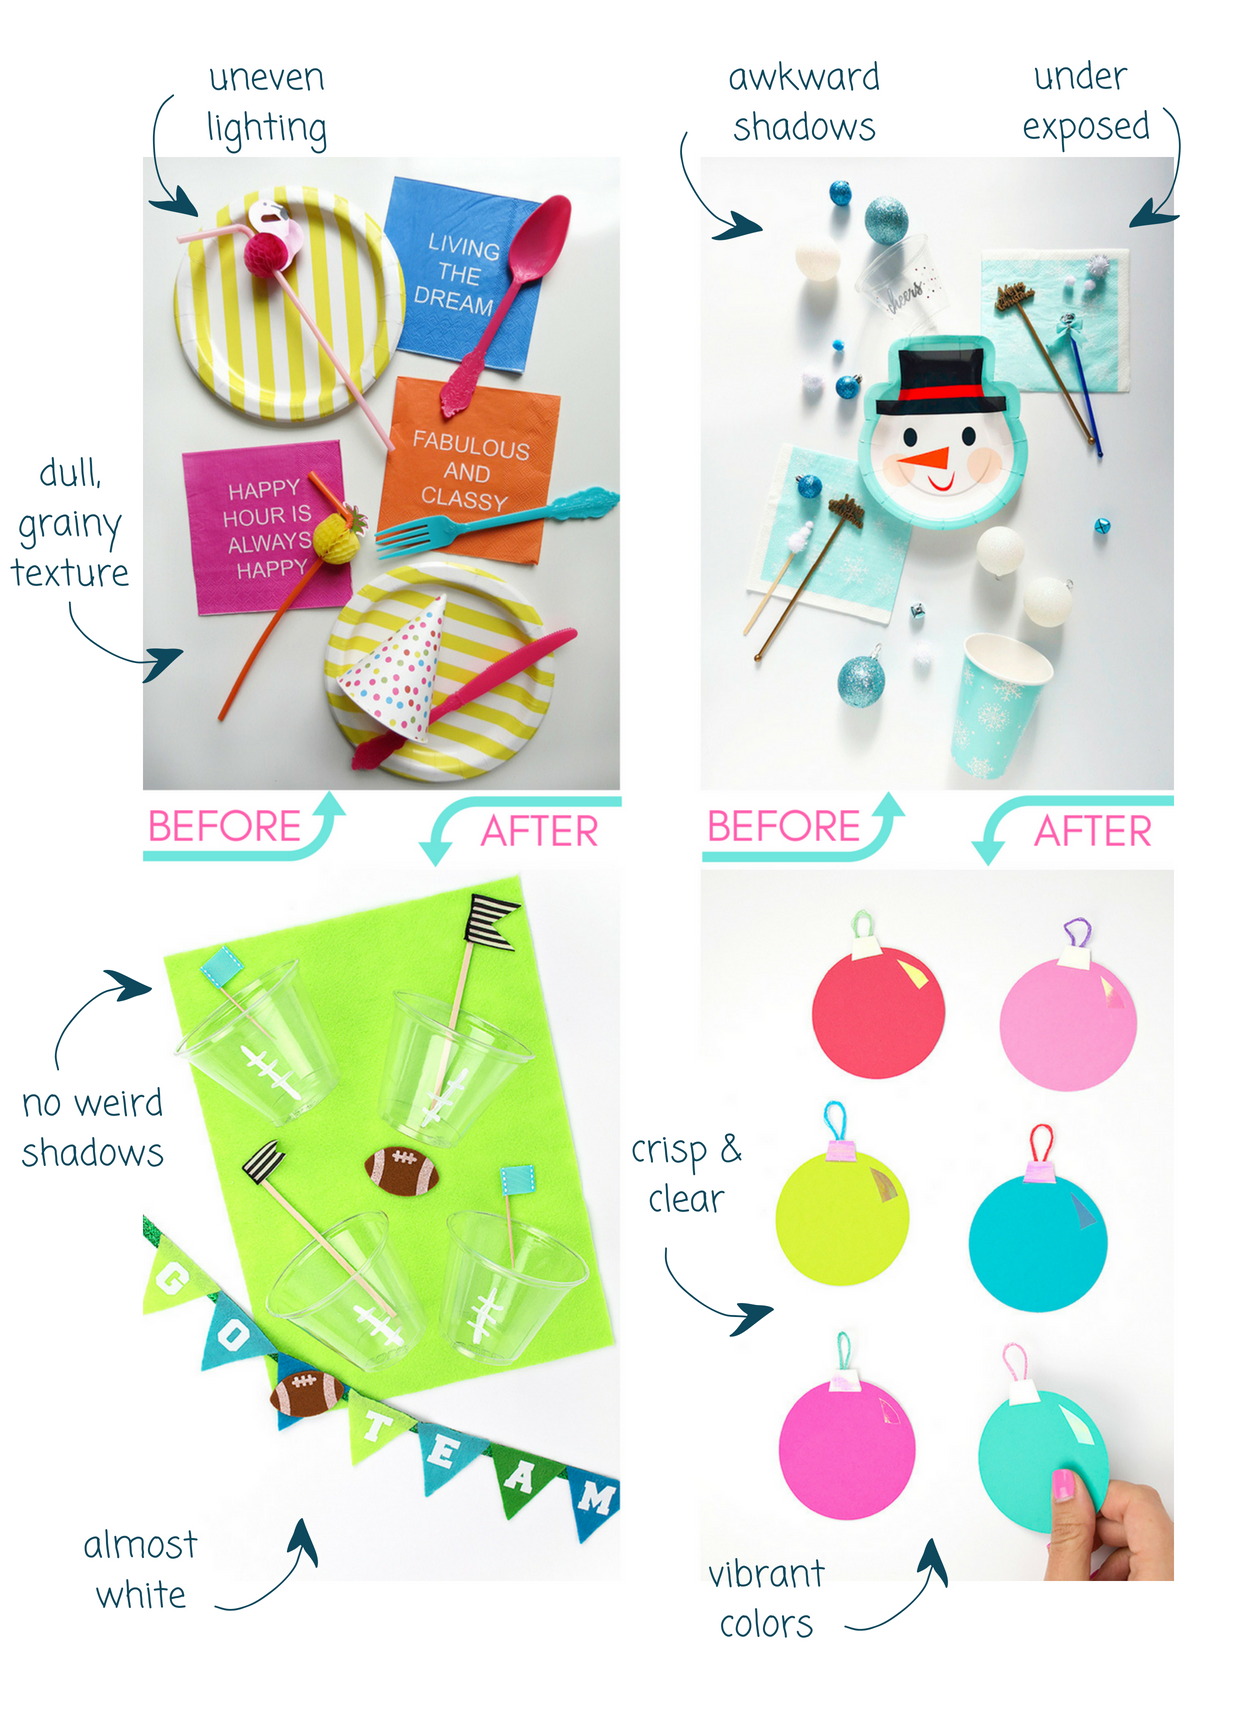
Hey guys! It’s been a really exciting summer so far. I’m hard at work doing something I’m really passionate about- helping other bloggers, Etsy shops, and small business owners with their photography. As you may know, I struggled with my photography when I first started my business and I made it my mission to improve my photography in the easiest, cheapest and fastest way possible. You can check out the before and afters here to see for yourself!

Taking better photos doesn’t have to be expensive. You can take better pictures on a budget, and improve your photography quickly and easily! Click to learn more.

As you probably know, having good photos is so important for your business. There are tons of options for stock photos out there, but nothing compares to having your own unique photos. This is especially true for most bloggers and shop owners, where it’s allll about the visuals! There are a lot of excuses that bloggers and business owners have about photography, but the reality is that photography doesn’t have to be complicated. If you develop a system, anyone can do it!

 To show you how true this is, I’ve created a 3 different offerings that will help you to improve your photography. They’re all super affordable, ranging from totally free to $149. Pick the option(s) that work best for you, and get those gorgeous photos online!

Starting Small

If your budget is non-existent but improving your photos is still important to you, I have a free e-course that you can take! This course is an introduction to photography and will teach you the very basics to take your photos to the next level. It goes over the basic principles of a good photo, and why it’s important for your business!

Cost: Free


Getting Some Guidance

If you’re just looking for a little bit of guidance on your photography, or to see if you’re headed on the right track, invest in an Instagram photography audit! I’ll take a look at your Instagram feed and let you know your strengths, weaknesses, and some recommendations to bring your A-game! Tons of businesses use Instagram as a marketing tool to get leads, clients, and sales. Now you can get some feedback and see if you’re on track with your goals.

Cost: $49


Become a Pro

If you’re looking to improve your photography pronto, look no further than Weekend Photo Academy. You’ll learn everything you need to improve your photos- lighting, composition, AND editing- within a short period, like a weekend! This is an online course, so you can take it any time at your own pace. But it doesn’t have any fluff, so you can learn what you need to know quickly and get back to your business. With step by step instructions, you’ll see immediate changes to your photography and editing process. Weekend Photo Academy is currently open for enrollment!

Only $149


No matter what your needs are, I can help you get your photography to the next level- quickly, easily, and affordably! Be sure to click the buttons above to get the photography service you need!

What’s your biggest struggle when it comes to taking your own photos? Is it lighting, editing, composition? Let me know in the comments below so I can help!

How I Improved My Photos (And You Can Too!)

Since I started blogging over 2 years ago, I have put a lot of effort into improving my brand's photography. It's been a series of trial and error, some frustration, and even a little cursing. But I can honestly say, without a doubt, that I am so proud of the achievements I have made in my brand's photography! Blogging has been one of the most amazing challenges I have ever put myself through. There's been good times (like landing my first paid guest posting spot!) and bad times (like, my shop failing) but honestly I would not go back and change the decision to start- despite all the efforts and time it has taken that I didn't even account for. And so much of my success can be attributed to the images I put forth on my blog.

Today, I want to take a trip down memory lane and show you a few before and afters to show you how my photography improved over the years. And, I want to show you some real-time before and afters- aka, how bad weather or editing can drastically change the quality of a photo! So, strap on your seatbelt. It's gonna be a bumpy ride.

Camera 3.jpg

Humble Beginnings: Donuts

For the first stop on our journey, I'm taking you way back to April of 2016. I did my first ever (and still the most popular!) DIY's- a Donut Party Platter. Overall, the photos were ok. But, they were kinda shadowy, small, and a little out of focus. It was really difficult to get the lighting to be even- you can see that the left side is brighter than the right! I can't remember how exactly I did this, but I know that back then I was working with white poster board, 2-3 desk lamps with regular incandescent bulbs (yikes!) and whatever sun I could find. I recently re-took the photos of the donut platter so I'd have a new pinnable image on Pinterest. You can definitely see the improvement in the photography! The photo is crisper and cleaner, and definitely matches my aesthetic better. Plus, now I don't rely on text to get people to stop and see what my pin is about. The images speak for themselves, and the details are in the captions. This makes my Pinterest boards look much cleaner than they were before!

donuts.jpg

Fake it 'til you make it.

I'm going to let you in on a blogging secret- most party posts are staged! And there's a good reason for that- it's pretty much impossible to get a real party set up with enough time to photograph it and get yourself ready. Plus, parties are based on what time is best for your guests NOT for photography! Well, back in my early days of blogging I didn't know this. So, I had a Sugar Sweet Birthday Party and tried to take photos... at night... without external lighting. And well, you can see the results for yourself. Also, the party table was set up in my kitchen, and just a few feet away from the party table was my kitchen island, which nearly blocked every effort to take a good photo! More recently, I had an Ice Cream Party and I used my improved photo skills. You can see the photos are less grainy, and there is a clear focus on specific items rather than the whole table randomly!

party.jpg

If at first you don't succeed, try try again.

Ok guys, now I am taking you on an exclusive, behind the scenes tour of a failed blog post that has never been shown before. In 2016, I had a genius idea to make some cute Christmas stirrers. I literally did an entire photoshoot for these. The whole post was DONE. But when I sat down to edit, I was appalled by my photos. I straight up could not get them to edit properly, and couldn't bring myself to post such hideousness on my blog. I didn't have time to re-do the whole post (#TisTheSeason) so I decided that it would have to wait, because these photos were too dang horrible to put forth into the world. Fast forward to 2017 and I re-did the whole shoot, start to finish. And I LOVED the results! The photos were bright and clean with a special holiday spirit. And I was SO glad I had waited.

Christmas Spirit.jpg

Honestly, holiday posts are some of my favorites and I knew I couldn't put forth work I wasn't proud of.  One of the reasons why this post was so awful was because I was playing around with backdrops, trying to infuse some color into my photos instead of having the backdrop always be white. And while I applaud myself for trying, this was a massive fail. The color of the backdrop wasn't even on brand, but I don't regret it. This was a big risk for me, photo-wise, and it helped me to create a new look for my blog. Now I LOVE my angled wrapping paper look, because it has that pop of color I was looking for while still being really clean. Don't be afraid to try new things, like backdrops. They may be a fail the first time, but you eventually can find a look you love- and that, my friends, is SO worth it.

The art of the flatlay.

A popular photo setup sweeping the nation is the flatlay. I don't remember them being quite so popular when I was younger but hey, I was an oblivious kid. Nonetheless, a killer flaylay is a surefire way to get noticed. But, they can be kinda hard to get right. First off, you have to arrange things nicely. Then, you have to light them up nicely. And lastly, you have to shoot them from overhead at a straight angle. YEA... good luck with that! I actually broke my toe trying to shoot a flat lay. Did you know that? I was standing on a chair to get just the right angle (hint: it wasn't) and just the right lighting (another hint: it wasn't) and as I was stepping off the chair, the whole thing freakin flipped over and I landed on the chair, scraped my back the whole way down, and landed with a loud THUD. I was pissed at myself (as we all are when we fall!) and got myself up. And I thought, huh... I fell on my back but my toe feels funny. A nice long trip to the ER later, I discovered that I fractured my toe and had to wear a boot for 2 months. So believe you me when I say that flatlays are HARD to get right, and it's really important to protect yourself from their evilness! Anyway...

The first trick I learned was to have consistent lighting for my flatlay (using these lights!) so that there aren't any weird shadows. The second trick was investing in a horizontal camera mount so that the photos could be nice and straight! There's obviously more to it than just that, but those were two HUGE improvements for me when it came to flatlays. And the proof is in the pudding.

before & after-5.png

If you're looking to improve your photos, I've created a FREE photography e-course to help you do just that! Be sure to sign up and get your workbook by clicking the photo below!

5 Tips to Speed Up Your Photography Process

Does this sound familiar? You have an idea for a photoshoot. You spend a day thinking about it, another day gathering supplies, and then another full day trying to find out where to set it up and take the photos. You try here, there, and everwhere, but in the end the photos are only mehhh. And, it took FOREVER. Maybe you don't even use the photos you took in the end! We all know that taking your time to create an amazing photo can really fun and rewarding. But sometimes, you just need a quick photo of a project, a product, or a process. What’s the best way to speed up the photography process, especially when you have lots of photos to take? Creating a routine, and sticking to it. These 5 tips will help you take quick and easy photos in no time!

What’s the best way to speed up the photography process, especially when you have lots of photos to take? Creating a routine, and sticking to it. These 5 tips will help you take quick and easy photos in no time!

1. Be predictable.

Create a photo “template” aka the usual way you take photos. For me, that means an overhead shot with a piece of wrapping paper angled sideways. This can be pretty boring, so why am I suggesting it? First, it allows you to take photos without wondering how exactly to set them up. And second, it creates brand identity and makes you easily recognizable. There are PLENTY of opportunities to be creative. But sometimes you just gotta get things done without reinventing the wheel each time. 

2. Create an editing workflow.

Once you’ve perfected your photo template, you've gotta perfect your editing workflow. Create a process where you can batch edit your photos and speed through them. This will also create brand identity since all your photos will have a similar look. Your website or shop will seem cohesive and will help people build trust in you. 

3. Keep all supplies together.

Whether it’s all in one box, one room, or one closet, having all your items in the same place will help drastically reduce the amount of time it takes for you to set up your photos. You’ll be able to grab everything you need in one go. Try your hardest to avoid the “whoops my extension cord is downstairs and my camera is in the car” dance. Why? Because any time spent running around is time you can get distracted by something else. And believe me, chances are you will!

4. Plan ahead.

Some factors are better for photography than others. The weather, time of day, and even the season can all have an effect on your photography. So, plan ahead! Check the weather app to see which days will be sunny (or partly sunny) and try to take your photos then. Add the photoshoot to your calendar, so you don't miss the best weather OR the best time of day. And, be sure to gather all your supplies before the day of the shoot and have them ready to go. It's way better to go shopping for props on a rainy Wednesday than on a sunny Saturday when you were hoping to take your pics!

5. Batch photos.

While everything is set up and ready, do ALL the photos you need to take. If you’re doing different poses or angles (like flatlays and model shots) batch those too! All the flatlays at once, all the model shots at once. Any time you can avoid moving lights, backdrops, etc. around is time saved. In the editing process you can batch your photos together if you need to (like by keyword, or into folders) otherwise once you name them they’ll magically group together! 

Taking your own photos doesn't have to take tons of time. With a bit of planning, you can speed up the process and take even better photos than you imagined!

If you're looking to improve your photos, I've created a FREE photography e-course to help you do just that! Be sure to sign up by clicking the photo below!

6 Myths About Photography That Are Completely Wrong

When it comes to taking your own photos for your blog and business, there are excuses and limitations all over the board. On the "selling" side, people are trying to get you to buy into the fact that you can't take your own photos, so you should invest in nice stock photos (that they provide, by the way!) to give your business a professional, polished look. But what's professional about having the same laptop-flowers-and-coffee-mug photos as everyone else? On the other hand, creators buy into it, because they have a myriad of excuses as to why they can't possibly take their own photos. They don't have the time, or the space, or the equipment. Well, my friends, I'm here to tell you that it's just not true! Here are some common photography myths surrounding bloggers, Etsy shop owners, and business owners.

When it comes to taking your own photos for your blog and business, there are excuses and limitations all over the board. Well, my friends, I'm here to tell you that they're just not true! Here are some common photography myths surrounding bloggers,…

1. You need a fancy camera to take good photos.

Um, FALSE! Most cell phones these days have amazing photo quality, right in your pocket. As long as you know what to do, you can use your cell phone to take amazing photos. Haven't you seen the Apple BILLBOARDS (yes, billboards!) that feature iPhone photos? If Apple can use it for their large-scale marketing, you can use it for your business!

2. There's no point in having a fancy camera if you don't know how to use it.

Just as your cell phone's camera is an amazing tool for its size, having a "fancy camera" can also have its perks. While I don't recommend going out and buying the most expensive one on the market, it can be helpful to have a fancy camera, even if you don't know all the features. Overall, it can yield better results if used properly. And by properly, I don't even necessarily mean on manual mode. There's actually a lot you can do with only a few features. I don't know how to use all the modes on my camera, but I gotta say that upgrading from my old camera definitely improved my photo quality. So, don't knock it- you may be able to hack it to take better photos!

3. You can't take good photos indoors or at night.

Yep, totally false! My house has less-than-ideal lighting, even at the best parts of the day. Plus, sometimes I need to snap some pics at night. Although taking pictures during the day is better, you can still get great quality photos at night with the right setup. You'll just need to make a few investments (like these lights) and create a good editing process, and you're good to go!

4. It takes a pro to use Photoshop.

While Photoshop is an amazing product with so so soooo many features, you can still get a lot out of it as an amateur. It has a relatively low price point ($10/month) and there's always more to learn on it. Don't get overwhelmed though- you can learn the very basics of the program so that you can use it to your advantage on a daily basis, and use those special extra features only when you need them. After all, it's great to have the option to use them, even if you don't.

5. Taking your own photos takes way too much time.

If you're creating a new setup every single time you're taking a photo- using different lighting, angles, cameras, locations, etc. then yes. Taking your own photos can be VERY time consuming, especially when you factor in editing. BUT if you take the time to create a process that works for you, taking photos will be insanely easy. Taking photos will become second nature, as will the editing process. Creating a routine that works for you will take all the guess work out, saving you time AND hassle. Be sure to check out this post (LINK) for more information about that!

6. You can't take good photos because you don't have enough room.

If you constantly compare yourself to huge brands or businesses that have been successful for years and have an enormous photo studio to work with, then yea- it'll take forever to get to their level. However, there are plenty of successful businesses, bloggers, and Etsy shops that take great photos from inside their home without a huge professional studio setup. There are tons of small-space options that you can use until you have budget or space to upgraded. For example, did you know that I take my photos in a small area the size of an ikea desk? And yet, I am able to take great photos there! I have sloped ceilings, a fairly narrow room, and 1,000 tripping hazards but I made it work. And I guarantee that if you took the time to develop a system, you would too!

Do you feel a bit more empowered to try taking your own photos for your shop, blog, or business? I hope so! There's so much possibility when you learn to take your own photos.

If you're looking to improve your photos further, I've created a FREE photography e-course to help you do just that! Be sure to sign up by clicking the photo below.

Got any other myths holding you back? Let me know in the comments below and I'll debunk them!

DIY & Affordable Photo Backdrops

Today I want to talk about something a little different- photography backdrops! As you know, good photography is very important (especially here at Party HarDIY!) and sometimes you need to be creative about your photo backdrops. I had written a blog post about my favorite photography items a few months ago, so I wanted to follow up with some other backdrop options that you can try! These backdrops come in a variety of prices from all sorts of places. I hope it helps you to think about your photos in a new way!

*This post contains affiliate links

DIY & Affordable Photo Backdrops. Sometimes you need to be creative about your photo backdrops. These backdrops come in a variety of prices from all sorts of places. I hope it helps you to think about your photos in a new way! #backdrops #photob…

Paper Backdrops

DIY & Affordable Photo Backdrops

DIY Polly Pocket Iron-On Tee with Backdrop Paper in No. 37 Tulip

Backdrop Paper 
Probably the easiest to use, this backdrop paper is meant for photography! It's got a wide variety of colors and it's matte, so you don't need to worry about weird reflections in your photos. Also, it comes on super wide rolls, so you can have a seamless backdrop without having to photoshop out weird edges or seams. I even used it to make my wall look pink once! It can be a bit pricey but if you're careful, you can get maximum usage out of it.

Scrapbook Paper 
Available at any craft store or online, in literally any color or pattern you can think of, scrapbook paper is an affordable way to create a backdrop for small items. You can also layer the paper in interesting ways or angle it, etc.

Colored Cardstock
Colored cardstock is great for photographing small items like jewelry. I made a small hole in mine for the earrings, and I was able to keep the earrings in place while also keeping the look consistent across the different colors of paper and style of earrings. 

DIY & Affordable Photo Backdrops

DIY No Sew Embellished Shirt with wrapping paper backdrop

Wrapping Paper 
A nice mix of the papers above, I think wrapping paper is a great way to add some color or pattern affordably. It does have a slight sheen to it, so it can add a colorful "glow" to your items, but it's cheap enough to get tossed away. I love using it for DIY posts, which can get pretty messy. You can easily gather up the paper and toss it out- barely any cleanup needed!

Easel Paper Roll
Again, this type of paper is great for when you're making a mess! I used it when I was painting my colorful blocks and I wanted to keep the backdrop neutral. It allowed me to paint freely without having a bunch of cleanup after. It's also great for making a clean white backdrop or covering a table with some scratches on it.

Wood & Paint

DIY & Affordable Photo Backdrops

Pineapple Garland DIY with a Wood Backdrop

Painted Abstract Backdrop
If you're looking for something quirky and fun, this painted backdrop is for you! Damask Love used it as a large backdrop for portraits but you could totally make a smaller tabletop version if you wanted! 

Solid Color Photo Backdrops
If durable but simple is more your jam, try this painted wood backdrop! It's really easy to make using plywood panels and house paint samples. 

Stained Wood Backdrop
If you like something a little more rustic, try a stained wood backdrop! This tutorial shows you how to whitewash as well as how to add a colored tint to your wood. 

Colored Wood Paneling
If you like the look of paneling, or if you want it to look like a floor/wall, try this colored paneling DIY. This one is so cute, I think I may just have to make one for myself!
 

Party Backdrops

DIY & Affordable Photo Backdrops

Hey Girl: Ryan Gosling Gender Reveal with Paper Fan Backdrop

Paper Fans
Paper fans are such a cool and easy way to make a statement! I have used them countless times, as both a small photo backdrop or a large scale party table backdrop. I never use the glue it comes with and instead prefer to paper clip them or staple them so that they're reusable! More info on that here.

Balloons
Although they aren't great for the environment, balloons can be such a cool way to make a statement! You can do a balloon arch, make them into letters or numbers... the possibilities are endless! Check out my Balloon Pinterest board for some fun ideas.

Sequin Tablecloths & Runners
If you've got a sequin table runner or tablecloth, they make a PERFECT sparkly backdrop for your pics! You can see how I used it here and here (scroll down).

DIY & Affordable Photo Backdrops

DIY Disco Ball Earrings with Fringe Curtain Backdrop

Fringe Curtains
These are a super cheap and easy way to transform an ordinary wall. They're fairly large and come in all sorts of colors, so they make the perfect backdrop! They're sold everywhere- Amazon, Party City, even the dollar store!

Crepe Paper Streamers
Another dollar store staple, these party streamers make a really cool backdrop! You can mix and match colors, do various shades of the same color, or do all one color to create some depth as a backdrop. You can use them hanging on the wall with a piece of tape, or you can lay them down on a tabletop and place your item on top of them. Works either way!

Misc

DIY & Affordable Photo Backdrops

Mean Girls Conversation Hearts and Fabric Backdrop

Fabric
Although it can be wrinkled sometimes, a piece of fabric is a great way to add a pop of color to your photos. It comes in all sorts of colors, patterns adn textures, plus everyone has it lying around their house somewhere. For one post, I even used the fabric from my ironing board as a backdrop! You can also grab a curtain, a blanket or a tablecloth too!

Foam Boards
In what is probably the easiest and cheapest backdrop of all, you can grab some foam boards from your local dollar store or Target and use those for a backdrop. They're also great for bouncing light, so be sure to place them around your subject while facing the window (aka... don't block the window light with a foam board!) to maximize the light coming in.

DIY & Affordable Photo Backdrops

Tissue Paper
I think I've only used tissue paper as a backdrop once, but I really liked the look so I have to try it again! Since tissue paper is somewhat sheer, it can give you an interesting look if you layer it over another pattern/paper. Mine had some folds, and it made for a great, lightly textured background. And best of all, it's cheap!

Vinyl Backdrop & Stand
I have my vinyl backdrop and stand permanently set up in my attic studio. Since the walls are sloped up there, it acts as a "fake wall" so that there isn't a giant shadow where the ceiling bends (see before pics here). It's large and wide, and can be even wider if you placed it the other way! I've used it on nearly every  and you can't even tell it's a fake wall most of the time!

DIY & Affordable Photo Backdrops

Cutting Mat
If you're a DIY blogger, chances are you'll be cutting something at some point! If you use a cutting mat, why not incorporate it as the backdrop of a photo? Mine is this really cool, bright pink color and it really adds a pop of color to a photo.

Matte PVC Backdrop
I saved the best for last! This is my most used backdrop, hands down. It's literally the backdrop in nearly every single photo I have. It cleans easily, it's bright white, and it's the perfect size for nearly every flatlay and DIY shoot I do. I purchased the entire collection of them, but I really only use the white one. I've had it for nearly 2 years now and I only had to replace it once because I spilled oil paint on it and it just wouldn't come off. After that, I made sure to use a cover in case things got too messy.

Well, there you have it! Tons of backdrop options for your next photo shoot. If you're looking to improve your photos further, I'm creating a FREE photography e-course to help you do just that! Be sure to sign up and get your workbook by clicking the photo below!