Boston Overnight Trip (With a Baby!)

This summer, John and I were amazingly lucky to have a month off together. We made it a staycation since we are on a budget, and mostly took day trips around Long Island. However, one thing I wanted to do was visit my friend Caren, who lives in the Berkshires. We’ve been chatting every week for a year and a half as part of a mastermind/accountability group and I really wanted to finally meet her! Since we were headed that way, we figured why not make a pitstop in Boston and stay for a night? I’ve been wanting to go back since I spent a few days there during the cold, harsh winter and we figured this would be the perfect time! We did all this with Hailey, who was 10 months old at the time. It was our first overnight trip with her and we were nervous, but overall it went really well!

For those of you looking to take a day trip/overnight trip to Boston, here’s my experience along with what we did while we were there. We did a very condensed version and I’m sure there’s SO much more to see, but we had a timeline we had to stick by.

For those of you looking to take a day trip/overnight trip to Boston with a baby, you’ve come to the right place! Here’s my experience along with what we did while we were there, where we stayed, and what we ate! #bostontraveltips #bostontravelguide…

Where to Stay in Boston:

We stayed at AirBNB in Beacon Hill. It was such a cute area, but it was really hard to find parking and super hard to maneuver a stroller down the narrow streets and steep hills. To make matters worse, we parked at the bottom of a hill, and had to carry pretty much everything in one trip which was hard. Oh yea, did I mention that it was trash day? Because it was, as luck would have it. That meant that the super narrow sidewalks were now even more narrow! We pretty much had to push the stroller in the street. If you’re looking to be in a cute and trendy area, Beacon Hill was really nice and quiet. However, with a baby, we didn’t really get to enjoy going out to eat or anything so for us it wasn’t worth it.

I would have preferred to stay in a hotel with parking or valet service, where they help you to your room with your bags. Baby’s come with a TON of gear, so it would have been nice to take an elevator instead of a narrow winding staircase! 

What to do in Boston:

The next day, we packed up all our stuff and filled up the car. We took a short drive over to the Boston Public Garden and took the first muni-meter spot we found. It was only for an hour, so we decided to grab some breakfast and head back out after to find more long-term parking. 

Coffee and pastries at Tatte

Address: 70 Charles Street, Boston, MA 02114

We happened upon Tatte’s Bakery along the way, and couldn’t resist stopping there for breakfast. It’s super crowded but moves quickly. We had a Pistachio Cherry Tart and a Chocolate Hazelnut Brioche and both were amazing! Everything there looked amazing and I wish I had taken a picture so you can see. Their website is gorgeous and really matches the look and feel of the place, so you’ll get a good idea of what it’s like. We sat outside on their picnic benches and relaxed for a few minutes with our breakfast, then went off on our way. The weather was so nice that day!

Parking near Boston Public Garden

Since there wasn’t any good street parking (especially since the muni-meters were so short) we parked in a private parking lot under the park called the Boston Common Garage. It wasn’t super cheap, however it was super easy to access and there was tons of parking.

Walk through the park

The first part our Boston adventure was taking a walk through the park. We walked by the Make Way For Ducklings statue, we had tons of little kids running around. They were all climbing on them while the parents were taking pictures.

Then we went to the Lagoon where they had swan boats. I was tempted to get on and take a ride, but it was just so sunny that we didn’t want to get burnt. There was also a splash pond in the park, so if you’ve got little kids who like water definitely bring a swimsuit or towel for them! All the kids were loving it so it’s definitely something that your kids will wanna do if they’re slightly older.

Go on the carousel 

During our stroll around the park, we found a carousel and decide to take Hailey on for her first ride. She loved it and it was really cute to see her so happy. It was only $3 too!

For those of you looking to take a day trip/overnight trip to Boston with a baby, you’ve come to the right place! Here’s my experience along with what we did while we were there, where we stayed, and what we ate! #bostontraveltips #bostontravelguide…

Walk down to Quincy Market

Next, we took a walk down to the Quincy Market and Faneuil Hall Marketplace. There’s tons of stores and restaurants over there! You can go shopping at stores like Gap, Old Navy, Home Goods, Marshall’s, Primark, The Flying Tiger, Crocs… there are a ton more, so get your credit card ready! I went to the Primark which has affordable clothes (it’s like H&M meets Forever 21) and The Flying Tiger, which has all the cutest stuff you don’t need but must purchase. Inside the markets themselves were pretty narrow and crowded, especially with a stroller. But, wandering the streets outside was a breeze.

For those of you looking to take a day trip/overnight trip to Boston with a baby, you’ve come to the right place! Here’s my experience along with what we did while we were there, where we stayed, and what we ate! #bostontraveltips #bostontravelguide…

Lunch and drinks at Zuma Tex Mex Grill

There were a ton of restaurants and eateries all around the Quincy market and the shops, but everything seemed really expensive. There wasn’t really anything that appealed to us very much, so we kept looking for something that excited us. At that point, we found a really affordable Mexican restaurant and decided to take a chance on it. The menu was huge and had tons of options, and the kids meal was affordable. The restaurant itself is downstairs and it isn’t necessarily that special looking. However, the food was really good and the service was great. We loved their food and I even had a margarita!

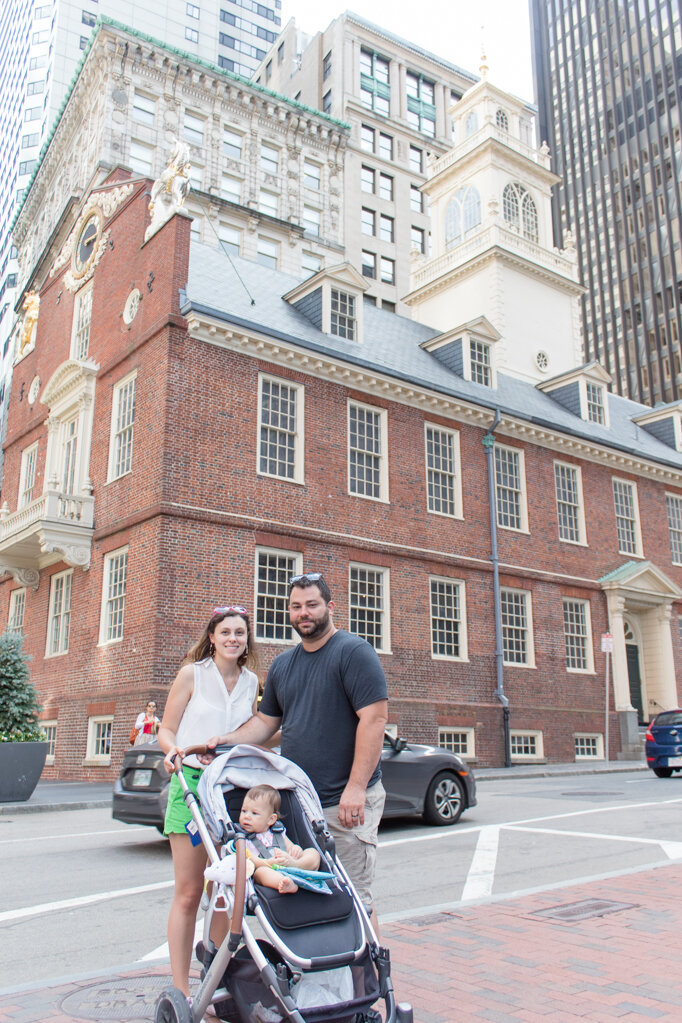
Walk along the Freedom Trail

After lunch and shopping, we took a walk along the Freedom Trail. We saw the first public school and the Old State House, which has a unicorn on it! There were a whole lot more sights on this trail than we actually did, but we wanted to head back since we had a long drive ahead of us.

For those of you looking to take a day trip/overnight trip to Boston with a baby, you’ve come to the right place! Here’s my experience along with what we did while we were there, where we stayed, and what we ate! #bostontraveltips #bostontravelguide…

Making the drive up to Boston is great for an overnight trip is a great idea if you live in the area. It’s got a lot of history and it’s walking-friendly, which is great when you’ve got a stroller! The winters there get COLD so if you’re planning to go at that time, be sure to pack lots of layers and warm clothing! But, during the rest of the year it’s definitely beautiful. There’s something for everyone- great food, lots of shopping, and tons of history. Even Hailey enjoyed it! I’d definitely want to go back with her when she’s older, since I bet there’s a ton more she’d be able to do.

Hailey's First Birthday Mood Board: Disney World Party

I’m so excited to share my mood board for Hailey‘s first birthday party! I honestly can’t believe she’s already going to be a year old. Everyone kept telling me to enjoy my time with her while she was a baby, and I always heard my parents say how time flew by so fast and it’s so totally true. No matter what, I can’t make time slow down so I guess I might as well just accept how fast it’s going! And, that means accepting that my tiny little newborn baby is now going to be a year old. Pardon me while I go cry.

*This post contains affiliate links

Looking for a fun birthday party theme? How about a vintage Disney World or Disneyland theme party?! Everyone loves Disney and with this party, you get to bring the magical parks to you. Click for the party plan, plus links to these items! #disneyla…

I had a difficult time deciding what theme I wanted to do for Hailey‘s birthday party. Some ideas that crossed my mind were a horse themed party, since she loves Spirit on Netflix or a Day of the Dead/Mexican Fiesta themed party, since she loves Coco! In the end, I decided to go with something I always love to do: Disney!

You see, way back when I was still pregnant, I told John that would be really fun to do her first birthday at Disney World. He pretty much thought I was insane. So, I decided that I would just bring Disney World to her! For the theme, since it’s so vague, I decided to pick a color scheme/palette that will keep the whole event looking cohesive. I know that Disney World has a whole lot of different colors and even varies based on the part of Disney that you’re in, but we all know that I’m not an Imagineer and therefore I need to keep my stuff cohesive.

Looking for a fun birthday party theme? How about a vintage Disney World or Disneyland theme party?! Everyone loves Disney and with this party, you get to bring the magical parks to you. Click for the party plan, plus links to these items! #disneyla…

Sources: Minnie Crown. It’s a Small World Backdrop. Disneyland Hotel Print. Castle Cupcake Stand. Pink and Gold Cups. Carousel. Pastel Fans and Paper Poms. 1 Candle. Striped Fans. Once Upon A Time Banner.

I wanted to have a sort of nostalgic/vintage vibe for the party while also being super modern and fresh. I started my search (as I always do) on Pinterest and pinned some parties for inspiration. I don’t want the party to be overly character-based, so I’m avoiding tons of Disney princesses or Mickey Mouse everywhere. I also didn’t want it to look too cluttered so I’m avoid polkadots for the most part.

After pinning my inspiration pics, I went on Etsy to look for vintage posters for the party. I focused on Disneyland or Disney World rides/attractions and made sure that the pictures fit in the general color scheme. I also originally wanted to create an It’s a Small World photo backdrop wall, but instead decided that I would just order one that was pre-made to avoid the extra effort of making it myself. In the past I definitely would have made it to save a few bucks, but the new mom version of me knows that there’s limited hours in a day and that was not worth spending time on! However, just know it would’ve been amazing ;)

Then I went on my favorite site ever, Amazon, to look up some additional party details like decorations, plates, and outfit choices for Hailey. Since there’s a Party City near me as well, and I’m able to more closely match the theme colors by being able to see them in person, I decided to look on there too. Overall I’m happy with the way that the event is shaping up and I’m excited to place my orders this week so that everything can arrive for the party!

Side note: I’m also considering creating a planning course so that you can see exactly how I plan my parties and can show you, step-by-step, how to plan a party of your own. If you’d like to be notified when the course is ready and get the free planning guide, enter your email here and I’ll send you some updates along the way plus some tips and tricks for planning the party of your dreams. 

In the meantime, If you have a party that you need help planning and want a special Cathy touch, visit my virtual party planning page so that you can book me to virtually plan your event! We’ll do a video call to discuss what you had in mind, I’ll come up with a theme and color scheme for you based off of what we discussed, and I’ll pin all the inspiration photos as well as let you know exactly what order to make your event a big success! Click the image below for more info on that.

Well, there you go! Hailey’s party is in less than two weeks so I’m off to go finish planning! It’s going to be really amazing, and I hope it’s something she can look back on some day (in photos, of course) and see how much fun we had together! I want to know- what was the theme you did for your baby’s first birthday? It’s such a special event to plan!

Abstract Painted Gift Tags

Back when I was a kid, I thought it was so cool to have a summer birthday. You didn’t have to go to school, the weather was hot, and something like a pool party or going to an amusement park was an option. So, while my mom did make strawberry cupcakes for all my classmates on my birthday, just being at school kinda sucked. Now that we’re all adults, it doesn't really matter as much. We all probably have to work on our birthdays anyway (cue the crying) so it's now an even playing field. For that next birthday king or queen, how about a handmade gift tag for their present? It’s incredibly fun and easy to make- anyone can do it!

*This post contains affiliate links.

For that next birthday king or queen, how about a handmade gift tag for their present? It’s incredibly fun and easy to make- anyone can do it! If you’re a fan of abstract painting, you’ll love this easy DIY project. Click for the full instructions a…

You will need:

Colored cardstock (similar here)
Paper punch (similar here)
Embroidery floss (similar here)
Acrylic paint (similar here)
Glue gun (similar here)
Scissors (similar here)

Directions:

For that next birthday king or queen, how about a handmade gift tag for their present? It’s incredibly fun and easy to make- anyone can do it! If you’re a fan of abstract painting, you’ll love this easy DIY project. Click for the full instructions a…

1. Cut out your tags from the card stock in your choice of colors. You'll need 2 pieces of cardstock for each tag you're making. I used the same color for both sides.

2. Paint abstract designs using your choice of paint colors on one of the cardstock tags. For the designs, I kept it simple with xoxo, lines, dots, etc. You can be as simple or as complex as you want.

3. While the paint dries, cut a piece of embroidery floss for the tag.

4. Glue the embroidery floss on the back of the tag, then glue on the blank tag to create a seamless background.

For that next birthday king or queen, how about a handmade gift tag for their present? It’s incredibly fun and easy to make- anyone can do it! If you’re a fan of abstract painting, you’ll love this easy DIY project. Click for the full instructions a…

That's it- you're done! Now add a to: and from: so your recipient knows who to thank for their awesome new present. Hang it on their gift, and get ready to see their face light up. Everyone likes a present!

I always love adding a homemade touch to my gifts because it really makes them more personal, especially in a world where everyone just gets each other gift cards! So, what do you think about these DIY gift tags? SO simple, right?!

Pamper Yourself In An Unlikely Way

Oftentimes when we hear the word “pamper” or “treat yourself” we are automatically tossed into a luxury hotel suite, soaking in a claw food tub and snacking on macarons with a glass of wine in hand. It’s often something of a quick escape, a way to momentarily forget about what ails you and insead enjoy a moment of peaceful relaxation.

Looking to pamper yourself? How about going beyond the usual face mask and Netflix marathon, and doing something a little bit more fulfilling? I’m detailing why it’s really important to have your self-care also be pushing you towards your goals. Cli…

Well I’m here to challenge that thinking. What if, instead of chocolate cake and face masks, the way to relax was in doing the hard work? That the way to pamper yourself isn’t a few minutes (or hours) of forgetting your life, but remembering exactly what you want it to look like? Deciding to carefully craft the type of life you want to lead, instead of trying to get away from the one you have?

Let’s think of it in terms of baking ingredients. Doing things like facials, taking a bath, or shopping is like butter, flour or eggs. Good enough on their own, sure. But it’s when you make it more complicated- growing a business, advancing a skill, or training for a marathon- that’s how you go from butter, flour and eggs to cookies. It’s through these more complex forms of self care and pampering that you create a true reward for yourself. It’s not always about what’s easy or even what’s relaxing. It’s about what sustains your life. Mixing relaxing with hard work that you do for yourself. A balanced diet, if you will.

Looking to pamper yourself? How about going beyond the usual face mask and Netflix marathon, and doing something a little bit more fulfilling? I’m detailing why it’s really important to have your self-care also be pushing you towards your goals. Cli…

How do you do it? You just gotta change the narrative. Folding clothes sucks. But having a neat closet and an easy time getting ready in the morning feels indulgent. It feels like shopping without spending a dime. Maybe you dress better or wear those earrings because now you can actually see them.

Sure, taking a relaxing bath now and again is nice. And sure, folding clothes every day sucks. But it’s all about mixing it up and balance. Listen to that inspirational podcast while you take your bath. Jam out to music while you fold your clothes. Don’t let being lazy with half-assed “I deserve this break” derail you from the things you want in life. A break is fine and needed and should be enjoyed! But putting a break and the easy thing over everything else is sometimes the worst type of self-care you can do. It’s self sabotage.

Looking to pamper yourself? How about going beyond the usual face mask and Netflix marathon, and doing something a little bit more fulfilling? I’m detailing why it’s really important to have your self-care also be pushing you towards your goals. Cli…

There are always exceptions to the rule. In 2018 I was pregnant and exhausted. I did FAR less work on the blog. And now in 2019 with a baby I’m taking it slow. But I didn’t give up. It’s not about working until you’re totally burnt out or stressed. It’s about taking small steps towards what you want in life. It’s never giving up. It’s finding a way to prioritize yourself and your goals however possible, even when it’s easier to flop yourself on the couch or make yourself busy with menial tasks like the dishes.

It’s about balancing those necessary types of self care (like dressing nice or doing your hair) with the mundane tasks that make your life work in a practical manner (like folding laundry, or doing it to begin with) and combining it with long term goals (like learning piano or growing a business) to create a life that truly feels fulfilling. It’s about not getting so bogged down with the everyday “urgencies” that you end up putting aside the goals and dreams you really want to achieve. We’ll always be busy. It’s about making time for what’s most important to you.

Self love and treating yourself can be eating an extra cupcake, or doing your hair, or re-decorating your home. There’s no one way to do it and by flopping on the couch with Netflix every day, you’re relaxing in a way that isn’t moving you forward. By all means, watch your tv shows. But do what you love too. Don’t be too scared or too busy or too tired to go for your dreams. Work towards them and you’ll see how amazing and fulfilling your life will become.

DIY Glitter First Birthday Crown

On the morning of Hailey's half birthday, I suddenly decided I needed to do an impromptu photoshoot. I had to post about her being 6 months old on social media, because I was pretty amazed at how fast the time had gone. And, since I had plans to do her half birthday party, I knew I wanted to make her a crown. Unfortunately, I didn't think to do it sooner, so I found myself on the morning of her half-birthday scrambling around the attic to find the supplies I needed. Luckily, it wasn't hard to do and I was able to make the template and the crown within just an hour! Imagine how quick it'll be for you since the template is already made. What can I say except “you're welcome"! (Anyone else get that Moana reference?)

The template contains all the numbers and two different sizes, so you can decide what’s best for your baby/toddler/child/yourself. It also contains directions and a bonus cake topper template! Oh, and it’s totally free. By making it yourself, you’ll save money. It's really easy and you can get everything you need on Amazon (lifesaver!) or save even more money with a trip to your local craft store.

*This post contains affiliate links

Everyone’s birthday is better with a crown! This DIY glitter birthday crown is super easy to make and even includes a free template. Whip one up, then get your camera ready – your baby it’s gonna look amazing! Click for the full DIY and the free pri…

These tutorial pictures were taken on my kitchen table as I worked so that I could give you guys a nice step-by-step tutorial without having to go up to the attic and try to cram in a blog post PLUS a craft project while Hailey napped, so it's not quite as detailed as I usually am. However, I figured done is better than perfect! I knew that if I put this project onto my never-ending to do list, you'd probably get this post when Hailey's going off to college.

You will need:

Template (see below)
Printer (I use this one and love it!)
Glitter paper (similar here)
Felt (similar here)
Scissors (similar here)
Trim (similar here)
Glue gun (similar here)
Elastic (similar here)

The printable is available in my resource library, which you can get totally FREE access to, just by signing up. What exactly do you get? Access to all my printables, including party planning guides, checklists, and my projects. By signing up, you'll have access to all projects- past, present and future! 

Directions:

1. Download and print your template. It consists of 3 pieces- a crown template with the space for the numbers, the template for the numbers, and a bonus cake topper.

2. Before cutting anything out, test your trim on the template and make sure it's wide enough that you can glue it on without covering the numbers. If not, add a bit of height by placing the template a few cm's above the edge of your glitter paper.

Everyone’s birthday is better with a crown! This DIY glitter birthday crown is super easy to make and even includes a free template. Whip one up, then get your camera ready – your baby it’s gonna look amazing! Click for the full DIY and the free pri…

3. Cut your crown template out of glitter paper and felt liner. When cutting your glitter paper, I recommend leaving a little bit extra on the sides so you have some width to play around with. This will make it easier to glue your crown shut.

4. Now some cutting tips! First, place your template against the bottom edge of your glitter paper so you'll get a nice, straight edge and one less thing to cut. Second, when cutting out your triangle points, or any small area like in the cake topper, I recommend only putting your scissor tip as far as you need to cut. Meaning.... don't intend to end your precise point in the middle of your scissor blade, because most likely when you cut it, you'll end up going a bit too far and your inside points won't be neat. I hope this makes sense- it’s hard to explain!

Everyone’s birthday is better with a crown! This DIY glitter birthday crown is super easy to make and even includes a free template. Whip one up, then get your camera ready – your baby it’s gonna look amazing! Click for the full DIY and the free pri…

5. Once you have your glitter paper crown and felt liner cut out, it's time to add the numbers! Cut them out of felt, using a colored pencil or washable ink marker to draw the template onto the felt. If you're thinking, “ok Cathy there is no way in freakin HECK I can cut numbers out of felt that small, ya looney”, never fear. I have 2 alternatives! Either purchase felt numbers and glue those onto your crown instead or in the scrapbook paper section, they have a flocked paper that looks like felt, but the backside has a cardstock backing. This will be much easier to trace your numbers onto and cut out. Just remember, ESPECIALLY with the flocked paper but the felt too, you should be tracing your numbers backwards so that the front is the correct direction and looks nice and neat with no ink or pencil marks.

Everyone’s birthday is better with a crown! This DIY glitter birthday crown is super easy to make and even includes a free template. Whip one up, then get your camera ready – your baby it’s gonna look amazing! Click for the full DIY and the free pri…

6. Glue your numbers onto the glitter paper, following the template. Add your trim to the bottom and glue that on too.

Everyone’s birthday is better with a crown! This DIY glitter birthday crown is super easy to make and even includes a free template. Whip one up, then get your camera ready – your baby it’s gonna look amazing! Click for the full DIY and the free pri…

7. Cut a piece of elastic large enough for your baby's head. I used 1/8 inch wide. You'll want to glue the elastic between the glitter paper and the felt liner, placing it by their ears so that it fits neatly and isn’t an eyesore. Then, glue your felt to the glitter paper.

Everyone’s birthday is better with a crown! This DIY glitter birthday crown is super easy to make and even includes a free template. Whip one up, then get your camera ready – your baby it’s gonna look amazing! Click for the full DIY and the free pri…

TA-DA! You're done mama! Now place that crown on your baby's head and snap some photos. They're gonna look SO CUTE!

Everyone’s birthday is better with a crown! This DIY glitter birthday crown is super easy to make and even includes a free template. Whip one up, then get your camera ready – your baby it’s gonna look amazing! Click for the full DIY and the free pri…

When you make this project for your babe, you have to tag me so I can see! I love baby photos.

Total Cost:

Template FREE!
Glitter paper $2
Felt $1
Trim $3
Elastic $2

Total: $8

Such a bargain! I've seen similar crowns on Etsy for $20 plus shipping, so you'd save a lot by making your own! Plus, you can customize the colors and you don't need to wait for it to ship or even worse, have to spend extra for rush shipping prices! Because us mommas are always doing everything at the last minute, amiright?