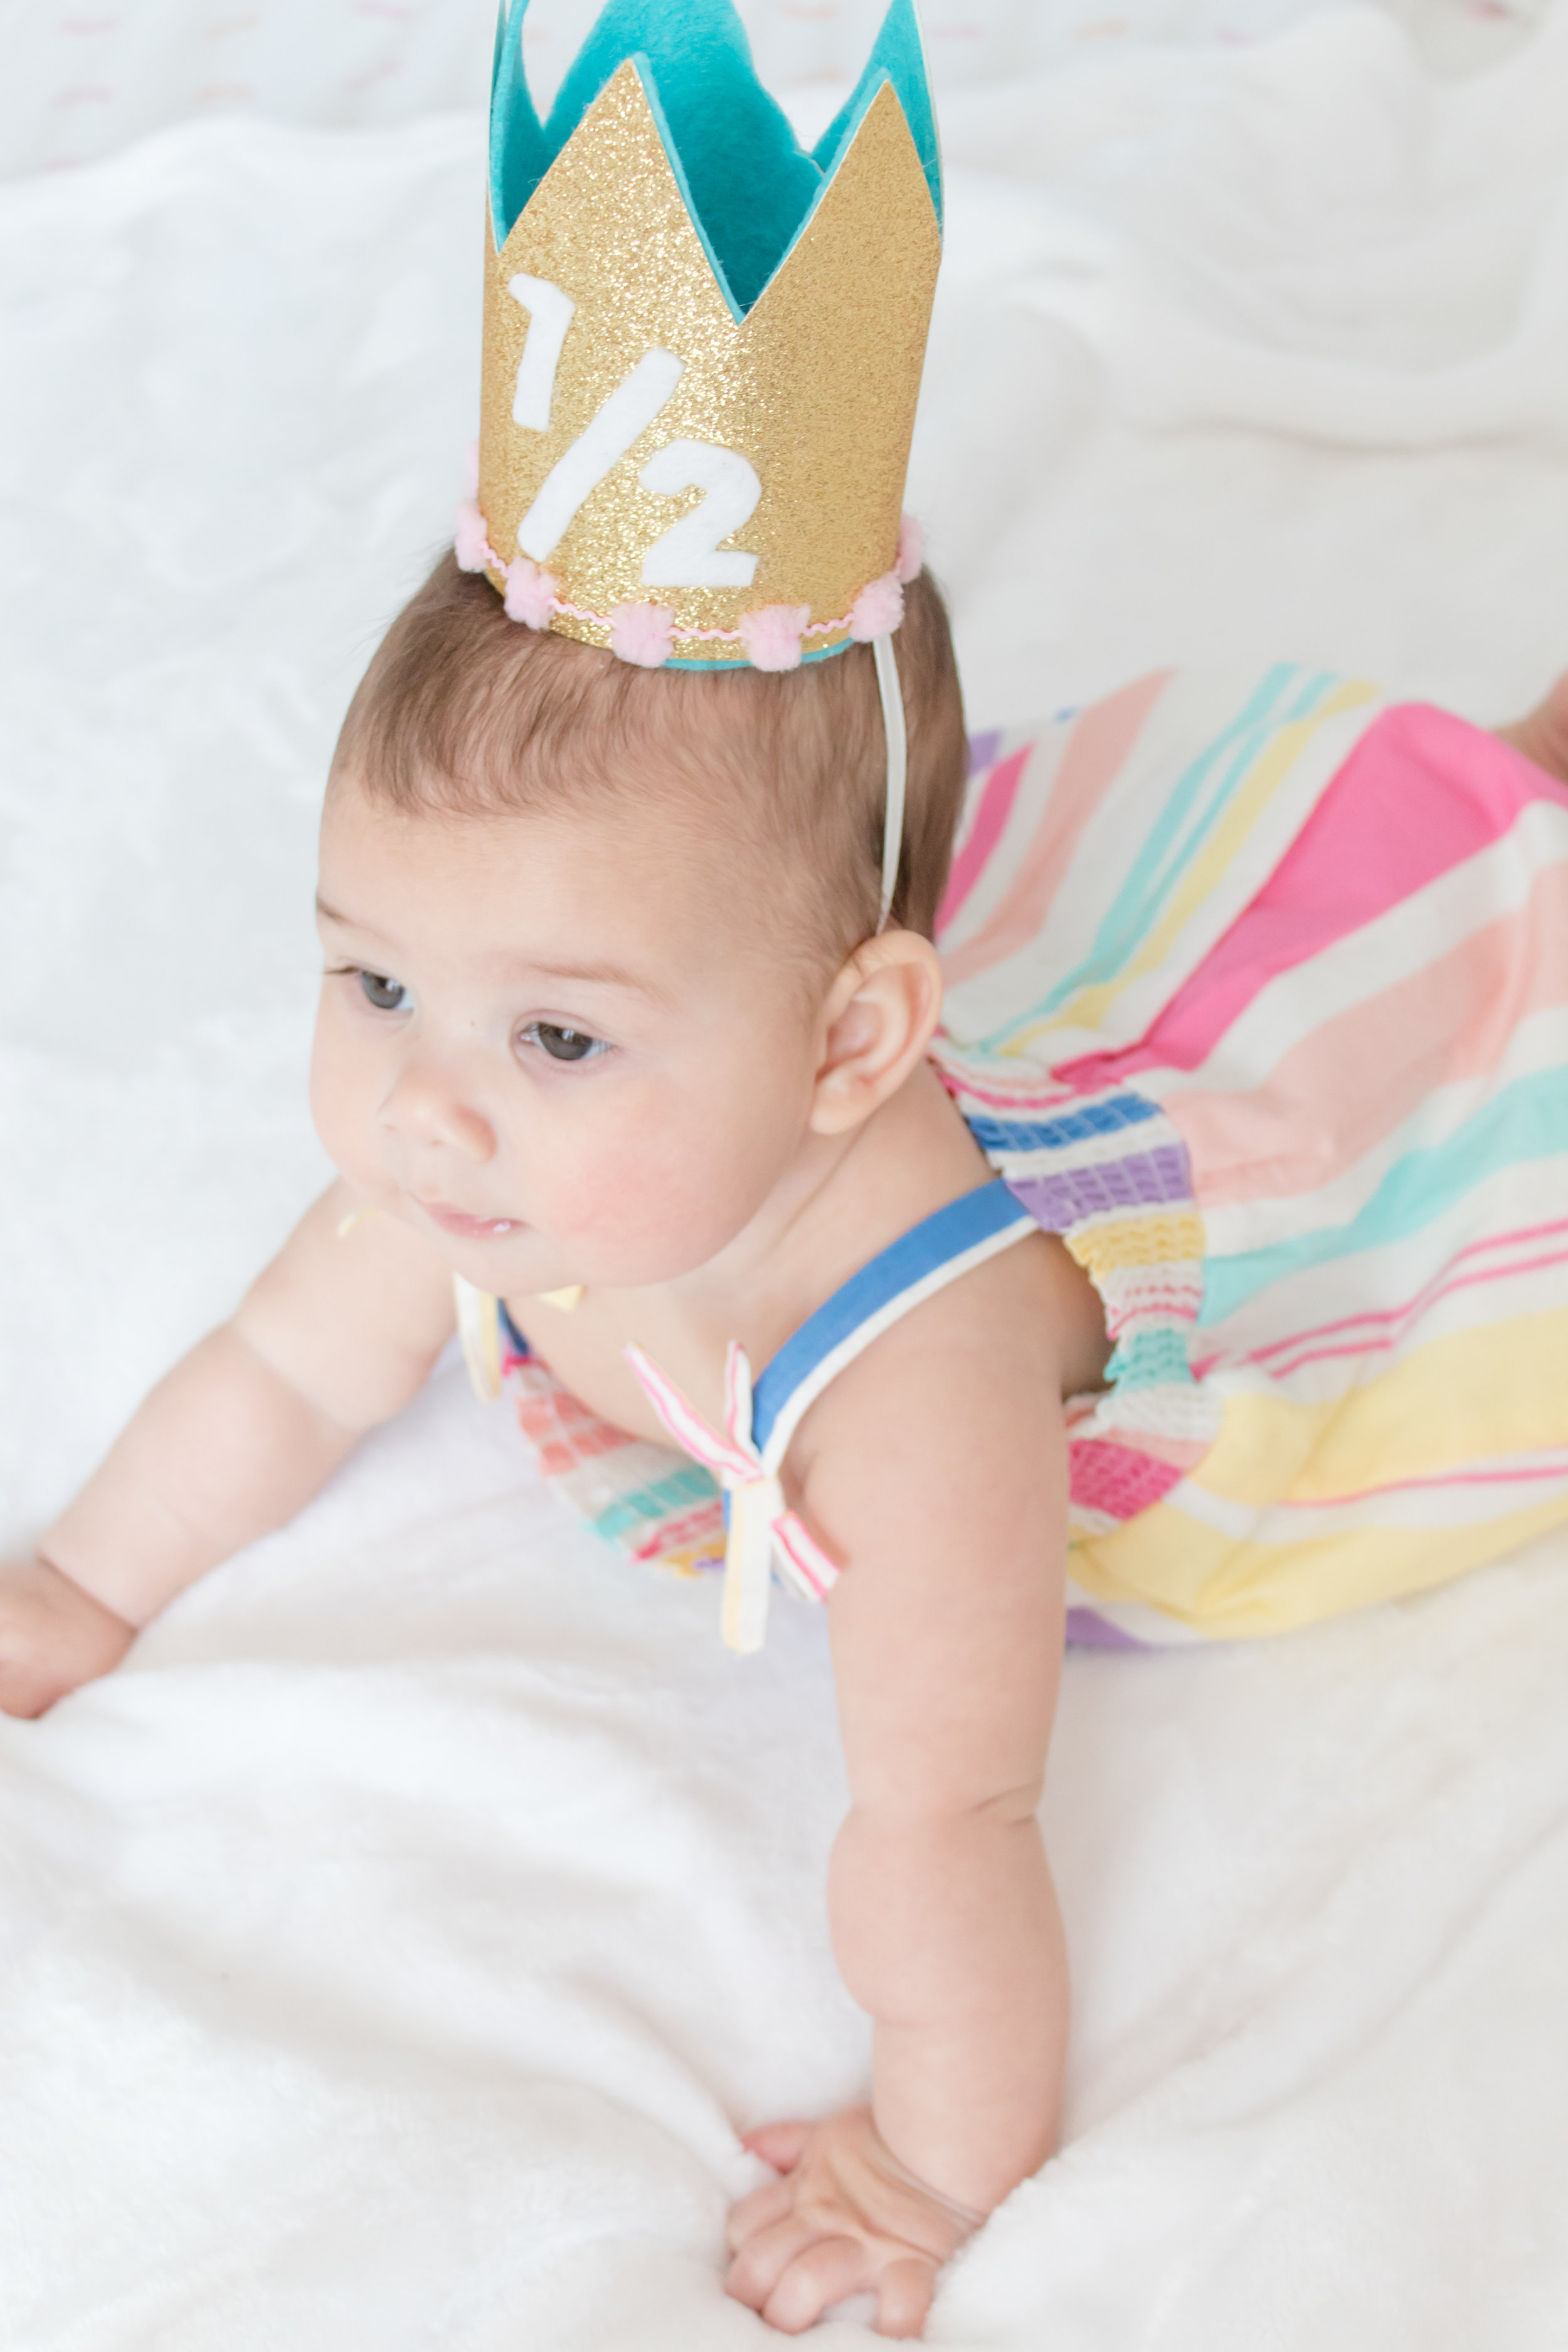
DIY Glitter First Birthday Crown

On the morning of Hailey's half birthday, I suddenly decided I needed to do an impromptu photoshoot. I had to post about her being 6 months old on social media, because I was pretty amazed at how fast the time had gone. And, since I had plans to do her half birthday party, I knew I wanted to make her a crown. Unfortunately, I didn't think to do it sooner, so I found myself on the morning of her half-birthday scrambling around the attic to find the supplies I needed. Luckily, it wasn't hard to do and I was able to make the template and the crown within just an hour! Imagine how quick it'll be for you since the template is already made. What can I say except “you're welcome"! (Anyone else get that Moana reference?)

The template contains all the numbers and two different sizes, so you can decide what’s best for your baby/toddler/child/yourself. It also contains directions and a bonus cake topper template! Oh, and it’s totally free. By making it yourself, you’ll save money. It's really easy and you can get everything you need on Amazon (lifesaver!) or save even more money with a trip to your local craft store.

*This post contains affiliate links

Everyone’s birthday is better with a crown! This DIY glitter birthday crown is super easy to make and even includes a free template. Whip one up, then get your camera ready – your baby it’s gonna look amazing! Click for the full DIY and the free pri…

These tutorial pictures were taken on my kitchen table as I worked so that I could give you guys a nice step-by-step tutorial without having to go up to the attic and try to cram in a blog post PLUS a craft project while Hailey napped, so it's not quite as detailed as I usually am. However, I figured done is better than perfect! I knew that if I put this project onto my never-ending to do list, you'd probably get this post when Hailey's going off to college.

You will need:

Template (see below)
Printer (I use this one and love it!)
Glitter paper (similar here)
Felt (similar here)
Scissors (similar here)
Trim (similar here)
Glue gun (similar here)
Elastic (similar here)

The printable is available in my resource library, which you can get totally FREE access to, just by signing up. What exactly do you get? Access to all my printables, including party planning guides, checklists, and my projects. By signing up, you'll have access to all projects- past, present and future! 

Directions:

1. Download and print your template. It consists of 3 pieces- a crown template with the space for the numbers, the template for the numbers, and a bonus cake topper.

2. Before cutting anything out, test your trim on the template and make sure it's wide enough that you can glue it on without covering the numbers. If not, add a bit of height by placing the template a few cm's above the edge of your glitter paper.

Everyone’s birthday is better with a crown! This DIY glitter birthday crown is super easy to make and even includes a free template. Whip one up, then get your camera ready – your baby it’s gonna look amazing! Click for the full DIY and the free pri…

3. Cut your crown template out of glitter paper and felt liner. When cutting your glitter paper, I recommend leaving a little bit extra on the sides so you have some width to play around with. This will make it easier to glue your crown shut.

4. Now some cutting tips! First, place your template against the bottom edge of your glitter paper so you'll get a nice, straight edge and one less thing to cut. Second, when cutting out your triangle points, or any small area like in the cake topper, I recommend only putting your scissor tip as far as you need to cut. Meaning.... don't intend to end your precise point in the middle of your scissor blade, because most likely when you cut it, you'll end up going a bit too far and your inside points won't be neat. I hope this makes sense- it’s hard to explain!

Everyone’s birthday is better with a crown! This DIY glitter birthday crown is super easy to make and even includes a free template. Whip one up, then get your camera ready – your baby it’s gonna look amazing! Click for the full DIY and the free pri…

5. Once you have your glitter paper crown and felt liner cut out, it's time to add the numbers! Cut them out of felt, using a colored pencil or washable ink marker to draw the template onto the felt. If you're thinking, “ok Cathy there is no way in freakin HECK I can cut numbers out of felt that small, ya looney”, never fear. I have 2 alternatives! Either purchase felt numbers and glue those onto your crown instead or in the scrapbook paper section, they have a flocked paper that looks like felt, but the backside has a cardstock backing. This will be much easier to trace your numbers onto and cut out. Just remember, ESPECIALLY with the flocked paper but the felt too, you should be tracing your numbers backwards so that the front is the correct direction and looks nice and neat with no ink or pencil marks.

Everyone’s birthday is better with a crown! This DIY glitter birthday crown is super easy to make and even includes a free template. Whip one up, then get your camera ready – your baby it’s gonna look amazing! Click for the full DIY and the free pri…

6. Glue your numbers onto the glitter paper, following the template. Add your trim to the bottom and glue that on too.

Everyone’s birthday is better with a crown! This DIY glitter birthday crown is super easy to make and even includes a free template. Whip one up, then get your camera ready – your baby it’s gonna look amazing! Click for the full DIY and the free pri…

7. Cut a piece of elastic large enough for your baby's head. I used 1/8 inch wide. You'll want to glue the elastic between the glitter paper and the felt liner, placing it by their ears so that it fits neatly and isn’t an eyesore. Then, glue your felt to the glitter paper.

Everyone’s birthday is better with a crown! This DIY glitter birthday crown is super easy to make and even includes a free template. Whip one up, then get your camera ready – your baby it’s gonna look amazing! Click for the full DIY and the free pri…

TA-DA! You're done mama! Now place that crown on your baby's head and snap some photos. They're gonna look SO CUTE!

Everyone’s birthday is better with a crown! This DIY glitter birthday crown is super easy to make and even includes a free template. Whip one up, then get your camera ready – your baby it’s gonna look amazing! Click for the full DIY and the free pri…

When you make this project for your babe, you have to tag me so I can see! I love baby photos.

Total Cost:

Template FREE!
Glitter paper $2
Felt $1
Trim $3
Elastic $2

Total: $8

Such a bargain! I've seen similar crowns on Etsy for $20 plus shipping, so you'd save a lot by making your own! Plus, you can customize the colors and you don't need to wait for it to ship or even worse, have to spend extra for rush shipping prices! Because us mommas are always doing everything at the last minute, amiright?

Must Have Craft Supplies

For those of you who are unaware, I'm in the process of cleaning & organizing my craft room. Let's just say, it's been an adventure. Although I have a whoooole lotta stuff, some people may want to know, what do you need to get started? After all, not everyone ends up with a whole room full of craft supplies overnight, right? To help all you aspiring crafters, I've created this list of my must-have craft supplies, along with a FREE printable you can download and take with you to the craft store! This way, you can start your post-apocolyptic craft bunker too ;)

Creating your Crafting Arsenal

Ok, way back in March of 2017, I told you how to be efficient to get all our crafts projects done in time. Now, let's talk about the supplies we need to do them! Here are some of my favorite, must-have items in your craft stash.

Starting a craft stash? Click to find out my must-have items for crafters of any skill level, plus some tips to save money and to rock a DIY party!

1. Glue Gun 2. Jewelry Tools 3. Cricut Explore Air 4. Paper Cutter 5. Circle, Heart, Star Paper Punches 6. E6000 Glue and Photosafe Glue Stick 7. Glue Gun Caddy 8. Mini Iron 9. Small Scissors and Large Scissors 10. Washi Tape 11. Paper Roll 12. Self-Healing Cutting Mat 13. Fringe Scissors 14. Craft Caddy 15. Paintbrushes and Paint Tray

1. Glue Gun- this one needs no explanation, but I'll give you one. Glue guns are handy for almost everything! They're good for craft projects, sure, but you can also use them for temporary fixes, party decor, etc. I've used it on nearly every project I've done, including my Pineapple Garland, Snowcone Party Hats, and Cotton Candy Garland. I guarantee if you buy one, you'll find a reason to use it. So, go get one!

2. Jewelry Tools- I purchased these for making jewelry once upon a time, but they're just handy to have around. I've used them for several crafts projects already on the blog, like my KS Inspired Bracelets and Wood Bead Tassel Necklace, but they're also good for cutting fake flowers and even for fixing your own jewelry when it breaks! Unlike regular tools, these are smaller, so they're better for tiny objects and precise fixes.

3. Cricut Explore Air- I resisted buying a Cricut for a while, but it's so handy to have! I used it for the Rapunzel lanterns at my Disney Themed Engagement Party, for my sister's Halloween costume, and for my Mean Girls Conversation Hearts. I'll probably be using it for my wedding too! It cuts a whole bunch of materials as well, not just paper and vinyl! It's an investment for sure, but I think it's really fun to have.

4. Paper Cutter- This little gadget is perfect for cutting a straight line. It's great for making banners and cutting out Printables from the internet. I've used it for my TGIF 90's Themed Slumber Party and my Nautical Notecard Birthday Banner. It's easy to use and small to store. Remember those giant paper cutters we had in school that looked like a guillotine? This is a much smaller, safer version of that. 

5. Paper Punches (Circle, Heart, Star)-  These punches are great to have on hand if you need to spruce up a project. So far I've used them on my Nautical Notecard Birthday Banner and Rock Candy Christmas Trees. They're easy to use and small, so they're easy to store!

6. E6000 Glue and Photosafe Glue Stick - E6000 is my second favorite glue, after glue guns. It adheres to nearly everything! It's a little smelly, so you need to use it with a window open, but it's great. I've used it for my DIY Dollar Store Candy Jars, my Zebra Party Tray and my Circus Animal Drink Stirrers. The photo safe glue stick is great for scrapbooking projects, making cards, and making collages! I used them for my DIY 90' Pun Valentines.

7. Glue Gun Caddy- I actually found this product while creating this blog post, and HAD to buy it. It holds your (hot!) glue gun, glue sticks, and protects your table. It's amazing! Never again will you be holding your half glued project mid-air while trying to remember where you left your glue sticks!

8. Mini Iron- A mini iron is great for small craft or sewing projects. I used it for my Mean Girls Conversation Hearts, the eye masks in my TGIF 90's Themed Slumber Party, and for touching up a wrinkly tablecloth on my Glam Friendsgiving Dinner. It's perfect for iron-ons!

9. Small Scissors and Large Scissors- I love that these scissors are so dang cute. Can we start with that?! I don't need to tell you why scissors are handy, so I'll just say that these small ones are great for when you need to do something precise, like making tassels, since they have pointed blades. These larger ones are great for cutting pieces of paper, cardboard, or other large things that require a straight line. I've used them in nearly every blog post, but they were especially useful for my Cotton Candy Garland and Rock Candy Christmas Trees.

10. Washi Tape- Washi tape has so many fun uses! It's great for temporarily sticking things together, for spicing up a project, or even organizing your planner! I used it to paint my beads for my Wood Bead Tassel Necklace, and it was super handy.

11. Paper Roll- This paper roll is great to avoid making a mess. You just need to pull a sheet long enough to cover your workspace to keep it clean. Ever dripped paint on your desk, or written with a marker that bleeds? This will help prevent them from staining! Sure, you can use newspapers but that means that 1. if you take photos of your project it won't look clean and neat, and 2. you'll have to find the newspapers. I highly recommend having this on hand!

12. Self-Healing Cutting Mat- This is one of my newest purchases. I haven't really used it yet (except as a really pretty backdrop for some craft projects) but it's got a ruler, which is great for measuring projects while working on them. It's also really thick and reversible, so you get twice the use and durability! Plus, the pink is SO much fun.

13. Fringe Scissors- Back when I made my Mini Faux Pintatas, I didn't have a pair of these scissors and I regretted it. They're so handy for making pinatas, fringe, and shredding up paper. It has 5 blades, so it makes more cuts and gets your project done faster! Again, VERY good for when you're making multiple projects at once!

14. Craft Caddy- A craft caddy is great for holding all your supplies and keeping them organized. I highly recommend having a spot that you use to store everything so that you can find it when you need it. There have been so many times that I lost my glue sticks, my paintbrushes, or my paper punches when I needed them. These crafting supplies are only useful when you can actually find and use them (duh). So, be sure to find a place where they can all stay together, like one big happy crafting family.

15. Paintbrushes and Paint Tray- These paintbrushes have a variety of uses! It's great to have multiple sizes so that you can do broad strokes quickly, but also have a nice thin one when you need to be more detailed. I really should invest in a new paint palette because mine is old and full of dried paint ("invest" = probably $3!) but paint palettes are really useful for pouring out just a little bit of paint or mixing colors. I've used paintbrushes on so many projects, including my DIY Donut Party Platter, my Colorful Leaf Garland, and my Circus Animal Drink Stirrers.

How to avoid going broke on craft supplies

I know what you're thinking- craft supplies can be expensive! I recommend adding a few items at a time, or using coupons! Michael's has plenty of sales and coupons you can use. There's also stores like A.C. Moore, Jo-Ann Fabric & Crafts, and Hobby Lobby. If you want to save even more, your local dollar store and even Walmart has a huge craft selection for cheap! Target also has some craft supplies, but not as many as Walmart. However, Target has some really CUTE stuff! Start small and keep adding more over time. Your crafting empire wasn't built in a day, right?

Do you already have a craft stash? What's in it? What can you NOT live without? I think for me, it's my glue gun. I even have one at work! Let me know your faves in the comments below.

Defining WellKeptChaos- Finding Yourself by Embracing Your Flaws

When I first started my blog, I intended for it to be an organization blog. I had just bought a house, and I really wanted to blog about it. It was going to be a lifestyle blog, but I’d provide all these handy tips to get your stuff organized. Hence the (old) name, WellKeptChaos. Learn more about the name change to Party HarDIY here.

DSCF8098.jpg

As it sometimes goes, the blog got reworked and reformed. I realized I didn’t have a passion for organization (and my house on any given day can prove that…) so I decided to go for my next passion- party planning. I did that for a bit, but then my other passion came out, which was crafting. And the blog went in that direction. I even thought about changing the name of the blog. I lined up my new social media channels, bought the domain, and just about everything else! But everyone told me they liked the old name, and so there it stayed. Somehow the name seemed perfect, but also like it didn’t fit either. (UPDATE: You can read about the name change here)

The truth is that through all these transitions, I never really felt like I found my niche or my audience. I, like my blog, wasn’t any one thing. I like to do a whole lot of everything. I have ADD and it was, again, rearing its ugly head. I wanted to do #allthethings and trying to fit myself into a box of a “diy blogger” or a “party blogger” wasn’t really doing it for me. Because the truth is, I want to talk about everything. And I can talk A LOT.

So I sat here, on this chilly almost-June day, and I felt defeated. Not just with my blog, but in general. Who am I and what am I doing? What defines me? Is it my blog, my job, my life? And if any one part changes, do I change? And I thought about that name I created for my blog, and how off it seemed, and it finally clicked. The WellKeptChaos was ME. But not just me… in a way, WellKeptChaos is all of us. 

WellKeptChaos is trying to be an adult when you really still feel like a kid. It’s trying to get your finances in order when you just want to go shopping. It’s trying to hustle and start a business when you have absolutely no frickin idea what you’re doing, but you’re not going to let that stop you. It’s all the very many pieces of your life and how they fit together and make you YOU, when they don’t seem to even make sense together. How a person can be lazy in life but dedicated in their business. How a person can love food and hate cooking. How a person can be obsessed with becoming an adult but not feel ready once they are. These are our quirks, these are our personality traits, and this is our chaos. 

But despite the chaos, despite the pitfalls, and despite the world around us trying to change us, we are doing it. We are being ourselves, we are fighting the norm, and we are trying to find our way in the world. We are changing and adapting every single day, even if we don’t feel it, or sense it, or even believe it. Every day is a change, every day has potential, and every day we learn. And although we might be panicking inside, we put on our big girl (or boy) pants and we get through that day with a smile. We pretend we know what we are doing, we have a sureness in our voice that even we don’t believe, and we pretend we’ve got our shit together. That is our WellKeptChaos.

One thing I always liked to do, and wanted to do, was to help people. And I think that with all the very many things I do on my blog and in my life, I do help people. I’m not an art teacher, but I can sure as heck help you DIY almost anything. I’m not a party planner, but I can plan a shindig that looks like it came out of a magazine- and tell you how to do it too. I’m not a life coach, or google, or the town wiseman, but that doesn’t stop people from coming to me for advice, for someone to listen to them, or someone to encourage them to get their “show on the road”, so to speak. Throughout my life, my career, my jobs, I am that person that people go to for help. It’s something I always knew but also always overlooked. By not being perfect at any one thing, I was fairly proficient in a great many things. And this allows me to help a whole lot of different kinds of people.

So who is my target audience? Anyone that needs help getting their life together. Anyone who needs a girlfriend to tell it to them straight, but with kindness. Anyone that needs help doing this thing called adulting without going absolutely bonkers in the process. She’s probably a woman, she’s probably in her 20’s-30’s, and she’s probably like me. Maybe she’s someone that wants to laugh at her failures while she cries, maybe she wants to dress better but she’s SO bad at it, or maybe she just got her apartment and she’s broke. None of these things are bad, but they aren’t what you see on the internet, or in magazines. Everything looks perfect on there, but I can assure you, it.is.not. And that’s ok, because no one is perfect. That’s a fact, and you can quote me on that.

So you do you, boo. Be weird, be crazy, be broke, be stylish, be lazy. Be everything that you are, that makes you who you are. Keep improving, keep striving, and keep navigating your way through adulthood. We’ll all figure it out someday, someway, and at our own pace. But for now, let’s figure out where the heck to start. And let's do it together.

So, let's get this helpful thing started. Tell me your #1 challenge right now, and I'll do my best to give advice, help you out, or create a blog post about it. Is it something simple, like how to refinish your dresser? Something harder, like how to update your wardrobe on a budget? Or something really tough, like how to move forward when your mind is filled with doubts? Let me know in the comments below, or contact me.

I can't wait to go on this journey with you!

In a world of photoshop, social media, and unrealistic expectations, it can be hard to feel like you're good enough. Click to learn how a particularly bad day helped me find myself- and how you can too!

How to Rock Your DIY Party Projects

You know how it goes. You're planning a party and have spent hours scouring the internet for the best ideas. You've got a whole list of projects and you're determined to throw the very best party anyone has ever seen. Ever! But, by the time party day comes around, you are scrambling. What happened between that day you were planning and had "so much time!" and today? Probably all the DIY projects you didn't leave yourself enough time for! Although these DIY projects may seem easy, they can be very time consuming, especially when you're doing several of them. Here are some tips to ensure you have the DIY party of your dreams!

Planning a DIY party? Read my top tips to avoid last minute speedbumps, plus my favorite craft items- and how to save money on them! Click to learn more. #diyparty #partyplanning #diyprojects

Divide them up.

Pick 1-2 must-do projects, 2-3 like-to-do projects and 1-2 if-I-have-time projects. This way, you can do as many projects as you have time for without sacrificing the projects you want to do most. 

Have a crafting party.

If you want to make a lot of projects and have crafty friends, invite them over! Be sure you have all the supplies on hand, then get some snacks, a bottle of wine, and start crafting. You can make more projects in a fraction of the time. Plus, it's a fun bonding experience! 

Learn to delegate.

Ok, maybe you're not the best cake decorator. Instead of trying to do it yourself (and possibly failing), how about having a friend assist? Ask around and see if anyone can come take on some tasks. They'll probably enjoy it! Just be sure to give them a deadline and follow up to make sure it gets done. The last thing you need is to be left scrambling on party day!

Don't leave it until the last minute.

The best thing you can have when it comes to DIY projects is time. Leave a few weeks to work on your projects to ensure they come out nicely and get done in time. Believe me when I tell you that things can take longer than you think!

Maximize your time.

To get the most out of your time spent crafting, try to make as many of each project as you can per session. This way you won't end up taking supplies in and out or wasting paint, etc. You'll also get into the rhythm of it, and be able to make them much faster than if you start and stop, making 2 projects at a time.

Slow and steady wins the race.

On that same note, don't wait until you have a large block of time to start on projects. If all you have are short periods of downtime, use them! It's better to work on 1-2 items per day than trying to rush everything into one day, right? I always love to pop on my favorite movie or TV show, grab a TV table, and whip up some crafts projects while I watch TV.

Create an assembly line.

Sometimes it's easier to batch your projects- aka doing "like" projects at the same time. What does this mean? Painting all your beads at once, cutting out all your shapes in one sitting, or gluing everything together. This will help you to find the most efficient way to do each step through repetition. 

Don't be a perfectionist.

Yes, you want this project to come out perfectly. But does it have to? If you spend too much time perfecting each project, you'll be missing out on valuable time you could be spending on other projects! This is especially important when you have others helping. Allow yourself to delegate and don't spend time micromanaging everyone. It's supposed to be fun! 

Reduce shopping time.

Create a shopping checklist so that you can avoid multiple trips to the store. A quick way to derail your productivity is to stop midway because you forgot something you needed. Been there... done that!

Free printable craft-2.png

Have you ever attempted a DIY party project at the last minute, and then realized you were in WAY over your head? Let me know in the comments below!

DIY Cotton Candy Garland

Ok guys, I have a confession to make. I'm a cotton candy addict. I loooove cotton candy. I know I shouldn't love it quite so much- it's pure sugar, and I'm a 27 year old woman. But something about that magical and fluffy cloud of candy tastes so good. Yes, I actually still eat it. Most people just admire it or decorate things with it, but I eat it. The only negative thing about cotton candy (besides the inevitable cavities) is the fact that the colored ones turn your mouth all kinds of colors. Then I get to walk around all day after a sporting event with blue lips, while people stare and my fiancé laughs at me. Oh well, c'est la vie. Luckily for you guys, this cotton candy won't turn your mouth any kinds of colors! Well, unless you try to eat it... I can't speak to that. With only a few steps, this garland is the cutest and easiest way to display your love for cotton candy. 

Zebra Tray 15.jpg

You will need:

Cotton Candy Picks (from Oriental Trading)
Ribbon (Mine was from Michael's on clearance)
Glue gun
Scissors (here)
 

1. Peel the sticks off the cotton candy picks. I recommend starting at the bottom tip of the cone, since it's the most delicate part. 

2. Cut off the tabs on the fluffy part of the cotton candy that keep it open. They're the teardrop shaped parts in the photo above.

3. Glue the honeycomb top open. Hold in place for a few seconds until the glue dries.

4. Once you've glued all your honeycombs open, grab your ribbon. Leave a few inches on the end so that you can hang it up. Then, glue the cotton candy evenly spaced out.

5. Hang it up and enjoy!

cotton candy garland 2.jpg

And there you have it! A quick and simple banner DIY that'll sweeten up any party. It would also make a really sweet addition to a little girl's room, your desk at work, basically anywhere you'd want to declare your love for cotton candy.

cotton candy garland 4.jpg

Do you still eat cotton candy, or do you have a different guilty snack you love? Let me know in the comments below!