Abstract Painted Gift Tags

Back when I was a kid, I thought it was so cool to have a summer birthday. You didn’t have to go to school, the weather was hot, and something like a pool party or going to an amusement park was an option. So, while my mom did make strawberry cupcakes for all my classmates on my birthday, just being at school kinda sucked. Now that we’re all adults, it doesn't really matter as much. We all probably have to work on our birthdays anyway (cue the crying) so it's now an even playing field. For that next birthday king or queen, how about a handmade gift tag for their present? It’s incredibly fun and easy to make- anyone can do it!

*This post contains affiliate links.

For that next birthday king or queen, how about a handmade gift tag for their present? It’s incredibly fun and easy to make- anyone can do it! If you’re a fan of abstract painting, you’ll love this easy DIY project. Click for the full instructions a…

You will need:

Colored cardstock (similar here)
Paper punch (similar here)
Embroidery floss (similar here)
Acrylic paint (similar here)
Glue gun (similar here)
Scissors (similar here)

Directions:

For that next birthday king or queen, how about a handmade gift tag for their present? It’s incredibly fun and easy to make- anyone can do it! If you’re a fan of abstract painting, you’ll love this easy DIY project. Click for the full instructions a…

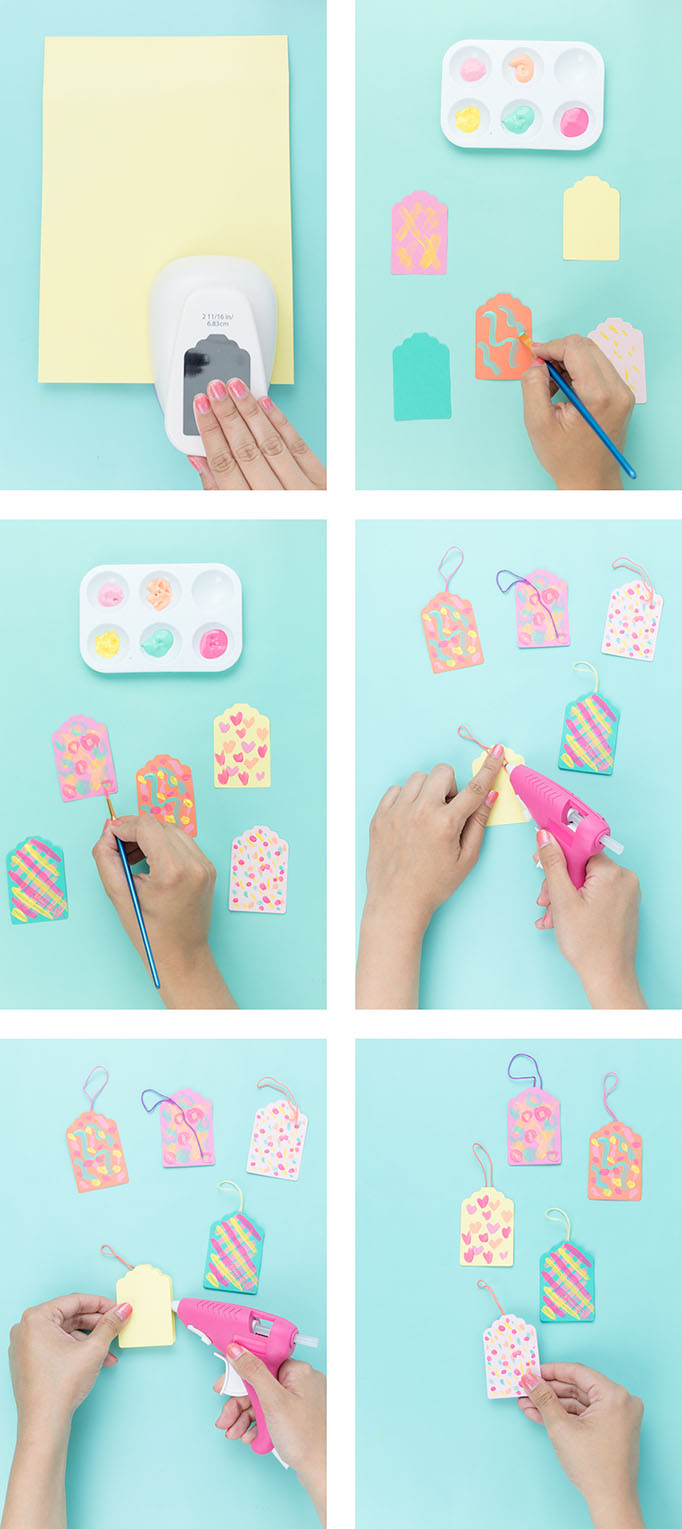
1. Cut out your tags from the card stock in your choice of colors. You'll need 2 pieces of cardstock for each tag you're making. I used the same color for both sides.

2. Paint abstract designs using your choice of paint colors on one of the cardstock tags. For the designs, I kept it simple with xoxo, lines, dots, etc. You can be as simple or as complex as you want.

3. While the paint dries, cut a piece of embroidery floss for the tag.

4. Glue the embroidery floss on the back of the tag, then glue on the blank tag to create a seamless background.

For that next birthday king or queen, how about a handmade gift tag for their present? It’s incredibly fun and easy to make- anyone can do it! If you’re a fan of abstract painting, you’ll love this easy DIY project. Click for the full instructions a…

That's it- you're done! Now add a to: and from: so your recipient knows who to thank for their awesome new present. Hang it on their gift, and get ready to see their face light up. Everyone likes a present!

I always love adding a homemade touch to my gifts because it really makes them more personal, especially in a world where everyone just gets each other gift cards! So, what do you think about these DIY gift tags? SO simple, right?!

DIY Paper Roll Pencil Cup

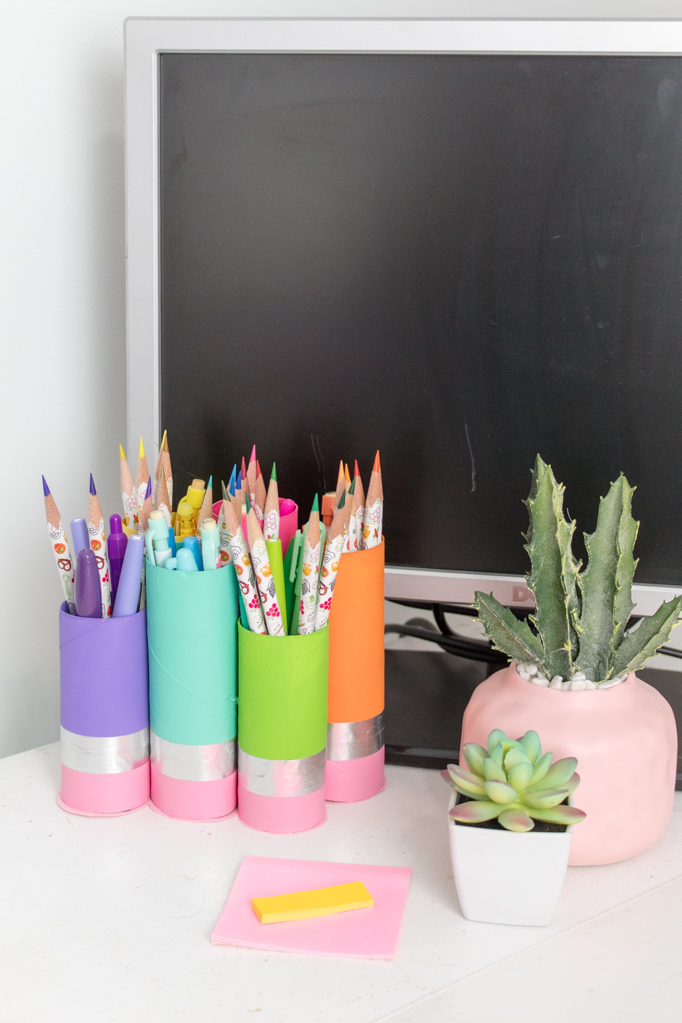
Can you believe that the summer is almost over, and back to school shopping has begun?! I mean, I’m not going back to school but any excuse for shopping is one I’ll take. Since everyone else has back to school on the brain, I whipped up the perfect project for families and teachers alike- this colorful pencil cup, using the humble paper roll! That’s right, we have a true trash-to-treasure treat for you today (say that 5 times fast!). You just need a few basic supplies that you probably have on hand.

Looking for a great back to school craft, or a perfect new teacher gift? How about a pencil cup made with something totally free- the paper roll?! This project is so easy to make and extremely affordable. Click to find out how to make it and where g…

My favorite part of back to school shopping was always getting brand new stationery. I was always picking out my favorite notebooks, folders and pens for the new school year. I always loved getting this fresh new gear. It’s a love I still have to this day, as I purchase unnecessary notebooks and markers. They take over most of my desk space, as I need a marker or pen in every single color for every single possible use. Thin markers, thick ones, pencils, pens… even erasable markers for my notes! I even have a giant puoch of markers that I keep with me at all times.

Looking for a great back to school craft, or a perfect new teacher gift? How about a pencil cup made with something totally free- the paper roll?! This project is so easy to make and extremely affordable. Click to find out how to make it and where g…

These would also make a great teacher gift when filled with some new supplies for the school year- pencils for the kids and markers for the teacher to grade papers with! I’m sure teachers have more than enough mugs and apple shaped things, plus everyone loves something homemade and useful. It would look so cute on a teacher’s desk.

Looking for a great back to school craft, or a perfect new teacher gift? How about a pencil cup made with something totally free- the paper roll?! This project is so easy to make and extremely affordable. Click to find out how to make it and where g…

The full DIY is over on the Giggles Galore blog, so head on over to take a look!

DIY Washi Tape Place Card

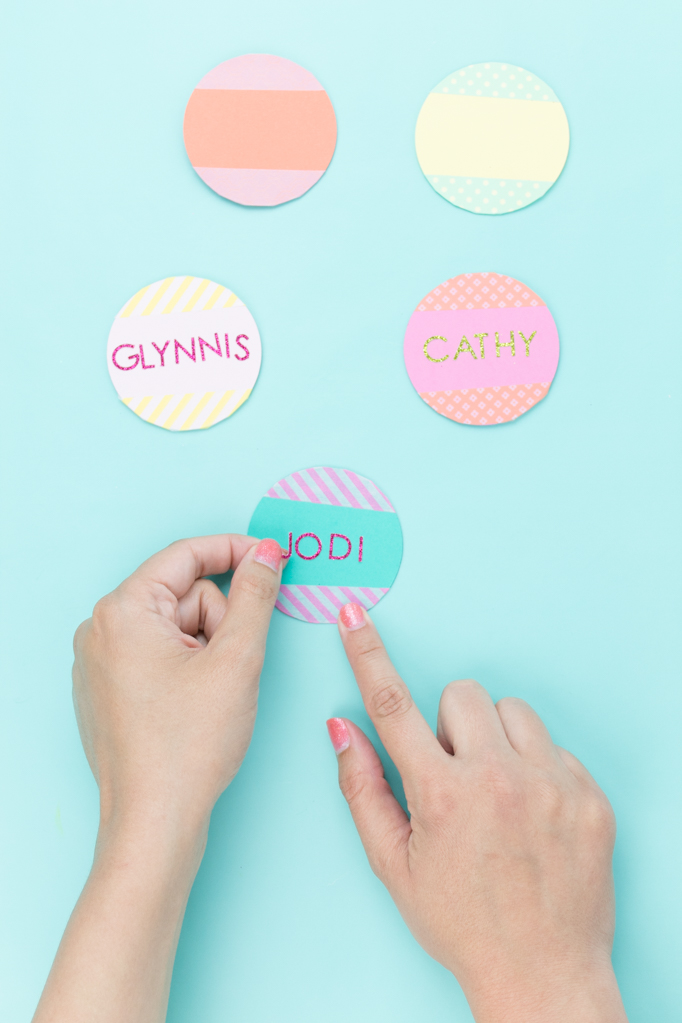
Summer is here, and that means constant get-togethers, picnics, and BBQ's. Essentially, we're all just looking for reasons to be outside with friends, with a glass of rosé or a sangria in hand. Sometimes it's fun to go beyond the usual paper-plate-and red-solo-cup combo we're used to, and whip up something a bit more elegant for our girls. What could be better than a simple summer tablescape featuring these washi tape placecards? They're really cheap to make and hella easy. Put that glue gun away girl- you don't need it for this project!

*This post contains affiliate links.

Summer is here, and that means constant get-togethers, picnics, and BBQ's. What could be better than a simple summer tablescape featuring these washi tape placecards? Get the super easy how-to on the blog! #placecards #washitapecrafts #summercrafts

You will need:

2.5 inch circle punch (similar here)

Colored cardstock (similar here)

Washi tape (similar here)

Glitter letters (From Michaels, similar here)

Directions:

1. Cut your circles out of your colored cardstock

Summer is here, and that means constant get-togethers, picnics, and BBQ's. What could be better than a simple summer tablescape featuring these washi tape placecards? Get the super easy how-to on the blog! #placecards #washitapecrafts #summercrafts

2. Add washi tape to the top and bottom of your circle.

Summer is here, and that means constant get-togethers, picnics, and BBQ's. What could be better than a simple summer tablescape featuring these washi tape placecards? Get the super easy how-to on the blog! #placecards #washitapecrafts #summercrafts

3. Fold over your excess washi tape. You can also cut it off if you want to, but it wasn't necessary. If you want the back to be neat, cut another circle from cardstock and glue it on the back.

Summer is here, and that means constant get-togethers, picnics, and BBQ's. What could be better than a simple summer tablescape featuring these washi tape placecards? Get the super easy how-to on the blog! #placecards #washitapecrafts #summercrafts

4. Starting from the middle, add your glitter letters to spell out your friends' names. I placed them down gently, then adjusted them once all the letters were on to make sure everything was straight.

Summer is here, and that means constant get-togethers, picnics, and BBQ's. What could be better than a simple summer tablescape featuring these washi tape placecards? Get the super easy how-to on the blog! #placecards #washitapecrafts #summercrafts

5. Press down on your glitter letters to seal them onto your place card.

Summer is here, and that means constant get-togethers, picnics, and BBQ's. What could be better than a simple summer tablescape featuring these washi tape placecards? Get the super easy how-to on the blog! #placecards #washitapecrafts #summercrafts

That's all folks! Add them to your letter place card holders (DIY coming soon!) and place them on your summer tablescape for your friends to enjoy. They're so cute and can be put at a desk or on a cork board after the party is over! This summer I'm all about the easy crafts projects and this one is no exception! It's no mess too. Perfect!

Summer is here, and that means constant get-togethers, picnics, and BBQ's. What could be better than a simple summer tablescape featuring these washi tape placecards? Get the super easy how-to on the blog! #placecards #washitapecrafts #summercrafts

So, what do you think about these placecards? Will you be whipping them up for your friends? Let me know how you plan to use them in the comments below!

DIY Boombox Music Valentines

Valentine’s Day is fast approaching, and I am still sorta in shock- wasn’t it Christmas 5 minutes ago?! Well, don’t worry- there’s still plenty of time to prepare some Valentines for the kiddos! While you can really easily purchase a stack of Minnie Mouse valentines at your local drugstore, I think it’s way more fun to make your own! Especially if you relate to every parent out there with a nostalgic boombox valentine. The full post is over on the Giggles Galore blog.

Looking to make something a little bit different this Valentine’s Day? Try these DIY boombox music valentines! They’re the perfect Valentine’s Day gift for a music lover, especially when paired with an iTunes gift card!

I think these would also be great if you paired them with an iTunes gift card for your kids or family members. Gone are the days when you needed to hang out by the radio with a cassette tape inside, waiting for your favorite song to play!

Looking to make something a little bit different this Valentine’s Day? Try these DIY boombox music valentines! They’re the perfect Valentine’s Day gift for a music lover, especially when paired with an iTunes gift card!

These cards are SUPER cheap to make- all you need is a pack of cardstock and some washi tape. That’s it! Some paper punches with make things a bit easier, but you don’t even need those. So, head on over to the Giggles Galore blog to see the full post!

DIY Holiday Cards Scrapbook

If you’re anything like me, you have a stack of holiday cards from friends and family that you don’t know what to do with. Keep them? Throw them away? So, they usually end up in a pile on the coffee table until April when I stuff them somewhere that I’ll probably never see them again. But, what if there was a better way to keep those cards so you’d actually get to enjoy them, year after year? And what if it was fun and easy to do?! Pop on a Christmas movie and grab your glue gun- we have a book to make!

*This post was sponsored by Pinhole Press, but all ideas and opinions are my own.

Christmas Card Book 13.jpg


This is perfect to make in the days between Christmas and New Year’s. I find that I’m a little sad that the holiday fun is over, and my life feels a little bit empty. This is a perfect excuse to prolong the holiday fun a bit longer, and watch all those Christmas movies you didn’t seem to have time for! Head on over to the Pinhole Press blog for the full DIY.

Christmas Card Book 11.jpg
Christmas Card Book 8.jpg

Seriously the cutest! I’m planning to make mine this week, now that we are taking down our Christmas decor.

Head on over to the Pinhole Press blog to see the full DIY!