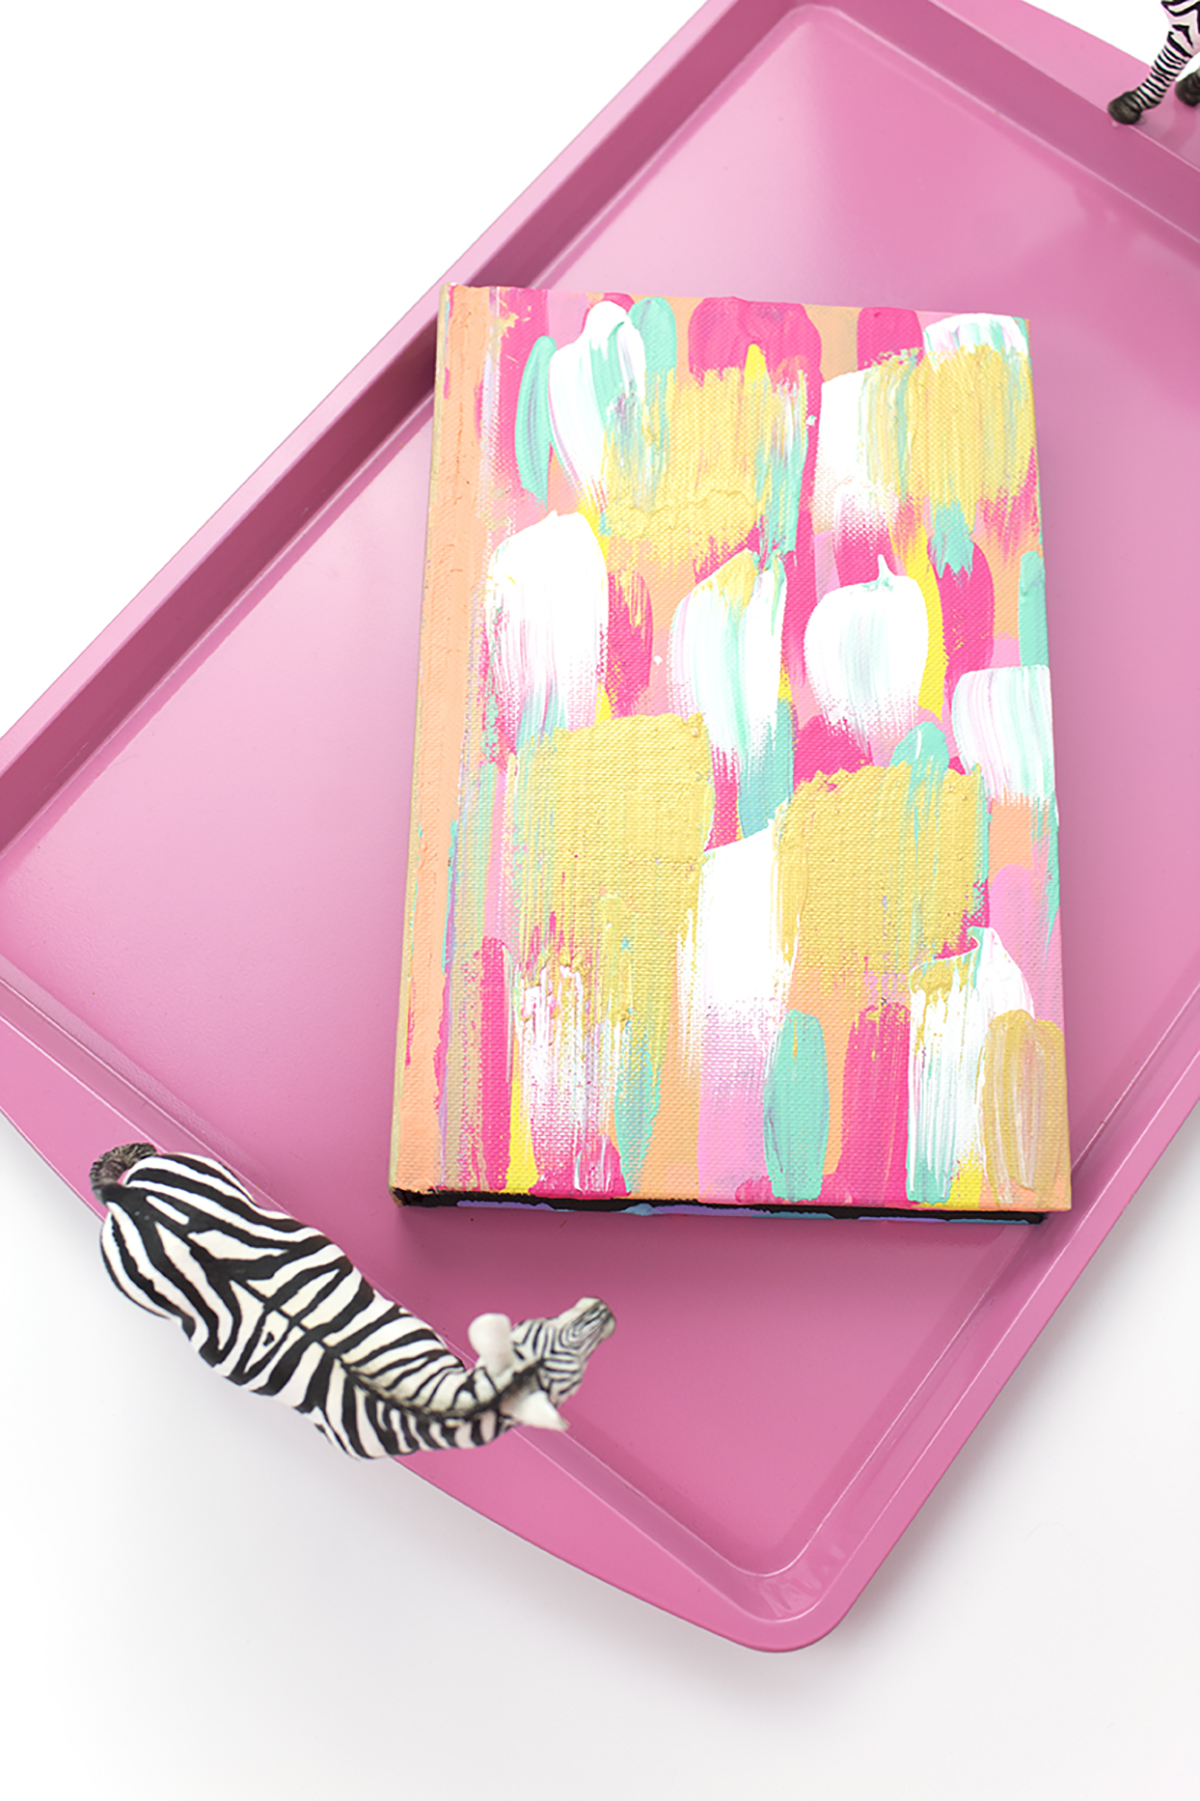
DIY Painted Notebook

This weekend I went to Michael’s to grab a few items for upcoming projects, and I had a sketch book on my list. I realized that I didn’t really have anywhere that I could keep all my project ideas together, so I usually scribbled on a sheet of white paper that ended up who-knows-where when it came time to actually create the project. One of my New Year’s Resolutions is to be more organized, so I knew I had to take care of this! However, when I went to Michael’s I didn’t love the selection of sketchbooks available. I grabbed this one because it was the most affordable at $5, and figured if it couldn’t be cute, at least it was cheap. WELL… while creating another paint project, I realized that this notebook (with its canvas-like surface!) was wishing for a new look. Lo and behold- here it is! I love this sketchbook now, and I can’t wait to use it for my project sketches, room upgrades, and any ideas that pop into my head! Best of all, it’s so easy and cheap to make with products you probably have on hand!

Give your ho-hum notebook a new look with just a coat of paint! Add a metallic accent and you're golden! Click for the DIY.


You will need:

Notebook (from Michael’s, or here)
Paints (similar here)
Metallic gold paint (here)
Brushes (similar here)
Newspaper or similar to cover workspace

Give your ho-hum notebook a new look with just a coat of paint! Add a metallic accent and you're golden! Click for the DIY.


  1. Open your notebook to the center and place it pages-down on your workspace. Paint on thick strips with your first paint color. I wanted to do a rainbow palette, so I decided to do half the rainbow on one side, and the other half of the colors on the other side.
  2. Paint your whole notebook cover as much as you can, and let dry just a little. I thought it looked kinda mehhh without a pop of color, so I went back and took 1 color from each side to add a jolt to each side. 
  3. Using your white paint, add some thick stripes to your notebook cover. I found that the white ended up with a cool rainbow effect, so I used it to paint the spine.
  4. Add your pop of gold to the notebook and spine if you’d like. Let dry fully, then go back and do any necessary touch-up.

You can spray it with a finishing spray to seal it, or just be careful with it. You can also get a small pouch for it so it doesn’t chip paint everywhere.

Give your ho-hum notebook a new look with just a coat of paint! Add a metallic accent and you're golden! Click for the DIY.

Related: DIY No Sew Embellished T-Shirt

I'm really loving this sketchbook now! It's so cheery and fancy. It really encourages me to create more, and I love taking a sketch break to think up new ideas, spruce up a room, or just brainstorm! How will you use your notebook? Let me know in the comments below! 

DIY Polly Pocket Iron-On Tee

Ah, Polly Pocket. The choking hazards of our childhood. Something about the amazing little world they could create in such a small space was seriously enticing as a kid. I was more into Barbies, but I did have one Polly Pocket toy that I loved- Vintage Polly Pocket Waterpark Fun which had an awesome pull-out slide! I don’t know how much I really played with the Polly Pocket, but I know I did often open up the case and stare at its interior. Usually Polly was a “Barbie” for my Barbies, but that case had its own special place in my heart. 

To commemorate my love for Polly Pockets, I made these super cute printable iron-ons that you can put on pretty much anything you desire! Get your printer out and your iron ready- we’re making some tees!

To commemorate my love for Polly Pockets, inside and out, I made these super cute printable iron-ons that you can put on pretty much anything you desire! We’ve got 2 sizes (kid and adult) and 2 orientations (backwards and forwards) so that it works for everyone! I picked some of my favorite shapes including my turquoise flower, a heart (perfect for Valentines Day and Galentine’s Day!), a sea shell, a star, and a regular 'ole square that looks somewhat like an ordinary pocket. Get your printer out and your iron ready- we’re making some tees!

To commemorate my love for Polly Pockets, I made these super cute printable iron-ons that you can put on pretty much anything you desire! Get your printer out and your iron ready- we’re making some tees!

You will need:

Tees (here, here, here)
Sweatshirts (here, here)
Iron-on for dark fabrics (here)
Scissors (here)
Fabric marker with disappearing ink (here)
Iron
Parchment paper
Fun earrings to wear them with! (here)
Free printable (see below)

The printable is available in my resource library, which you can get totally FREE access to, just by signing up. What exactly do you get? Access to all my printables, including party planning guides, checklists, and my projects. By signing up, you'll have access to all projects- past, present and future! 


Directions

To commemorate my love for Polly Pockets, I made these super cute printable iron-ons that you can put on pretty much anything you desire! Get your printer out and your iron ready- we’re making some tees!
  1. Print out your Polly Pockets according to the instructions on your iron-on paper. I used the one for dark fabrics, and it worked perfectly on my white shirts too. It required printing the design the normal way. Often, light colored fabric iron-ons require it to be backwards. Just be sure to follow the instructions on your papers!

  2. Cut out each design, then trim off all the extra. The paper is white, so anything left over will show! I stayed as close to the edge as possible.

  3. Try on your shirt, and mark where you want your Polly Pocket to go. Remember that when you look in the mirror, everything is backwards ;)

  4. Put your shirt on a flat surface. Remove any hairs with a lint roller, and iron your shirt to be free of wrinkles.

  5. Peel the back off your Polly Pocket decal, and place it in the spot that you want. Cover with parchment paper

  6. Iron according to the instructions on your package. Mine said to iron for 40-60 seconds with a lot of pressure. Let cool completely.

To commemorate my love for Polly Pockets, I made these super cute printable iron-ons that you can put on pretty much anything you desire! Get your printer out and your iron ready- we’re making some tees!

The printable is available in my resource library, which you can get totally FREE access to, just by signing up. What exactly do you get? Access to all my printables, including party planning guides, checklists, and my projects. By signing up, you'll have access to all projects- past, present and future! 

To commemorate my love for Polly Pockets, I made these super cute printable iron-ons that you can put on pretty much anything you desire! Get your printer out and your iron ready- we’re making some tees!

PS- For anyone that missed my Instagram stories, I decided that I'll be "the ugly blogger", because trying to take photos where I am actually pretty proves to be a challenge for me. So, get ready to see some awkward pics like the one above. They're just so much more fun to take than fake laughing so that I look happy!

Sources: All Earrings, Seashell Cup, Diamond Ring, Heart Sunglasses Similar, Vintage Polly Pocket- Waterpark Fun