DIY Varsity Letter Sweatshirt

The other day, I was sitting in the car in a mini mall parking lot, and suddenly had this great idea to create a varsity letter themed sweater. Maybe it’s because of all the back-to-school stuff or the fact that it’s fall, but suddenly I wanted nothing more than a cozy sweater with a cute fluffy letter on it. So, I bumped all the other blog posts I had out of the way so that I could show you guys this cute sweater that I made for myself! The best part is that it’s super affordable, so you can definitely make one for yourself! I was able to get everything I needed on Amazon so I didn’t even need to leave the house or go shopping at the mall for the right supplies. However, if you want to live out your back to school shopping days and go to the mall, don’t let me stop you. Shop til you drop honey!

Maybe it’s because of all the back-to-school stuff or the fact that it’s fall, but suddenly I want nothing more than a cozy sweater with a cute fluffy letter on it. This varsity sweater is really easy to make- so easy, it almost isn’t a DIY! Click f…

I feel silly calling this a DIY but technically it is. Lucky for you, it’s an easy one!

You will need:

Sweatshirt (here)
Iron-on letters (here)
Vanishing ink marker or chalk (here or here)
Iron (similar here)
Piece of cotton fabric

Maybe it’s because of all the back-to-school stuff or the fact that it’s fall, but suddenly I want nothing more than a cozy sweater with a cute fluffy letter on it. This varsity sweater is really easy to make- so easy, it almost isn’t a DIY! Click f…

Directions:

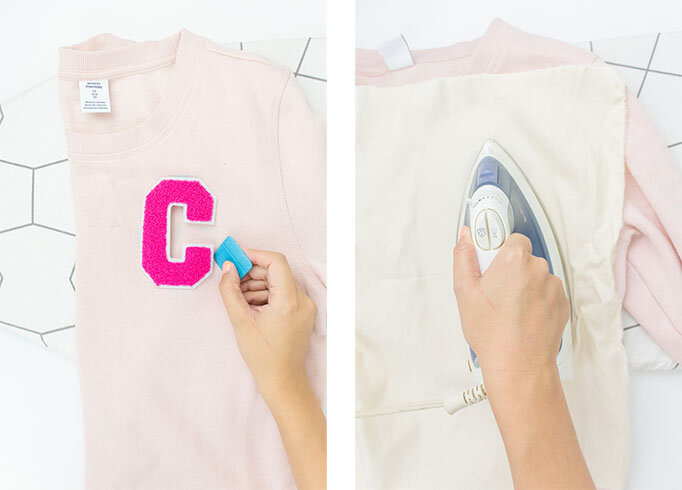
  1. Try on your sweatshirt and mark where you want your letter to go. I used fabric chalk, but you can also use vanishing ink markers or even regular chalk if that’s all you have.

  2. Place your letter on the sweater in the desired spot and place a piece of cotton fabric on top to prevent burn on the patch.

  3. Iron it on, making sure to focus on the edges so it doesn’t peel. My directions said to iron on high for 30 seconds, but follow what your directions say.

  4. Turn your sweatshirt inside out and iron underneath the patch for another 30 seconds.

Maybe it’s because of all the back-to-school stuff or the fact that it’s fall, but suddenly I want nothing more than a cozy sweater with a cute fluffy letter on it. This varsity sweater is really easy to make- so easy, it almost isn’t a DIY! Click f…

To style your new sweater, try it with a sporty skirt or a pair of jeans and booties. It’s perfect for giving your outfit a sporty touch. There’s nothing better in the fall than a cozy sweatshirt, especially if it’s slightly oversized and therefore super duper comfortable. 

Maybe it’s because of all the back-to-school stuff or the fact that it’s fall, but suddenly I want nothing more than a cozy sweater with a cute fluffy letter on it. This varsity sweater is really easy to make- so easy, it almost isn’t a DIY! Click f…

That’s all there is to it! Now you’ll have a cute and comfy sweater to tote around with you during the fall. It’s perfect for chilly nights or for wearing during fun activities like apple picking or football games! You could even match it to your team colors or school colors. I went with pink because, you know…. those are my team colors! Haha.

Maybe it’s because of all the back-to-school stuff or the fact that it’s fall, but suddenly I want nothing more than a cozy sweater with a cute fluffy letter on it. This varsity sweater is really easy to make- so easy, it almost isn’t a DIY! Click f…

So, what do you think? Will you be slapping one of these bad boys on this fall? How would you style your sweatshirt? Let me know in the comments below!

DIY Polly Pocket Iron-On Tee

Ah, Polly Pocket. The choking hazards of our childhood. Something about the amazing little world they could create in such a small space was seriously enticing as a kid. I was more into Barbies, but I did have one Polly Pocket toy that I loved- Vintage Polly Pocket Waterpark Fun which had an awesome pull-out slide! I don’t know how much I really played with the Polly Pocket, but I know I did often open up the case and stare at its interior. Usually Polly was a “Barbie” for my Barbies, but that case had its own special place in my heart. 

To commemorate my love for Polly Pockets, I made these super cute printable iron-ons that you can put on pretty much anything you desire! Get your printer out and your iron ready- we’re making some tees!

To commemorate my love for Polly Pockets, inside and out, I made these super cute printable iron-ons that you can put on pretty much anything you desire! We’ve got 2 sizes (kid and adult) and 2 orientations (backwards and forwards) so that it works for everyone! I picked some of my favorite shapes including my turquoise flower, a heart (perfect for Valentines Day and Galentine’s Day!), a sea shell, a star, and a regular 'ole square that looks somewhat like an ordinary pocket. Get your printer out and your iron ready- we’re making some tees!

To commemorate my love for Polly Pockets, I made these super cute printable iron-ons that you can put on pretty much anything you desire! Get your printer out and your iron ready- we’re making some tees!

You will need:

Tees (here, here, here)
Sweatshirts (here, here)
Iron-on for dark fabrics (here)
Scissors (here)
Fabric marker with disappearing ink (here)
Iron
Parchment paper
Fun earrings to wear them with! (here)
Free printable (see below)

The printable is available in my resource library, which you can get totally FREE access to, just by signing up. What exactly do you get? Access to all my printables, including party planning guides, checklists, and my projects. By signing up, you'll have access to all projects- past, present and future! 


Directions

To commemorate my love for Polly Pockets, I made these super cute printable iron-ons that you can put on pretty much anything you desire! Get your printer out and your iron ready- we’re making some tees!
  1. Print out your Polly Pockets according to the instructions on your iron-on paper. I used the one for dark fabrics, and it worked perfectly on my white shirts too. It required printing the design the normal way. Often, light colored fabric iron-ons require it to be backwards. Just be sure to follow the instructions on your papers!

  2. Cut out each design, then trim off all the extra. The paper is white, so anything left over will show! I stayed as close to the edge as possible.

  3. Try on your shirt, and mark where you want your Polly Pocket to go. Remember that when you look in the mirror, everything is backwards ;)

  4. Put your shirt on a flat surface. Remove any hairs with a lint roller, and iron your shirt to be free of wrinkles.

  5. Peel the back off your Polly Pocket decal, and place it in the spot that you want. Cover with parchment paper

  6. Iron according to the instructions on your package. Mine said to iron for 40-60 seconds with a lot of pressure. Let cool completely.

To commemorate my love for Polly Pockets, I made these super cute printable iron-ons that you can put on pretty much anything you desire! Get your printer out and your iron ready- we’re making some tees!

The printable is available in my resource library, which you can get totally FREE access to, just by signing up. What exactly do you get? Access to all my printables, including party planning guides, checklists, and my projects. By signing up, you'll have access to all projects- past, present and future! 

To commemorate my love for Polly Pockets, I made these super cute printable iron-ons that you can put on pretty much anything you desire! Get your printer out and your iron ready- we’re making some tees!

PS- For anyone that missed my Instagram stories, I decided that I'll be "the ugly blogger", because trying to take photos where I am actually pretty proves to be a challenge for me. So, get ready to see some awkward pics like the one above. They're just so much more fun to take than fake laughing so that I look happy!

Sources: All Earrings, Seashell Cup, Diamond Ring, Heart Sunglasses Similar, Vintage Polly Pocket- Waterpark Fun

DIY Animal Sweater Necklace

Last month, I made some awesome Animal Sweater Ornaments for my pink mini-tree and I just couldn't bear to put them away! So, what's a girl to do? Re-purpose them into something that can be worn year-round! (or, at least, all winter long.) These animals in sweaters are so cute that everyone wants them. I only wore these twice and I had several questions about where I got them! They would also make a great gift for a winter or animal/dinosaur-themed party, or even as party favors! Overall, I think they're the freakin' cutest and they're so much fun to make!

These animals in sweaters are so cute that everyone wants them! They would make a great gift for a winter or animal/dinosaur-themed party, or even as party favors! Click for the DIY. #diyjewelry #handmadejewelry #diygifts

You will need:

Plastic animals (here and here)
Acrylic paint (here)
Felt (similar here)
Screw eyes (similar here)
Glitter (here)
Nylon cord (here)
Jump rings & clasps (similar here)
Beads (From Joann, like these but in pink & orange) 
Toothpicks
Gluegun
Jewelry tools (here)
Scissors (here)

Directions:

These animals in sweaters are so cute that everyone wants them! They would make a great gift for a winter or animal/dinosaur-themed party, or even as party favors! Click for the DIY. #diyjewelry #handmadejewelry #diygifts

1. Paint a sweater onto your animals using your acrylic paint. I did it freehand, but you can always use some artist's tape if you don't have a steady hand. I did 2 coats.

2. While they dry, cut a few thin strips of felt for the scarf. Try to be mindful of how large the animals' necks are in comparison to the length and width of the scarf.

3. Paint your scarves with either a thin paint brush or a toothpick. I used the pointy side for the polka dots, and the edge for stripes. I used a paintbrush for the thicker stripes, but overall I mostly used toothpicks.

4. Once the animals are dry, add glitter to the edge of the sweater to jazz it up and provide a clean edge. I used glitter paint, but you can achieve a similar look by using a small amount of equal parts glue and glitter to create your own paste/paint. I found that a toothpick was the perfect tool to get the glitter paint on in a thin line.

5. Glue your scarf in place. I used a small dab of hot glue on the scarf to shut it. If it moved around too much, I added a small dab of glue on the animal to secure it in place.

6. Using your pliers, screw the screw eye into place. I first took the pointy screw side and twisted in to make a small hole, then I used my pliers to twist the screw eye into place. When it gets to a point that it's mostly in, I recommend using your hand to twist it all the way in, so that your pliers don't scratch the paint.

These animals in sweaters are so cute that everyone wants them! They would make a great gift for a winter or animal/dinosaur-themed party, or even as party favors! Click for the DIY. #diyjewelry #handmadejewelry #diygifts

7. Cut your string the length you want it to be plus a little extra. Create a Larks Head Knot to secure the thread to your animal pendant. I also added a regular knot after, so that it stayed in place, nice and snug and secure :) 

8. Add your beads. I only wanted a few, so I did 3 neon pink and orange on each side. Be sure your bead hole is big enough for your string, and trim as you go along so that you have a nice, compact edge to thread the beads with. I found that mine got "fat" after a bead or two and needed to be trimmed off.

9. Attach your clasp to one crimp, and your jump ring to another crimp, and attach them to your cord. 

These animals in sweaters are so cute that everyone wants them! They would make a great gift for a winter or animal/dinosaur-themed party, or even as party favors! Click for the DIY. #diyjewelry #handmadejewelry #diygifts
These animals in sweaters are so cute that everyone wants them! They would make a great gift for a winter or animal/dinosaur-themed party, or even as party favors! Click for the DIY.
These animals in sweaters are so cute that everyone wants them! They would make a great gift for a winter or animal/dinosaur-themed party, or even as party favors! Click for the DIY. #diyjewelry #handmadejewelry #diygifts

How cute are these necklaces?! I'm so glad I get to re-use those ornaments and be able to see them daily! I really love re-purposing little animal toys, as exhibited by my Circus Animal Drink StirrersZebra Party Tray, and Animal Sweater Ornaments.  

So, what else would you like to see these animal toys made into? Let me know in the comments below!

DIY Animal Sweater Ornaments (Perfect for Mini-Trees!)

It's beginning to look a lot like Christmas! While I usually decorated in traditional red and green growing up, my dad got us a little 3-foot PINK tree one year. It was the cutest thing! We decorated it with a few small ornaments, and basked in its pretty pink glow. 

Although I don't think I could EVER get my husband to agree to a pink tree in our living room (unless I have 7 daughters, and we all take a vote!) I did get myself a tiny pink mini-tree for the attic. And this mini-tree needed some fun ornaments to go with it. I had stumbled upon this puppy ornament from Neiman Marcus while browsing Pinterest, and knew I needed to make my own version! A few days, 2 coats of paint, and some glitter later, I was ready with an army of festive little animals! The best part (aside from how adorably colorful they are) is that they're not breakable! Plus, you can make them in any color scheme you'd like. So, pop on a Christmas movie, grab your supplies, and get crafting!

You need these festive friends on your tree! The best part (aside from how adorably colorful they are) is that they're not breakable! Plus, you can make them in any color scheme you'd like. So, pop on a Christmas movie, grab your supplies, and get c…

You will need:

Plastic animals (here and here)
Acrylic paint (here)
Felt (similar here)
Screw eyes (similar here)
Glitter (here)
Toothpicks
Gluegun
Scissors
Pliers
Embroidery floss (similar here)

Directions:

You need these festive friends on your tree! The best part (aside from how adorably colorful they are) is that they're not breakable! Plus, you can make them in any color scheme you'd like. So, pop on a Christmas movie, grab your supplies, and get c…

1. Paint a sweater onto your animals using your acrylic paint. I did it freehand, but you can always use some artist's tape if you don't have a steady hand. I did 2 coats.

2. While they dry, cut a few thin strips of felt for the scarf. Try to be mindful of how large the animals' necks are in comparison to the length and width of the scarf.

3. Paint your scarves with either a thin paint brush or a toothpick. I used the pointy side for the polka dots, and the edge for stripes. I used a paintbrush for the thicker stripes, but overall I mostly used toothpicks.

4. Once the animals are dry, add glitter to the edge of the sweater to jazz it up and provide a clean edge. I used glitter paint, but you can achieve a similar look by using a small amount of equal parts glue and glitter to create your own paste/paint. I found that a toothpick was the perfect tool to get the glitter paint on in a thin line.

5. Glue your scarf in place. I used a small dab of hot glue on the scarf to shut it. If it moved around too much, I added a small dab of glue on the animal to secure it in place.

6. Using your pliers, screw the screw eye into place. I first took the pointy screw side and twisted in to make a small hole, then I used my pliers to twist the screw eye into place. When it gets to a point that it's mostly in, I recommend using your hand to twist it all the way in, so that your pliers don't scratch the paint.

7. Add a small piece of embroidery floss to hang.

You need these festive friends on your tree! The best part (aside from how adorably colorful they are) is that they're not breakable! Plus, you can make them in any color scheme you'd like. So, pop on a Christmas movie, grab your supplies, and get c…

Dinosaur ornaments!! I mean, how stinking cute are these?! I know that dinosaurs could never exist among the other animals, but maybe a sweater and a cute scarf could have saved them from extinction.

You need these festive friends on your tree! The best part (aside from how adorably colorful they are) is that they're not breakable! Plus, you can make them in any color scheme you'd like. So, pop on a Christmas movie, grab your supplies, and get c…

How cute are these ornaments?! This has become one of my favorite and most fun projects to make on the blog! I really love re-purposing little animal toys, as exhibited by my Circus Animal Drink Stirrers and Zebra Party Tray. You can also use larger toys for a regular-sized tree, but these were perfect for my tiny pink mini-tree! Oh, and did I mention that they make a great necklace? Because they do!

You need these festive friends on your tree! The best part (aside from how adorably colorful they are) is that they're not breakable! Plus, you can make them in any color scheme you'd like. So, pop on a Christmas movie, grab your supplies, and get c…

Will these ornaments be joining your tree this year? Or, perhaps your kids' tree?! Let me know what you plan to make in the comments below!