What I Wish I Knew About Breastfeeding (Plus Must-Have Items!)

Ok, this is a blog post I’ve been wanting to share for a LONG time, and I think it’s a really important one. My breastfeeding journey wasn’t exactly easy, but I made it happen so I definitely want to share my experience in the hopes that it will help another struggling mom out there. More importantly, I hope that any pregnant mamas out there (hey, boo!) get a realistic idea of what to expect and can therefore plan accordingly! Preparation is key and will really help out when the baby is here and is in constant need of our care.

Before Hailey was born, I decided that I wanted to breastfeed her. After all, “breast is best” and it’s natural, so how hard can it be right? Holy cow, was I in for a world of hurt. Breastfeeding was sooo tough! It was another challenge added on top of already being in pain, sleep deprived, and overwhelmed. As my friend so aptly put it “I feel like my boobs are failing me”. In the end, I stuck it out and I’m glad I did. A lot has changed since that first week that Hailey nursed and it’s gotten easier. But, there’s a lot that I wish I knew about breastfeeding when I first started that would have helped me get through it much easier.

*please remember that I am not a medical professional. This is all just my advice and opinion. Think of it more like girlfriends chatting over a piece of chocolate cake than medical advice :)

I’ve also added very handy Amazon ads at the bottom that take you directly to the items mentioned in each section. Amazon Prime to the rescue! These are affiliate links and I receive a commission if you purchase one of these items.

My breastfeeding journey wasn’t exactly easy, but I made it happen so I definitely want to share my experience in the hopes that it will help another struggling mom out there. More importantly, I hope that any pregnant mamas out there get a realisti…

Don’t give up

If you’re in those first few days (or heck, even weeks!) of breastfeeding and you’re ready to give up, don’t! I know that by day 4, I was ready to throw in the towel. I was tired, in pain, and dreading feeding time. When she would cry, I wanted to cry too! I didn’t like feeling that way about my baby, and I thought about how much easier it would be to just give up now and switch to formula. It wasn’t what I had imagined doing, but at that moment it felt like maybe that was the best option. But, I knew I’d kick myself later if I gave up so early, so I stuck it out. I already felt like I took the “easy way out” with the epidural and I didn’t want to have regrets about giving up breastfeeding. I’m so glad I stuck it out, because I love feeding time now!

When it comes to breastfeeding during those tough first days, I think the important thing is to try as hard as you can. I know that day 4 with baby “try as hard as you can” is a fraction of what we can usually accomplish. Those are some of the most trying times, with the physical pain and the sleep deprivation. But, I think that it’s important to just think of it like “one more feeding”, “one more minute”, “one more boob”. I started to spiral when I thought about “she does this 10 times a day” or “I need to feed her again in an hour” or “how do women do this for months and years?”. All that matters is this feeding, right here and now. The pain will get better. I promise!

I’ve got my must-haves in this post that helped me to survive breastfeeding, but I think a big part of it is the mental hurdle. You are doing amazing, mama. Keep going. Remember why you wanted to do this and know that things WILL get better! I promise!

Pain (usually) = Bad Latch

I thought pain was just a part of breastfeeding, and at first it kind of is. But, I also learned that if you’re in a lot of pain, baby probably has a bad latch! I had heard the nurses mentioning a bad latch, but I don’t remember ANYONE saying to me, “If the baby doesn’t latch properly, they’re basically just chomping on your nipple and it’s going to hurt like a biotch later.” I heard bad latch and thought, eh well she’s still eating so I guess it’s working. No no no! A good latch means less pain for you and less effort (plus more milk!) for baby. A bad latch means you’re gonna hate feeding time, your life, and the world.

A good latch is when baby is on your WHOLE nipple, not just the tip. Their mouth is open wide and in a C-shape. The way a baby eats (and the way a breast pump works too) is that the baby makes a few quick, strong sucks to get the milk flowing, then does slower sucks to drink the milk. Although it may hurt when they first get on (the quick strong sucks), the pain goes away after a few seconds (With the slower sucks). If you have pain the entire time that your baby is drinking, you may have a bad latch or some other issue. In this case, it’s best to see a lactation consultant. Helpful tip: my pediatrician’s office had one! When we took Hailey to her first appointment, I told them that I was having trouble with feeding the baby and it was hurting. They had me feed the baby and showed me the best way to do it. Although they were (trying) to show me at the hospital, it was really hard to get advice on something I had never done while the baby was more interested in sleeping than eating. After about 4 days of breastfeeding, it was nice to have the lactation consultant come in and give feedback about what I was doing right and wrong about feeding the baby. Your baby could have a bad latch, or be tongue tied, or any various issues that could be causing trouble. So in this case, it’s great to see a professional about it sooner rather than later.

My breastfeeding journey wasn’t exactly easy, but I made it happen so I definitely want to share my experience in the hopes that it will help another struggling mom out there. More importantly, I hope that any pregnant mamas out there get a realisti…

Pain Relief For Nursing Moms

Ok, now that we talked about why you might have pain, let’s talk about what you can do about it. There’s a good chance you’re still on some sort of painkillers (like Motrin or Tylenol) since other parts of you are probably hurting, but here are some specific treatments for your nipple pain.

Nipple Cream

At the hospital, they’ll probably give you a nipple cream and tell you to use it as much as possible. This cream is great because you don’t need to wash it off before you feed the baby. I found myself slathering a whole bunch on, then wiping it off with a moist paper towel before I fed Hailey. I didn’t really want her to have a mouthful of ointment with her milk- especially when she was feeding around the clock. Also, they told me at the hospital that it’s best to give your nipples some air. They recommended putting the cream on and going topless to let it absorb, instead of putting a shirt right over it. This helps with some of that tenderness, since you don’t have your rough shirt rubbing up on your already sore nipples. Plus that ointment is oily and it will stain your shirts. Don’t say you weren’t warned!

A similar cream to the one you get at the hospital is Lansinoh Lanolin Cream. This ointment comes from an extract found in a lamb’s wool, and it’s then treated so that it’s clean. If this concerns you, I recommend going for an organic version. This is going right into baby’s mouth, so you don’t want anything you’re unsure about. The Lansinoh is probably fine, but do whatever you’re comfortable with! I liked having a few tubes of it all around the house, so that I could slather it on whenever and wherever I needed it.

Gel Pads

I don’t know why this is a hidden secret, but these gel pads are a LIFESAVER when you’re breastfeeding! Seriously, I think I am going to give these to every new mama at their baby shower from now on. The way they work is simple. You peel off the protective layer and wear the pads in your bra, directly on your nipples. The gel is cool and soothing, and protects your nipple from your rough clothing. Plus, it keeps the nipple moist so it doesn’t dry out and crack, bleed, etc. You can also put these in the fridge for extra relief. I found that even having them at room temperature made them feel refreshing after a feeding. Without these pads, I don’t think I would have been able to continue breastfeeding. I mean that. They helped with relief when I needed it most, and they were so easy to use. I went from dreading feedings to being ok with them!

These gel pads last 1-3 days, depending on the brand, and you just need to rinse off the gel before feeding the baby. I did so with either some warm water or a moist paper towel. I was home most of the time, so it wasn’t really a big deal to need a water source. I tried both the Medela brand and the Lansinoh brand and preferred the Lansinoh Soothies for a few reasons. You need to rinse the Medela brand before applying them again and wait 2 mins, which means you need to have it laying around on the side of your sink or table which is kinda gross. Plus the protective backing doesn’t have an obvious front/back so you’re not even sure it’s on the clean side. Since both sides of the gel pad are clear, after a few uses it’s hard to tell which side has the gel. The Lansinoh brand had a fabric backing, which made it really easy to see which side goes on your nipple and which side goes against your clothing. Plus, the backing was obvious with which side the gel goes against, which kept it very sanitary. And, it was more cost-effective, since they last for 3 days instead of only 1.

Nipple Shields

I tried a nipple shield when I was in pain and it didn’t work for me, but maybe it’ll work for you! I tried it before my milk came in, and Hailey was so tiny that I think she had trouble pulling the colostrum out with it on. However, these nipple shields are great for reducing pain or helping with inverted nipples. Plus, I’d think that if your baby preferred the bottle nipple, maybe they’d be able to breastfeed with this on since it’s a similar material.

A Good Attitude

I think this is just about as important as the gel pads, in my opinion! If you dread breastfeeding, it’s going to be a miserable experience. Yes, it hurts and you’re tired and sometimes the last thing you want when you’re exhausted is the baby munching away on the thing that’s already hurting. But if you go into it upset or angry, that’s going to affect the experience. So try to think positively when going into a feeding. Easier said than done, right?

At first, I made up a cheer for when it came time to feed Hailey. It hurt like a mother and I didn’t want to do it, at all. So I would say to her, “Are you ready for the boobie? You want the boobie?! It’s boobie time! BOOBIE BOOBIE BOOBIE!” I would say this every time to get myself excited. Then, when she would wake me up at night and I was cranky, I would say hi to her sweetly. This would remind me of how much I loved her, so I became excited to see her and snuggle her, instead of being cranky and tired from being woken up. And finally, almost losing my milk made me realize that although bottle feeding was easier, I enjoyed having her so close to me and watching her eat from her boobie. She always looked so happy and I loved her little sounds as she tried to latch on. She was like a little animal, and with a bottle she just grabbed the nipple and drank. It was special bonding time for us, and I love that.

Pacifier

This is a controversial thing, but I found that sometimes Hailey was really cranky because she wanted something to suck on. This helped to bridge the gap between feedings, or keep her calm in the car or supermarket when I couldn’t feed her right away. I use these Philips Avent Soothies pacifiers because they’re supposed to be sized and shaped to baby’s mouth. They say that when a baby uses a pacifier it can reduce their risk of SIDS too.

Increasing Breastmilk Production

One of the most stressful parts about nursing is when you aren’t producing enough milk! There were several times when it seemed like I didn’t have enough to offer, so I used these methods to get the milk flowing.

Lactation Smoothie

A really easy and purposeful breakfast is a lactation smoothie. Sometimes it’s hard to make breakfast with a new baby that wants to be on you 24/7 so this smoothie is great for 3 reasons. 1. It’s easy to make. 2. It only requires one hand to consume. 3. It increases your supply like WHOA. It’s also really tasty. I made this chocolate version which was SO good, and also switched it up with this cinnamon one which reminds me of horchata!

Milkmakers Lactation Cookie Bites

I wouldn’t say my breast milk supply is completely dependent on a cookie but... it kinda is. On the days I don’t eat these cookies, or when I run out, I noticed a very big dip in my supply a day or two later. These cookies, aside from being necessary for my flow, are also a great snack or breakfast with some Mother’s Milk tea. If you prefer a homemade version, try this lactation cookie mix.

Mother's Milk Tea

This tea is easily found in supermarkets, which is great for stocking up! I enjoyed mine with some honey and milk. Full disclosure- after drinking this practically every day for a few months, I was totally sick of it. But for a while, it wasn't too bad! And, it's a really affordable option if you're on a tight budget.

Upspring Milkflow

This comes in lots of different flavors, like berry and chocolate! It's pretty tasty and easy to fit into your diet, so it makes a great option to add on with the others. I usually had it as a drink with my lunch or dinner. The chocolate one was also good as a “hot chocolate” in the winter months!

My breastfeeding journey wasn’t exactly easy, but I made it happen so I definitely want to share my experience in the hopes that it will help another struggling mom out there. More importantly, I hope that any pregnant mamas out there get a realisti…

Vitamins and Supplements for Nursing Moms

Prenatal Vitamins

Did you know you’re supposed to keep taking prenatal vitamins, even after the baby’s born? They can help with nursing and will help prevent you from losing nutrients that you’re (still) giving your baby. I liked these Nature’s Way vitamins because the chewables don’t make me nauseous and they aren’t chalky. Plus, they don’t contain gelatin!

Fenugreek Capsules

These Upspring Milkflow Max capsules help your supple when it’s dipping low. Fenugreek really helps to up breastmilk production, though an interesting side effect of it is that it makes you kinda smell like maple syrup! My husband didn’t notice it, but I did and it was pretty strange. Nonetheless, these will help boost your supply when it’s getting low!

*note: Fenugreek can make babies gassy, or have loose or green stools if you take too much of it. My baby was ok but a friend’s baby had those symptoms. Use your own discretion when using it! Or, try starting with a small dose like 1 tea or drink per day then adding the supplement as needed.

Legendary Milk’s Liquid Gold

I started taking these supplements when my supply REALLY dipped (around 5 or 6 months) and none of the usual stuff was working. It turned out to be my period coming back that dipped my supply, but taking these pills helped me get it back again! The good thing about these is that they don't contain Fenugreek!

Lactation Supplement Liquid

This stuff doesn’t taste very good, but it’s effective! I would take one dropper per day and it would really help to increase my production when nothing else would work. After a while you have to switch it up! Somehow your boobs catch on to what you’re doing, and you supply can still dip from time to time. This liquid really helped during that time.

Pumping Advice

A Convenient Breast Pump

If you're breastfeeding, you're going to need a good breast pump! It's handy for when you have extra milk that the baby didn't eat, when you have a drink and need to pump because you can't feed the baby, or when you need to increase your supply (more on that below). I use the Spectra S1, which is lightweight, has a rechargeable battery, and lots of customizable settings. Your insurance company will most likely provide you with a free breast pump so I'd look into that before purchasing one!

Hands Free Pumping Bra

If you're going to be pumping, you're going to want a hands free bra! I found it helpful to wear this bra and pump while I did dishes or washed the baby's bottles. Or, I could get a little bit of work done on the blog while I pumped. I don't pump totally hands free though- I found that kinda milking myself (hah!) helped me to get more milk and reduce the time it took me to pump. So, I'd usually let the pump do the work for about 10 minutes and then squeeze and massage more milk out until they were empty.

Pumped Milk Storage

Once my milk was expressed, I needed somewhere to store it! I used these bags to store my milk in the freezer and labeled them with sharpies. Then, I stored them in these clear freezer bins so that they didn’t get lost in the wide abyss of my fridge. I usually stored a bottle or two in the fridge (in my regular bottles) and used these handy reusable bottle labels to indicate when they were from. This got really helpful once I had more milk than I could use up within one day.

Keeping Track of Feedings/Pumping

At the hospital, they’ll probably ask you to keep track of when and how much your baby is eating. You’ll definitely want to keep this up after you get home, since it can get SO confusing. My sweet friend created this amazing journal called The Everyday Mother that keeps track of feedings, milestones, and so much more. This will serve as both a record-keeping notebook and a memory book! She created it after her baby was in the NICU and she had to keep track of feedings and wanted to figure out a better way. She has so many cover colors and styles, and even limited edition artist covers! You can find everything over at her website The Everyday Mother.
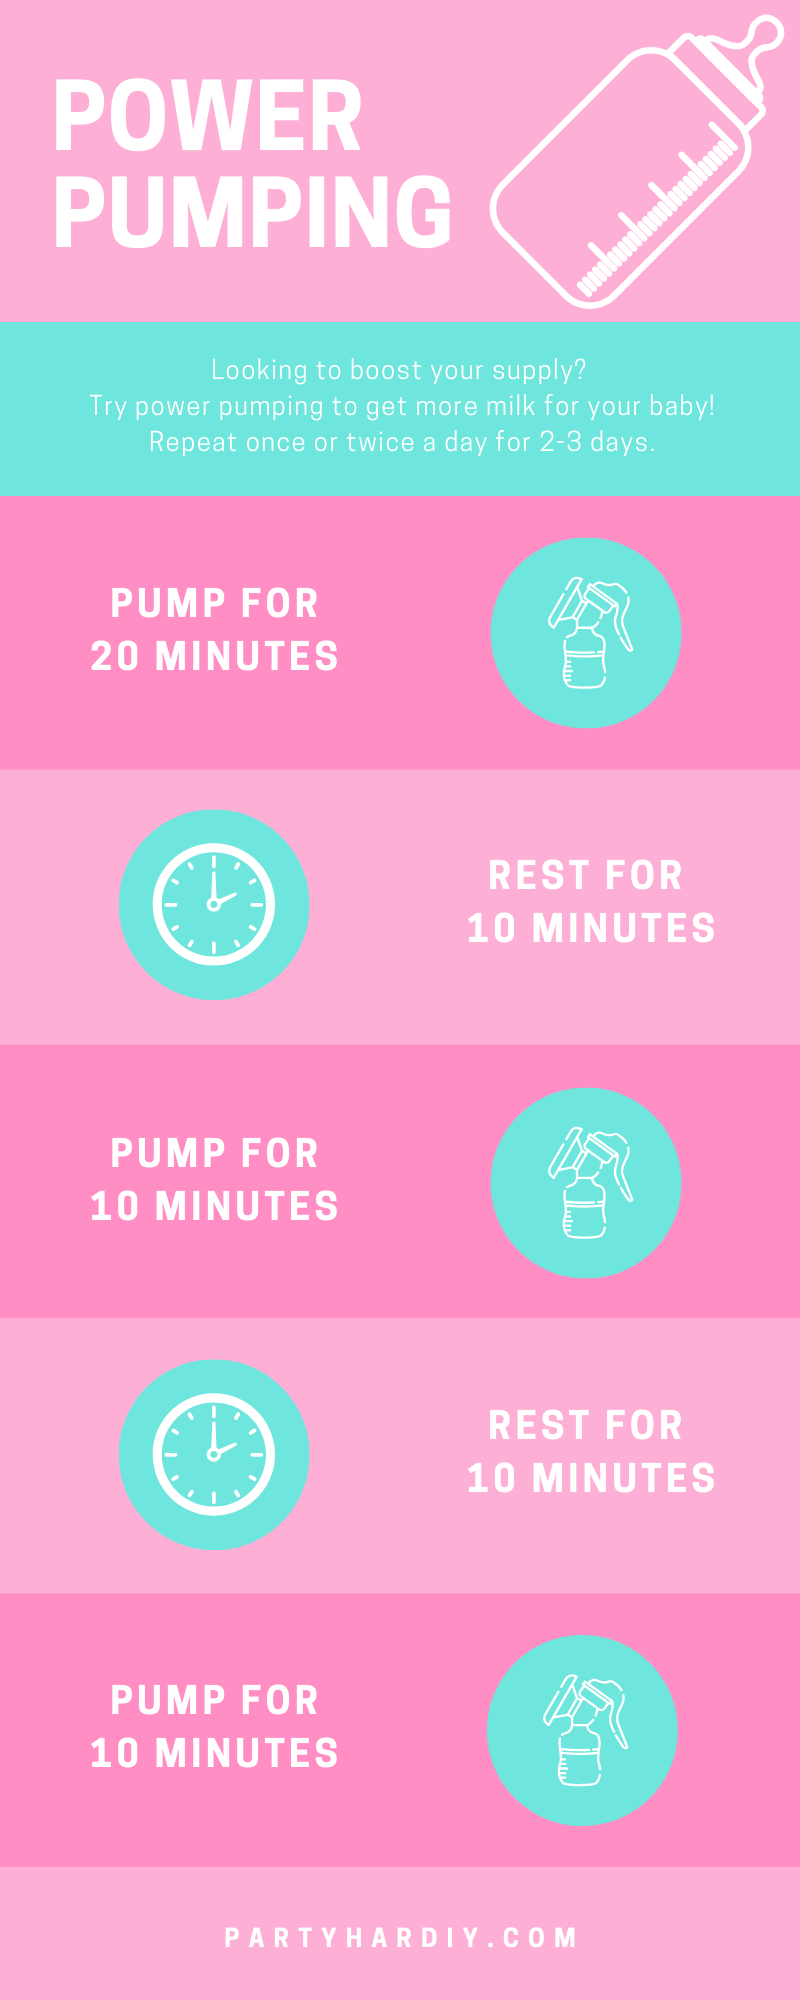
Power Pump Sessions

When my supply was especially low, I would do a power pump to increase my supply. This is quite easy to do, although very tedious. I’ve created a graphic below so you can try it out too! Don’t forget to pin it on Pinterest so that you can have it saved forever :) I usually did this after my morning feeding, when I usually had leftover milk and had to pump anyway.

Looking to increase your breastmilk supply? Try a power pump session! It only takes an hour and helps A LOT. Plus, learn what foods and supplements I used to increase my supply- fast! Don’t forget to pin it on Pinterest so that you can have it saved…

Other Stuff That Helps

Nursing Bras

By now, you’re probably wearing nursing bras and have been through most of your pregnancy. I thought I’d share the ones I liked from when I was pregnant, which is these. I love that they have a spot for your nursing pads if you need them and they’re super soft and comfortable!

Nursing Shirts

I bought a set of these nursing tank tops and they were a miracle during the first few weeks of nursing! I still wear them to this day, and they’re one of my favorites. They also have a pocket inside so you can pop in a nursing pad. Additionally, the inside layer helped to absorb the excess nipple cream instead of having it seep through the front of my shirt.

Boppy Pillow

If you don’t have a boppy pillow, get one! It was essential for nursing during those first few weeks so that I could make sure Hailey got a good latch and it prevented my arm from getting tired. She loved it, using it to lounge, do tummy time and it even helped her to poop! I also recommend purchasing the waterproof liner and an extra cover, because they do tend to spit up on them!

Nursing Cover

I'm not really comfortable whipping a boob out in public, so I got this nursing cover which also doubles as a carrier cover. It's really cute and lightweight, and folds up nice and small. My friend has this scarf cover which has a piece of wire and a clear mesh so you can see the baby, which is helpful since the one I have requires me to stick my head in the hole under the cover to see what's happening.

Burp Cloths

Surprisingly, we didn't get nearly enough burp cloths at the baby shower, so I ordered some myself. The other ones I have kinda suck, and these are always my favorites to grab. They don't have a fun pattern, but they can be used for hours even after a baby spits up on them more than once. We really loved these!

Phew! Ok, I know that’s a lot but I wanted to be as helpful and up front as possible. Those first few weeks of breastfeeding are HARD but they are so worth it. I promise it gets easier mama! If you need to supplement with formula, that’s ok. Hailey had about one bottle per day of formula (we used Enfamil Gentlease), and sometimes she needed more and other times she didn’t need any. I think that it’s important to continue nursing, even if you need to supplement with formula. It has so many health benefits, for both the baby and for you. I helps you lose that pregnancy weight and helps your uterus shrink down. It’s also known to reduce your risk for cancer! Overall, it’s great if you can do it and once you stop, you can’t really turn back. So keep pushing through mama. You’re amazing and your baby is lucky to have you!

If you need support, please reach out to your baby’s pediatrician, your OB, or a lactation consultant. There are also tons of FB groups out there for nursing moms and your hospital may even have a local support group that meets up once a week! Either way, you don’t need to go through this alone.

Mess-Free Baby Painting (Perfect Baby Gift!)

Get ready for the easiest gift your baby can make. It’s absolutely perfect- minimal mess, beloved by all, and your baby is HAPPY to do it. In fact, depending on their age, they won’t even know they’re doing anything at all! Let’s backtrack a little bit. Wayyyyy back in February, I needed a Valentine’s Day gift idea for my husband. I wanted it to be something from the baby, and something that he would cherish for years to come. Plus, I knew it had to be simple because we had JUST gotten our puppy, and Hailey was only 4.5 months old. I was overwhelmed but I wanted to make something special for my husband. That’s how this gift came about! I’ve seen lots of these painting projects on Pinterest, but never one with a baby as young as Hailey was! And that’s why I added the extra element of putting it on the floor (in a trash bag!) and letting her jump and leap on it in her bouncer. It’s so easy to do that you’ll be buying paint and canvases by the truckload. I promise!

*This post contains affiliate links

Looking for a gift that your baby can make? Check out how to create this mess-free painting that your little one can make using their hands, feet, or their bouncer! It’s the perfect mother’s day gift too! Click to see how easy it is. #babysensorypla…

You will need:

Canvas panels 11x14 (here)
Paints (similar here)
Glad Press’n Seal (here)
Large clear trash bag (here)
Newspapers/fliers
Photo Frame (similar here)

Directions:

Measure and cut your Press’n Seal to size. I ended up using two long sheets since it wasn’t wide enough to do one long one. You want to have enough overlap so that paint doesn’t ooze out anywhere! I used the Press’n Seal instead of regular saran wrap because it stuck to the canvas nicely and it wasn’t a total mess to unwrap from the roll. Usually saran wrap seems to get all tangled up- this made it easy, AND the seams stuck together nicely!

Looking for a gift that your baby can make? Check out how to create this mess-free painting that your little one can make using their hands, feet, or their bouncer! It’s the perfect mother’s day gift too! Click to see how easy it is. #babysensorypla…

Add your paint around the canvas in little globs. Don’t use too much paint or it’ll take forever to dry. Try to use a nice mix of colors that blend well. You can also use metallic paints for added dimension and shine.

Looking for a gift that your baby can make? Check out how to create this mess-free painting that your little one can make using their hands, feet, or their bouncer! It’s the perfect mother’s day gift too! Click to see how easy it is. #babysensorypla…

Carefully place the saran wrap over the canvas and seal it closed. For this step, you want to make sure that you don’t smush it shut, but just gently fold the saran wrap and seal the edges as tight as you can. Remember, we want the baby to create the art- not you!

Looking for a gift that your baby can make? Check out how to create this mess-free painting that your little one can make using their hands, feet, or their bouncer! It’s the perfect mother’s day gift too! Click to see how easy it is. #babysensorypla…

Ta-da! See? The artwork is fully intact after I sealed it in the Press’n Seal. That leaves the smushing to Hailey.

Looking for a gift that your baby can make? Check out how to create this mess-free painting that your little one can make using their hands, feet, or their bouncer! It’s the perfect mother’s day gift too! Click to see how easy it is. #babysensorypla…

Now for the very last “prep step”- place the saran wrapped canvas into a large clear trash bag. A black bag would work in a pinch, but with clear you can see whats happening. If it’s a larger bag like mine was, you can fold it over for added protection and, mostly, to get it out of your way.

Looking for a gift that your baby can make? Check out how to create this mess-free painting that your little one can make using their hands, feet, or their bouncer! It’s the perfect mother’s day gift too! Click to see how easy it is. #babysensorypla…

Place the canvas under baby and let him/her jump around, crawl, or play like usual. Guide the canvas around so that all parts of it get spread out. I used the bouncer which ensured that worst case, only her feet would get dirty. Luckily nothing got dirty :) When it got down to the very end, I spread the excess paint into the bare corners of the canvas so that it would go all the way to the edges. This also helps to avoid giant globs of paint next to bald spots!

Looking for a gift that your baby can make? Check out how to create this mess-free painting that your little one can make using their hands, feet, or their bouncer! It’s the perfect mother’s day gift too! Click to see how easy it is. #babysensorypla…

Take the canvas out of the trash bag, and unwrap it carefully. I recommend having a trash bag handy to toss out the Press’n Seal, because it’ll be covered in paint and so will your hands. This is the messiest part of the entire project- well, the only messy part of this project! Don’t say I didn’t warn ya ;) There are no pictures of this step for obvious reasons.

Lay the canvas on the newspapers to dry. If your paint was thick it may take a few hours or even a day, so you’ll want to make this gift ahead of time. If you need it the same day, just use less paint (a lot less!) which will dry faster. But, to make this canvas a true work of art I highly recommend making it about 2 days before and this way it’ll be perfect- and dry!

I gave this gift to my mom and my MIL for mother’s day and they LOVED it!

Looking for a gift that your baby can make? Check out how to create this mess-free painting that your little one can make using their hands, feet, or their bouncer! It’s the perfect mother’s day gift too! Click to see how easy it is. #babysensorypla…

The gift recipient is sure to love this gift that came directly from your little one! It’s such a great keepsake for moms, dads, grandmas, aunties… everyone! Seriously, everyone will want one of these for their home. It’s truly the greatest gift a baby can give, besides just being their awesome, poopy self!

Hailey's 5 & 6 Months Updates

Time has flown by (again!) and I missed an update so here’s a 2 in 1 for ya ;) A lot has happened in the past few months and overall Hailey is a much more alert, vibrant baby than she was before! Let’s see what happened, shall we? 

Lexie Baby 9.jpg

Got a Puppy

Perhaps the biggest thing that happened in the last 2 months is that we got a puppy! Lexie joined our family and it’s been madness ever since. But, she and Hailey LOVE each other so it makes it worth it. I’ve got a post about having a puppy AND a baby coming soon, so let me know any specific questions you have about it! It’s funny though, because a few days before we adopted Lexie, we saw another puppy that was a small poodle mix. As soon as Hailey saw me with the puppy, she started to cry! Luckily she got over it really quickly and soon enough she was loving Lexie. 

Hailey 5 Mos-2.jpg

Touch your Toes

At 5 months, Hailey started holding her feet and toes which made changing her much easier! Eventually she started eating her toes too, which was pretty funny to watch. She could basically be found with a foot in her mouth at all times!

Hailey 5 Mos-4.jpg

Rolling over in secret

This kid- mind of her own I tell ya! John and I would lay her down to try and encourage her to roll over. She came close but never really did it. Then a few times that we left her laying on her back and moved away (like on her play mat in her room and went to grab something, or in her crib) she’d secretly roll over on her own! Now she won’t stop rolling at all. On the floor, your lap, the changing pad... this little lady’s flipping over all day long!

Hailey 5 Mos-19.jpg

Crib

We transitioned Hailey into her crib and I mayyyy have cried. We tried to have her sleep in her room but she kept waking up, so we brought her back into our room where she stayed for 2 months! After she started rolling over, she insisted on sleeping on her tummy but then she couldn’t turn back and would cry to get turned.

6 months

Loves tummy time

In an interesting turn of events, Hailey now loves being on her tummy! She’s always flopping over from her back to her tummy so that she can play with stuff. She also loves being laid down on her tummy and looking around the room or trying to move around. She hast quite mastered it yet, but she’s determined!

(Sorta) Sitting up

Hailey’s starting to get the hang of sitting up, but she doesn’t want to do it on her own. She prefers to flip over onto her tummy instead! It’s frustrating because at 3 or 4 months old she was starting to sit up, but then she completed regressed once we got the puppy!

Haileys 6 Months-19.jpg

Playing with the pets

Hailey’s favorite pastime is playing with Lexie. Which is great, because Lexie loves her too! They spend the day making out (I try to separate them but it’s so difficult), and Hailey loves to stick her hand in the puppy’s mouth to get nibbled. If Lexie’s sleeping, Hailey will touch her paws and call to her. It’s the cutest thing. She’s not very gentle but Lexie doesn’t mind at all! I had Hailey and Lexie laying next to each other and Hailey was excited and kicking Lexie in the ribs and face. I made Lexie move to the other side of me so she was safe. She laid down for a minute and decided she wanted to be near Hailey, kicks and all! Hailey’s also trying to get attention from the cats but they’re not quite as interested as Lexie is. Well, except that one time.

Haileys 6 Months-22.jpg

Waking Up Again

Well, I guess the honeymoon had to end sometime. Hailey went from sleeping 12-14 hours in her bassinet to waking up at night in her crib. I had hoped she was just crying because it was new, but she ended up waking up once or sometimes twice a night. It’s made this momma tired! It doesn’t help that it’s also totally random. Some nights she wakes up at 2-4 am hungry. Other nights it’s 4-6:30 am. She usually has a quick snack and goes back to bed so I can’t complain too much!

Haileys 6 Months-33.jpg

Mirror games

Hailey loves to look at herself in the mirror! We like to play “who’s that baby?” I take her over to a mirror and point her out and she gives me a big smile. She also loves selfie mode and it’s resulted in lots of fun smiling pictures of us for daddy while he’s at work. She also loves when I dance with her in front of a mirror!  I either put on a Pandora station, or sing my rendition of “who’s that lady” by the Isley brothers. And it goes “who’s that baby? (Who’s that baby?) Cutesy baby (who’s that baby?). She loves it!

Haileys 6 Months-14.jpg

Singing

Hailey’s been singing a lot more lately and making a ton of noises. She has a wider range of sounds and loves trying to go high pitch and shouting. Then, she looks around for our reactions to make sure we are paying attention to her. It’s really cute!

Haileys 6 Months-23.jpg

I can’t believe how quickly she’s growing. I know I say that every month, but wow is it flying by! She’s becoming such an amazing little person.

Tummy Time Fun (for less than $25!)

Hailey’s been rolling over (a lot) and she seems to be on her tummy a lot more lately! It’s really adorable to watch her do it, but also a little scary when I turn around for a second and all of a sudden she’s flipped on her tummy on the floor, her changing pad, in the crib… I’ve definitely got to keep my eyes on her! Since tummy time is really important for her development, I decided to make tummy time as fun as possible. I wanted a fun toy for her that allowed her to play and explore instead of just staring around and eventually crying. And, since I’m not working right now I needed something that didn’t break the bank.

*This post contains affiliate links

Make tummy time more fun for baby with this water toy! It’s a great baby shower gift idea and perfect for playing with baby. Click to learn more about this baby list must-have item! #tummytime #tummytimeproducts #bestbabyproducts

I went onto Amazon and found this tummy time water mat and knew I had to give it a try. The mat comes folded up, and you fill it yourself with air and water. This means it’s really compact when it’s not in use, and for only $22 you can’t go wrong! There are a few more affordable options (see below) but I picked this one because it seemed like a good size and had good reviews. I didn’t want it leaking water everywhere! 

Make tummy time more fun for baby with this water toy! It’s a great baby shower gift idea and perfect for playing with baby. Click to learn more about this baby list must-have item! #tummytime #tummytimeproducts #bestbabyproducts

A lot of the reviews complain about a smell, but in the words of my husband “it pretty much smells like a beach ball would”. You could definitely air it out if you wanted to, but I didn’t feel it was overpowering or anything. Plus, the baby didn’t seem affected. That being said, the smell was much stronger when we closed it in our baby’s room, so I’d recommend storing it somewhere else.

Make tummy time more fun for baby with this water toy! It’s a great baby shower gift idea and perfect for playing with baby. Click to learn more about this baby list must-have item! #tummytime #tummytimeproducts #bestbabyproducts

As for storage, I keep it filled since I’ve been using it everyday. I’m nervous to leave it on the floor unattended (if it leaks that’s a LOT of water!) so I’ve been storing it in the bathtub when not in use- works perfectly for keeping it clean and safe from my 3 cats and new puppy.

Make tummy time more fun for baby with this water toy! It’s a great baby shower gift idea and perfect for playing with baby. Click to learn more about this baby list must-have item! #tummytime #tummytimeproducts #bestbabyproducts

Hailey’s still getting the hang of it, but she seems to love when I press down and the water sloshes around so the little foam sea animals “swim” across the water. She’s been very observant lately, so she loves studying all the different colors and images on the mat. It’s also comfy for lounging apparently, because she always takes a rest on it. And another added bonus is that tummy time often leads to lots of saliva and spitting up, and with this mat it just gets wiped right off! One less thing to launder is a win in my book. I use these baby-safe wipes to clean it off before and after use :)

Make tummy time more fun for baby with this water toy! It’s a great baby shower gift idea and perfect for playing with baby. Click to learn more about this baby list must-have item! #tummytime #tummytimeproducts #bestbabyproducts

As mentioned above, I got this mat because of the good reviews and larger size. They also have a pastel version for under $12, a round one for less than $10 and a mini one for less than $6, which is perfect for small apartments or those that don’t have a lot of space! I was soooo close to buying the pretty pastel one but I opted for the larger size and better reviews with the one I ended up getting.

No matter which mat you get, baby is sure to love playing around and watching the little items move inside the water. Grab one today to start your tummy time fun!

Just a Wee Bit Irish Free Printable Iron-On

Happy St. Patrick’s Day! As the queen of the last minute blog post (seriously… it’s March 17!) I decided to make the easiest St. Patrick’s Day craft out there. A free printable where all you need is iron-on paper and a onesie or t-shirt! I’ve had this idea for a month but I was just finally able to work on it this weekend. Since Hailey is just a wee bit Irish (12.5%, to be precise!) I thought it would be really fun to make her this onesie! And since I'm generous, I'm sharing the printable with you totally for free! Also… I feel really foolish for having to use iron-on paper for dark fabrics YET AGAIN. I totally didn’t learn my lesson from Halloween but I’m going to order a new set for white fabrics, stat! Also, can we talk about how tiny newborn Hailey was. I’m not crying, you’re crying.

Looking for an easy St. Patrick’s Day craft for your baby or toddler? How about a free St. Patrick’s Day printable?! Get your for free now! #stpatricksday #freeprintable #ironon

You will need:

White onesies (here)
Iron-on paper (here)
Iron
Printer (I have this one and love it!)
Free Printable

The printable is available in my resource library, which you can get totally FREE access to, just by signing up. What exactly do you get? Access to all my printables, including party planning guides, checklists, and my projects. By signing up, you'll have access to all projects- past, present and future! 

Looking for an easy St. Patrick’s Day craft for your baby or toddler? How about a free St. Patrick’s Day printable?! Get your for free now! #stpatricksday #freeprintable #ironon

Isn’t she sooo stinkin’ cute in this little outfit?! If you want to create this super easy onesie for your little baby, get the free printable and get crackin’!

I’ll also add for a second time… your printable won’t have this white border if you get the right iron-on paper! You want to use one for light-colored fabrics.

The printable is available in my resource library, which you can get totally FREE access to, just by signing up. What exactly do you get? Access to all my printables, including party planning guides, checklists, and my projects. By signing up, you'll have access to all projects- past, present and future!