Mess-Free Baby Painting (Perfect Baby Gift!)

Get ready for the easiest gift your baby can make. It’s absolutely perfect- minimal mess, beloved by all, and your baby is HAPPY to do it. In fact, depending on their age, they won’t even know they’re doing anything at all! Let’s backtrack a little bit. Wayyyyy back in February, I needed a Valentine’s Day gift idea for my husband. I wanted it to be something from the baby, and something that he would cherish for years to come. Plus, I knew it had to be simple because we had JUST gotten our puppy, and Hailey was only 4.5 months old. I was overwhelmed but I wanted to make something special for my husband. That’s how this gift came about! I’ve seen lots of these painting projects on Pinterest, but never one with a baby as young as Hailey was! And that’s why I added the extra element of putting it on the floor (in a trash bag!) and letting her jump and leap on it in her bouncer. It’s so easy to do that you’ll be buying paint and canvases by the truckload. I promise!

*This post contains affiliate links

Looking for a gift that your baby can make? Check out how to create this mess-free painting that your little one can make using their hands, feet, or their bouncer! It’s the perfect mother’s day gift too! Click to see how easy it is. #babysensorypla…

You will need:

Canvas panels 11x14 (here)
Paints (similar here)
Glad Press’n Seal (here)
Large clear trash bag (here)
Newspapers/fliers
Photo Frame (similar here)

Directions:

Measure and cut your Press’n Seal to size. I ended up using two long sheets since it wasn’t wide enough to do one long one. You want to have enough overlap so that paint doesn’t ooze out anywhere! I used the Press’n Seal instead of regular saran wrap because it stuck to the canvas nicely and it wasn’t a total mess to unwrap from the roll. Usually saran wrap seems to get all tangled up- this made it easy, AND the seams stuck together nicely!

Looking for a gift that your baby can make? Check out how to create this mess-free painting that your little one can make using their hands, feet, or their bouncer! It’s the perfect mother’s day gift too! Click to see how easy it is. #babysensorypla…

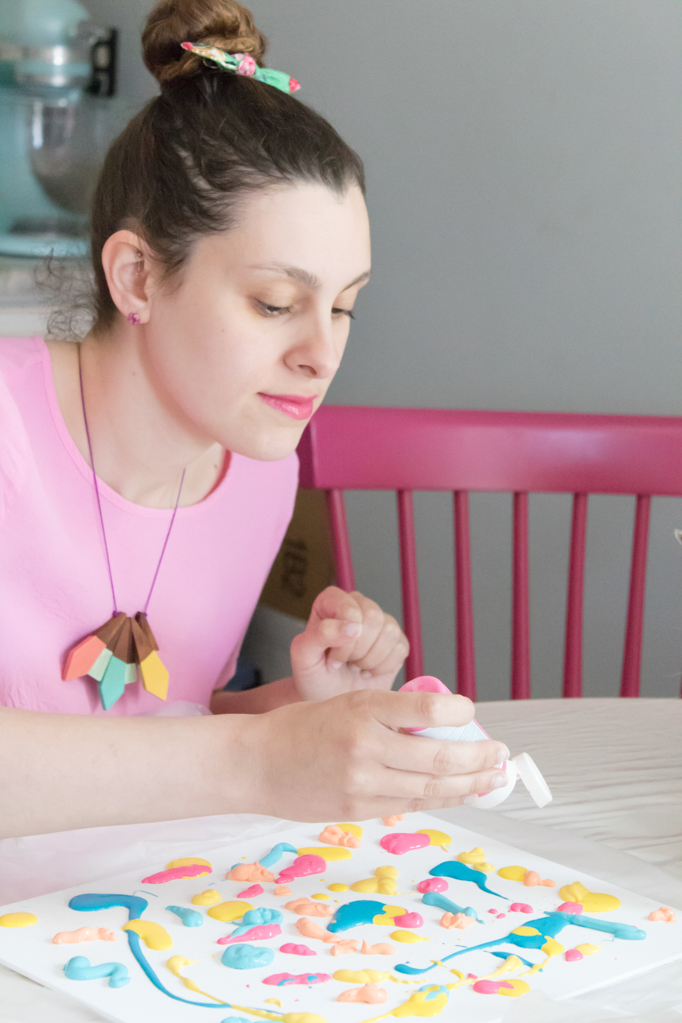
Add your paint around the canvas in little globs. Don’t use too much paint or it’ll take forever to dry. Try to use a nice mix of colors that blend well. You can also use metallic paints for added dimension and shine.

Looking for a gift that your baby can make? Check out how to create this mess-free painting that your little one can make using their hands, feet, or their bouncer! It’s the perfect mother’s day gift too! Click to see how easy it is. #babysensorypla…

Carefully place the saran wrap over the canvas and seal it closed. For this step, you want to make sure that you don’t smush it shut, but just gently fold the saran wrap and seal the edges as tight as you can. Remember, we want the baby to create the art- not you!

Looking for a gift that your baby can make? Check out how to create this mess-free painting that your little one can make using their hands, feet, or their bouncer! It’s the perfect mother’s day gift too! Click to see how easy it is. #babysensorypla…

Ta-da! See? The artwork is fully intact after I sealed it in the Press’n Seal. That leaves the smushing to Hailey.

Looking for a gift that your baby can make? Check out how to create this mess-free painting that your little one can make using their hands, feet, or their bouncer! It’s the perfect mother’s day gift too! Click to see how easy it is. #babysensorypla…

Now for the very last “prep step”- place the saran wrapped canvas into a large clear trash bag. A black bag would work in a pinch, but with clear you can see whats happening. If it’s a larger bag like mine was, you can fold it over for added protection and, mostly, to get it out of your way.

Looking for a gift that your baby can make? Check out how to create this mess-free painting that your little one can make using their hands, feet, or their bouncer! It’s the perfect mother’s day gift too! Click to see how easy it is. #babysensorypla…

Place the canvas under baby and let him/her jump around, crawl, or play like usual. Guide the canvas around so that all parts of it get spread out. I used the bouncer which ensured that worst case, only her feet would get dirty. Luckily nothing got dirty :) When it got down to the very end, I spread the excess paint into the bare corners of the canvas so that it would go all the way to the edges. This also helps to avoid giant globs of paint next to bald spots!

Looking for a gift that your baby can make? Check out how to create this mess-free painting that your little one can make using their hands, feet, or their bouncer! It’s the perfect mother’s day gift too! Click to see how easy it is. #babysensorypla…

Take the canvas out of the trash bag, and unwrap it carefully. I recommend having a trash bag handy to toss out the Press’n Seal, because it’ll be covered in paint and so will your hands. This is the messiest part of the entire project- well, the only messy part of this project! Don’t say I didn’t warn ya ;) There are no pictures of this step for obvious reasons.

Lay the canvas on the newspapers to dry. If your paint was thick it may take a few hours or even a day, so you’ll want to make this gift ahead of time. If you need it the same day, just use less paint (a lot less!) which will dry faster. But, to make this canvas a true work of art I highly recommend making it about 2 days before and this way it’ll be perfect- and dry!

I gave this gift to my mom and my MIL for mother’s day and they LOVED it!

Looking for a gift that your baby can make? Check out how to create this mess-free painting that your little one can make using their hands, feet, or their bouncer! It’s the perfect mother’s day gift too! Click to see how easy it is. #babysensorypla…

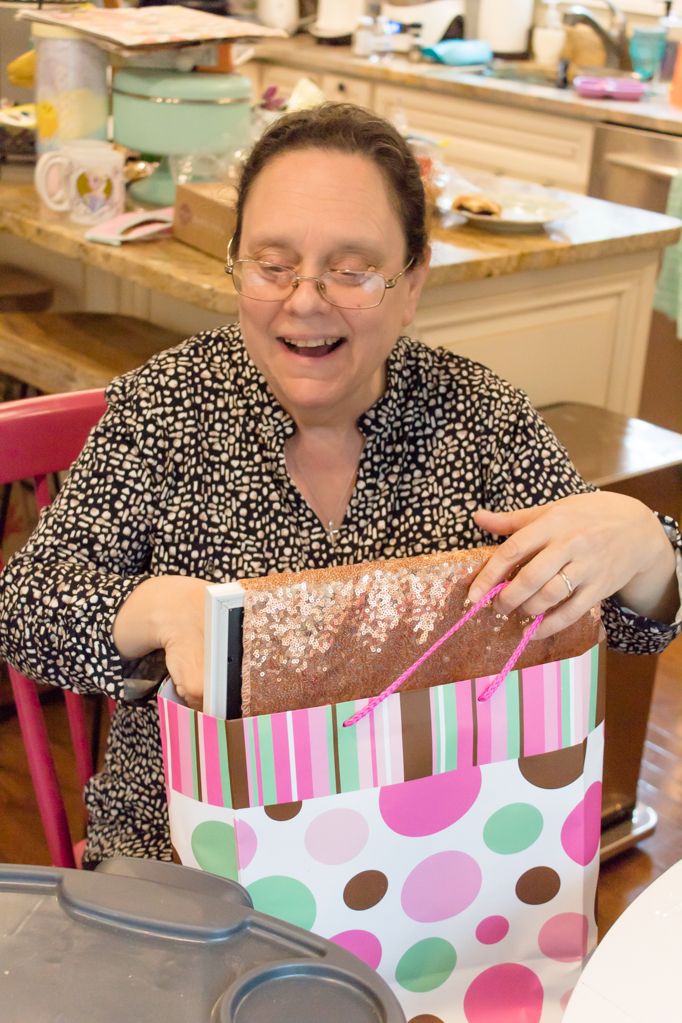
The gift recipient is sure to love this gift that came directly from your little one! It’s such a great keepsake for moms, dads, grandmas, aunties… everyone! Seriously, everyone will want one of these for their home. It’s truly the greatest gift a baby can give, besides just being their awesome, poopy self!

Hailey’s Happy Half- A Confetti Carnival Half Birthday Party

On March 28, Hailey officially became 6 months old! I truly cannot believe how quickly time flew by, but it’s true! I love a good party (surprise surprise!) so I decided to throw Hailey a small (but adorable) half birthday party to mark the occasion. I knew the party had to be cheap, because our budget is a little tight these days. I also knew it had to be simple so my husband wouldn’t get annoyed at me for having an unnecessary party. And I knew it had to be cute, because IT’S ME and I wouldn’t have it any other way. The result was an adorable little party on a budget that any mom can throw for their baby!

Hailey-Half-Party-18.jpg

Picking a Half Birthday Party Theme 

The first thing I had to do was pick a theme for the party. I was a bit stumped at first, but I knew I wanted something colorful and maybe with confetti. I browsed Pinterest for ideas, then I looked up the silly holidays and found that March 28 is food on a stick day. My mind instantly went to carnival food like corn dogs, and that’s how the confetti carnival theme came about! I created a mood board for the party (more on that coming to the blog soon!) and I began planning my purchases and menu. 

One of my goals for this party was to not generate a ton of trash afterwards. So, I purchased reusable supplies like the honeycombs instead of balloons. I decided not to use cute patterned paper/plastic plates because we had enough everyday plates for the guests. I also used our turquoise footed glass goblets that we never get to use with company and regular silverware. The only plates I got where these half circle plates because they just fit with the theme wayyyy too well, and I knew there was no way I’d find that affordably for a reusable set. I skipped paper straws altogether because no one really uses them anyway. 

Hailey-Half-Party-2.jpg

Carnival Party Crafts 

The good news is that all the fun DIYs that I did will be coming to the blog soon! I wanted to get this party post up before Hailey turned 9 months (or 9 years!) old. Like I said, I kept it simple and only did a few diy projects. I made Hailey a crown to wear with a 1/2 on it which at first seemed a little big but looked pretty cute overall. She wore it comfortably for most of the party! Then, I made a 1/2 cake topper. I had big plans for it with hanging ribbons but it looked funny, and 9pm the night before means you just gotta move on. I kept it simple with just glitter paper and a skewer stick. And lastly, I really wanted to display the photos I’ve been taking of Hailey each month so I made some picture holders! I picked my favorite photo from each month plus one from when she was first born.  It was really amazing being able to capture her growth each month because I can’t believe how big she’s gotten already and it hasn’t even been a year yet! I think I’m going to look back at these with such appreciation.

Psst- I made a baby photography course so that you can learn how to take better baby photos too! Learn more about Dreamy Baby Photography here.

Hailey-Half-Party-16.jpg
Hailey-Half-Party-47.jpg
Hailey-Half-Party-22.jpg

Carnival Party Decor

I knew I wanted to make a tent (even though it’s more circus than carnival) so I raided my fabric stash and found some tulle that I had bought for my veil, but it was too narrow. I would have preferred something bolder but hey, sometimes you just gotta move on! I also knew I wanted to have balloon animals, so I used these figures I had and put them around the house. Finally, I wanted to add some pizzazz to the party area so I purchased a set of tassel garlands and a pack of honeycombs and lanterns. I made some of the garland tassels thicker and some thinner (2 pieces of tissue paper vs 4) so I was able to make a ton of tassels and hang them up around the party area. I also used the tassels and the honeycombs to decorate the tent and give it more of a carnival feel. I also added my DIY cotton candy garland which is so fun and complimented the theme!

Hailey-Half-Party-27.jpg
Hailey-Half-Party-4.jpg
Hailey-Half-Party-8.jpg
Hailey-Half-Party-3.jpg
Hailey-Half-Party-14.jpg
Hailey-Half-Party-1.jpg

Carnival Party Menu

You can’t have a party without food! Well, you can but it wouldn’t be as good haha. We decided to keep the menu really simple (and cheap!) with traditional carnival fare. 

Popcorn chicken
Corn dogs
Mexican street corn (elote)
Loaded tot kabobs (recipe here)
Cotton candy
Cake pops
Popcorn
Buffalo wings (brought by family)
Spinach pies (common at Greek fairs!)

Hailey-Half-Party-13.jpg

Rainbow Layer Cake 

I decided that I wanted to do a layer cake and make it rainbow. I’ve never made a layer cake before nor a rainbow cake so I was a little worried. But it came out soooo cute! Since it was her half birthday I cut the cake in half, which left the layers out for everyone to see. The cake was actually really easy to make but in case you want a “tutorial”, here’s what I did. I used 2 white cake mix boxes and dyed them using neon McCormick dye. I sprayed the pans with flour spray which helped the cake not to stick to the pan. After they baked and cooled, I took them out of the pans and cut them flat using a long sharp knife. Then, I cut them in half and assembled the cake with a layer of frosting in between. Hailey was too young to eat the cake, but we took some pretty cute photos of her with the cake!

Hailey-Half-Party-32.jpg
Hailey-Half-Party-35.jpg
Hailey-Half-Party-36.jpg
Hailey-Half-Party-40.jpg
Hailey-Half-Party-46.jpg

I mean…. look at that rainbow gorgeous goodness! Not bad for my first attempt at rainbow cake and a layer cake. I served the cake on the half circle plates, because what better to eat half a cake on than half a plate?! Once the cake and dessert was served, Hailey opened a few gifts from my mom. We requested no gifts but she said she had purchased the items months ago and since my parents were moving, she didn’t want to lose them. Fair enough! Most of those toys ended up being some of her favorites.

Hailey-Half-Party-52.jpg
Hailey-Half-Party-62.jpg
Hailey-Half-Party-63.jpg

Such a fun and simple way to celebrate Hailey’s Half Birthday! Most of those decorations are still up, 2 months later. I love how festive the honeycomb balls and lanterns are! Even the circus tent is still up, although that’s probably due to laziness more than anything else. It’s hard to believe that in less than 4 months, we’ll be celebrating her first birthday. Seriously, where has the time gone and how do I stop it?!

Hailey-Half-Party-23.jpg
Hailey-Half-Party-24.jpg

Well, that’s all folks! I’ve got the individual DIY projects for this party (including the crown and photo holders!) coming to the blog soon, as well as Hailey’s monthly updates. It’s been a little busy around here and sadly I’m slacking on those! Part of me was thinking maybe I shouldn’t bother with them anymore but I think someday I’m going to look back at them longingly so I’m going to keep going! Keep an eye out for the DIY projects and don’t forget to follow me on Instagram for more behind-the-scenes plus reminders for new posts!

The Dreamy Baby Photography Course is LIVE!

If you’ve been trying to take better photos of your baby…. have I got the perfect thing for you! I’m creating a baby photography course and it’s now available for pre-sale! I’ve been wanting to launch this for several months now and I am so excited that it’s happening! I’ve been working on baby photography since Hailey was born and I know all mommas want better photos of their babes, so I’ve been taking notes so I can teach my ways to you! I’ll also be answering some FAQ below.

Nia-Easter-Shoot-31.jpg

Why did you create this DIY baby photography course?

Great question! When we took Hailey for her newborn photoshoot, it left a lot to be desired. I decided that I wanted to take better photos of her and I wanted to take them more often than just the milestones. So, I started learning more about photography and applying these new skills to taking pictures of the baby!

Will I learn how to take my own newborn photos?

Yes! There’s a module all about newborn photos! I’ll teach you what I learned from taking photos of Hailey plus another newborn session I did! They’re only that tiny once, so it’s important to capture those little details and to do it right the first time.

2019-03-28_01.jpg

Do I need a fancy camera, or can I just use my cell phone?

No matter what equipment you’re using, I’ll show you the basic principles that will take your photography to the next level! If you’re using a fancy camera, I’ll teach you how to get off automatic mode so that you can get the very best pictures possible.

Can I get this for a mother’s day or baby shower gift?

Yes! You can either use the person’s email address to send them the course right away, or use yours and update it once you’re ready to give them the gift. It’s really easy to change the email address by going to your account and updating it.

I’m so busy- will I even have time to learn this stuff?

Yes! One of the very first lessons will show you how to find time to watch these videos. Plus, my system is quick and easy so that you’re only taking a few minutes to set up plus how to find the perfect time of day for ideal lighting. Then, you snap pictures for as long as you want! Editing is quick and easy with my method, which I’ll teach you step by step.

Hailey vaca half-1.jpg

That picture up there? It’s a cell phone picture I snapped of Hailey in the moment! Nothing fancy was done when I took it- she just looked cute so I snapped a pic. Then I edited it so that it was well-lit and dreamy. Which picture would you rather have- dark and dreary or bright and airy?! I’ll also add that this course will teach you how to edit your photos WITHOUT those fancy presets that get advertised. Instead of putting a band-aid over your photos, I’ll be teaching you how to take better photos AND how to edit all of them to look amazing.

So, don’t dawdle! Head over now to enroll in the course and start taking better photos of your baby today! The course is affordable and for every sale, I’ll be donating $1 to March of Dimes. If you have any other questions, pop them below and I’ll be sure to answer them ASAP!


Tummy Time Fun (for less than $25!)

Hailey’s been rolling over (a lot) and she seems to be on her tummy a lot more lately! It’s really adorable to watch her do it, but also a little scary when I turn around for a second and all of a sudden she’s flipped on her tummy on the floor, her changing pad, in the crib… I’ve definitely got to keep my eyes on her! Since tummy time is really important for her development, I decided to make tummy time as fun as possible. I wanted a fun toy for her that allowed her to play and explore instead of just staring around and eventually crying. And, since I’m not working right now I needed something that didn’t break the bank.

*This post contains affiliate links

Make tummy time more fun for baby with this water toy! It’s a great baby shower gift idea and perfect for playing with baby. Click to learn more about this baby list must-have item! #tummytime #tummytimeproducts #bestbabyproducts

I went onto Amazon and found this tummy time water mat and knew I had to give it a try. The mat comes folded up, and you fill it yourself with air and water. This means it’s really compact when it’s not in use, and for only $22 you can’t go wrong! There are a few more affordable options (see below) but I picked this one because it seemed like a good size and had good reviews. I didn’t want it leaking water everywhere! 

Make tummy time more fun for baby with this water toy! It’s a great baby shower gift idea and perfect for playing with baby. Click to learn more about this baby list must-have item! #tummytime #tummytimeproducts #bestbabyproducts

A lot of the reviews complain about a smell, but in the words of my husband “it pretty much smells like a beach ball would”. You could definitely air it out if you wanted to, but I didn’t feel it was overpowering or anything. Plus, the baby didn’t seem affected. That being said, the smell was much stronger when we closed it in our baby’s room, so I’d recommend storing it somewhere else.

Make tummy time more fun for baby with this water toy! It’s a great baby shower gift idea and perfect for playing with baby. Click to learn more about this baby list must-have item! #tummytime #tummytimeproducts #bestbabyproducts

As for storage, I keep it filled since I’ve been using it everyday. I’m nervous to leave it on the floor unattended (if it leaks that’s a LOT of water!) so I’ve been storing it in the bathtub when not in use- works perfectly for keeping it clean and safe from my 3 cats and new puppy.

Make tummy time more fun for baby with this water toy! It’s a great baby shower gift idea and perfect for playing with baby. Click to learn more about this baby list must-have item! #tummytime #tummytimeproducts #bestbabyproducts

Hailey’s still getting the hang of it, but she seems to love when I press down and the water sloshes around so the little foam sea animals “swim” across the water. She’s been very observant lately, so she loves studying all the different colors and images on the mat. It’s also comfy for lounging apparently, because she always takes a rest on it. And another added bonus is that tummy time often leads to lots of saliva and spitting up, and with this mat it just gets wiped right off! One less thing to launder is a win in my book. I use these baby-safe wipes to clean it off before and after use :)

Make tummy time more fun for baby with this water toy! It’s a great baby shower gift idea and perfect for playing with baby. Click to learn more about this baby list must-have item! #tummytime #tummytimeproducts #bestbabyproducts

As mentioned above, I got this mat because of the good reviews and larger size. They also have a pastel version for under $12, a round one for less than $10 and a mini one for less than $6, which is perfect for small apartments or those that don’t have a lot of space! I was soooo close to buying the pretty pastel one but I opted for the larger size and better reviews with the one I ended up getting.

No matter which mat you get, baby is sure to love playing around and watching the little items move inside the water. Grab one today to start your tummy time fun!