Toddler Matching Game- Shapes & Numbers

Now that we’re quarantined and can’t leave the house, we’ve been looking for activities to keep Hailey busy. She’s been getting a LOT of screen time, so I wanted to make something for her that was fun, easy and educational. Also, bonus points for something that didn’t contain 3,000 pieces for her to throw on the floor and for me to pick up! That’s when I came up with the idea for this felt educational mat- a toddler matching game, if you will. I knew we could teach Hailey her numbers and shapes, but she could also play with it on her own while we cooked or just relaxed. It was perfect timing when Cricut sent me their new Cricut Joy machine, which I’ve been eyeing since they released it! Whether you’ve got a small hobby room or even just a craft cart in the corner, this machine is perfect for you! And, there are SO many projects that you can make with it. If you’ve been on the fence about getting the Cricut Joy, here is the universe telling you- it’s time. Get it now, and see how many amazing things you can make! You won’t regret it.

*This post contains affiliate links.

Cricut-Shape-Mat-15.jpg

You will need:

Free Template (here)
Cricut Joy (here or get the bundle here)
Cricut EasyPress 2 (here)
Cricut Smart Iron-On Vinyl (here, I used white)
Cricut Joy StandardGrip Mat (here)
Cricut Starter Tool Set (here)
Cricut EasyPress Mat 12 x 12 (here)
Felt pieces for the shapes (similar here)
Thick Felt (Stiff or Double Thick)
Felt glue (here)
Velcro (here)
Glitter paper (similar here)
Ruler or T-Square (similar here)
Tailor’s chalk (similar here)

Directions:

This project has a lot of small steps, but is simple to make. So, I split each part up into smaller pieces so that it’s less overwhelming of a blog post.

Prep Collage.jpg

Prepping To Make Your Toddler Matching Game:

  1. Open the template on Cricut Design Space. The template is free to use and can be found here.

  2. Cut your paper template using cardstock. I took one page and cut it in half, and ran each one through the Cricut Joy on the StandardGrip Mat. This paper template is for the felt matching shapes.

  3. Load your vinyl into the Cricut Joy. I used Cricut Smart Iron-On Vinyl (here, I used white), which means I didn’t need a cutting mat.

  4. A couple of notes when cutting vinyl: When using an Iron On, always go shiny side down. And, remember that you want to cut the numbers backwards so that they are mirrored. I’ve already done this on the template, so you don’t need to worry about it!

  5. Weed your vinyl using your weeding tool, then carefully cut out the shapes individually. You’ll want to leave the protective (shiny) layer on so that you can iron it.

Cricut-Shape-Mat-6.jpg

To Make The Toddler Matching Game Mat:

  1. Arrange the vinyl shapes on your felt. Try to keep them centered on the mat and lined up.

  2. Once you’ve arranged your shapes, use a ruler to make sure they’re straight. I did this by placing a T-square under the first shape and then lining up the rest of them along the ruler’s edge.

  3. Set up your Cricut EasyPress 2 to the appropriate settings. You can use their handy Heat Guide but for this project, you’ll use 280 degrees for 30 seconds with light pressure.

  4. Put your felt on the Cricut EasyPress Mat, and use your Cricut EasyPress 2 to iron on the vinyl.

  5. Once your vinyl has cooled, carefully peel off the protective (shiny) layer.

Shapes_Collage2.jpg

To Make The Shapes For Your Toddler Matching Game:

  1. Pick out your felt colors. I used 4 colors and figured out which shape should get which color by using pom poms. This ensured that each color wasn’t too close together. 

  2. Take your cardstock shape templates that you had cut out and arrange them on the corresponding felt colors. Make sure that you have plenty of space around each shape so that you can cut it out afterwards.

  3. Slip your vinyl numbers under the template and ensure (once again!) that you have enough room for each shape.

  4. Use your Cricut EasyPress 2 again to iron your numbers. Note: You can also use the EasyPress Mini for this! Especially if you’re using scrap pieces of felt, where the larger EasyPress would just be too big. Let cool and carefully peel. You’ll now be left with a sheet of felt with a few numbers on it.

  5. Place your shape templates back on the vinyl to ensure that your number is centered in the shape. Trace around your shapes with chalk. Then, cut them out.

Envelope_Collage2.jpg

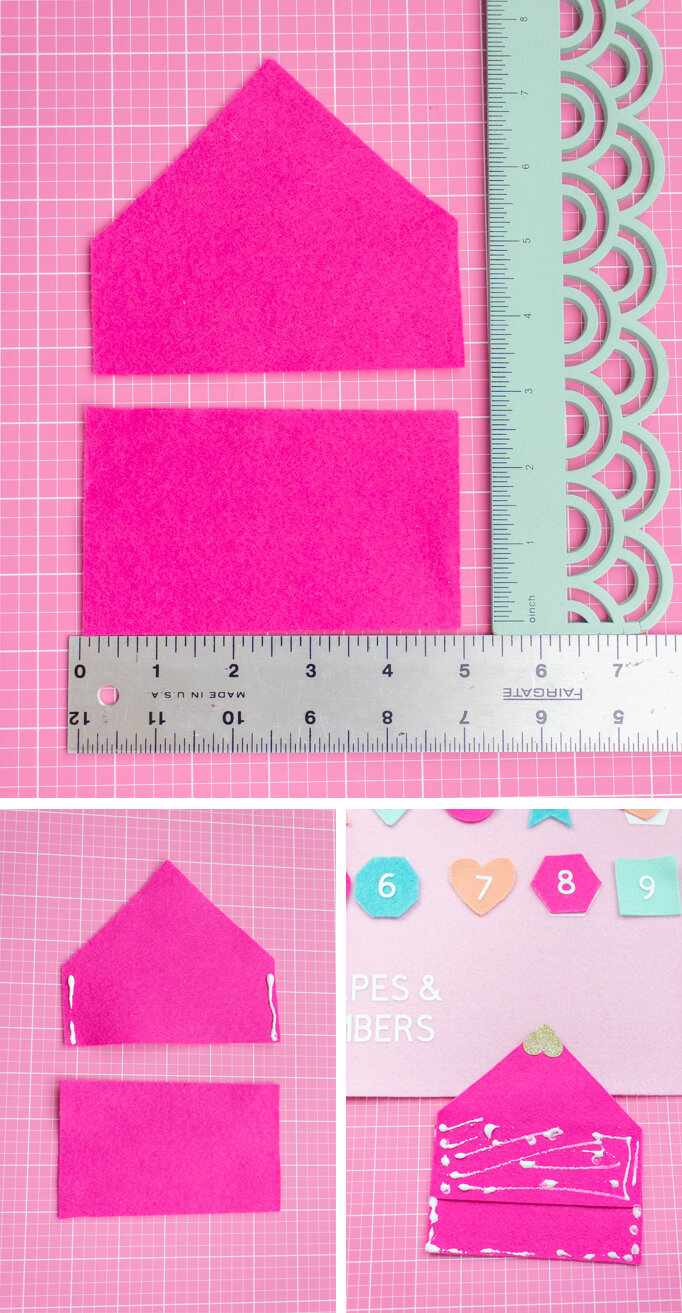
To Make The Envelope For Your Toddler Matching Game:

  1. Cut out your envelope pieces from felt. I used a rectangle that was 5 x 2.5 (aka, smaller rectangle) and then a second piece that was approx 5 x 7.5 (aka, the house side).

  2. Take your larger 5 x 7.5 felt rectangle. Fold the two top corners into the center to meet at a point and then cut at the folds. This will create your point at the top while still keeping it nicely centered. Hence, the nickname “the house side”!

  3. Take your “house side” of felt and put felt glue along the two side edges. Then, place your 5 x 2.5 smaller rectangle on top. See the pics for reference on how to make the envelope since it’s a bit funky!

  4. Turn your envelope over and put glue on your envelope as shown in the picture. Then, press it down on your felt mat and wait for it to dry.

  5. For the heart, I used my heart punch but you could just as easily cut one using the Cricut Joy with the Light Grip Mat.

  6. Glue your heart onto the tip of your envelope point. Then, add a piece of velcro to seal it.

Cricut-Shape-Mat-16.jpg

I’m happy to say that Hailey LOVED playing with this matching game! She hasn’t quite gotten the hang of matching the shapes and numbers, but she loves to play with the felt shapes and put them on top of the vinyl on the mat. She’s gone back to it every day, and has even put down her iPad to fiddle with this! It makes a momma so happy. 

Cricut-Shape-Mat-18.jpg
Cricut-Shape-Mat-19.jpg
Cricut-Shape-Mat-20.jpg

Although this project has a few steps, it’s really fun to make and quite simple. It keeps Hailey busy and it’s pretty to look at! And, it all tucks away nicely into the envelope to make clean-up a breeze. I leave this out on the coffee table to she can have easy access when she gets bored. I can’t wait to make more projects like this using my Cricut Joy!

Starting today through 4/25, Cricut is launching their Spring Cleaning Flash Sale, featuring 40% off select materials and accessories, and Explore Air 2 Machines at their lowest price ever of $179.99! In addition, snag a Maker Machine for $329 or a BrightPad for $49!

Explore Air 2 Machines at Their Lowest Price Ever - As Low as $179.99! Valid through 4/25 

Maker Machines Starting at $329! Valid through 4/25  

Save 40% off Select Materials! Valid through 4/25 

Save up to 75% off Materials & Accessories Clearance! Valid through 4/25


Cricut.com is offering Free Economy Shipping on orders $99+ with code SHIPAPR or APRSHIP, and Cricut Access Members receive free shipping on orders through 4/30. Head over to their website and load up your cart girlfriend- let’s get crafting!

Hailey's 2 Month Update

I can’t believe another month has gone by! My little girl is getting so big and while I’m loving all the new parts of her personality, I’m missing my teeny baby. However, I wouldn’t change these new smiles I’m getting for anything!

Hailey is now 2 months old!! Click through for the full update.

At two months old, Hailey is 10 lbs 6 oz and 22 3/4 inches tall. She’s wearing size 0-3 months clothes. She hates onesies going over her head, so we’re mostly wearing sleepers and dressing up occasionally when she goes out. She’s officially my new best friend, and I ain’t even mad that she poops her pants. 

Hailey is now 2 months old!! Click through for the full update.

Wonder Week Nightmare

The first week I spent home alone was ROUGH. Hailey was up all night, eating every hour and not letting me sleep at all. Every night was like a slumber party I didn’t agree to attend. I’d catch up on sleep in the morning, when she usually slept from about 6am to 10am or so. Luckily, by the end of the month Hailey was sleeping through the night. This momma is super happy about that! 

Hailey is now 2 months old!! Click through for the full update.

Smiles

I’m so happy to say that we’re getting more and more smiles from Hailey! Lately she’s been smiling because we are smiling. She loves being held, talked to, or even having her diaper changed if you smile at her while doing so! She also does this almost-laugh where she smiles big and makes a cooing sound. I’m pretty much in love with it and will do almost anything to make her laugh! 

Hailey is now 2 months old!! Click through for the full update.

Look Who’s Talking

Ok, so they’re not actual words but Hailey just started making sounds and “responding” to us when we talk to her. Whether it’s with some noises or a smile, conversations don’t seem so one-sided anymore! She also discovered her tongue this month. She would stick it out and play with it, lick things (like a blanket touching her lips) and even would copy me when I’d stick my tongue out!

Hailey is now 2 months old!! Click through for the full update.

Songs

Hailey’s getting into the holiday spirit! She loves when I play Christmas songs for her, and loves it even more when I sing them to her! She even seems to anticipate it and immediately calms down when she hears the music start up. Then she starts to smile and breaks into a big grin when I start full on singing to her! She melts my heart, I swear. I’m like Olaf near the fireplace. Some people are worth melting for, and she’s definitely one of them!

Hailey is now 2 months old!! Click through for the full update.


My Favorite Things

Still a big fan of the boobie. Hailey also loves attention/smiling, Christmas songs, and playing Mommy Watch Me Poop. She loves sleeping and lounging on the boppy, and hearing me sing “head and shoulders, knees and toes” plus the Winnie the Pooh song. 

Hailey is now 2 months old!! Click through for the full update.

Nicknames

I’m still calling Hailey Little Bird and Little Chirp Chirp (from her cooking sounds she makes when she stretches). I call her an animal when she’s trying to find the boobie and cheese foot, because her owlet makes her foot kinda sweaty and stinky haha! 

Hailey is now 2 months old!! Click through for the full update.

Fitness Star

Hailey is a master at pulling things. She loves my hair, John’s chest hair, and my mom’s cross. She’s also starting to do sit-ups! She’ll grab my thumbs with her entire tiny fist and use them to pull herself up into a sitting position. 

Hailey is now 2 months old!! Click through for the full update.

I’m amazed by how much Hailey is growing and changing everyday. She’s my little BFF and I love every day and every minute I spend with her! Even diaper changes make me happy, mostly because she’s smiling the ENTIRE time!

Hailey’s 1 Month Update

I can’t believe it- Hailey is already a month old!! I’m starting to understand why my parents would always say it seems like just yesterday they brought me home from the hospital. This month really flew by, and while I’m loving that she’s awake more, I miss how teeny tiny she was. I really wanted to do a fun, themed photo shoot each month with a number made out of items or something, but there just wasn't time. I took her first set of photos on Halloween in her costume with the sign, then did another photoshoot when she was looking cute a couple days later. It turns out, I accidentally did a theme because they’re both unicorns! So, I guess I can do something like this for the other months.

I can’t believe it- Hailey is already a month old!! Click through for the full update.

At one month old, Hailey is 8 lbs 6 oz and 21 inches tall. She’s still wearing newborn size clothes. She loves to wear sleeper pajamas, although her fashion item of choice is a diaper and nothing else!

I can’t believe it- Hailey is already a month old!! Click through for the full update.

Sleeping Beauty

The first few weeks were pretty interesting. Hailey was a really sleepy baby, and didn’t really want to eat. She would often cluster feed then sleep for long periods of time. She’s a night owl, so we took care of her in shifts. John got the overnight shift and I took the early morning one. We basically slept on the couch, because Hailey didn’t like her bassinet and preferred to be in our arms. We’d watch tv or movies and every couple of hours I’d feed her. 

Trying to get her to wake up was pretty comical. We’d strip her down to a diaper, change her, poke her, sing to her, “yell” at her to wake up, put our cold hands on her... basically anything we could to wake her up. It usually didn’t work. She’s open one eye, or look like she might wake up, but she’d just fall right back asleep again as if nothing happened. She reminds everyone of me when they try to wake me up! I’m a very heavy sleeper haha. 

I can’t believe it- Hailey is already a month old!! Click through for the full update.

Jaundice 

Because Hailey had a different blood type than I did, and because she didn’t really eat very often, she ended up becoming jaundice. We had to take her to the doctor every few days to track it, including a lab where they had to take blood work. It was so sad seeing her get pricked when she was so so tiny. We also had to make sure we woke her up every few hours to feed her, because that’s the best way to flush it out.  Luckily, within a couple of weeks it went away and she’s perfectly healthy now. 

I can’t believe it- Hailey is already a month old!! Click through for the full update.

Snack Time

She loves mommy’s boobies, but isn’t a fan of the formula we’re supplementing. She’s an aggressive little eater, but it’s the cutest thing watching her. I have scratch marks from her nails and a big bruise on my nipple but hey, as long as she’s fed! Breastfeeding was a struggle at first (blog post coming soon!) but we’ve gotten the hang of it and we have a rhythm now. Hailey eats more than I can provide, so we supplement formula. At first she didn’t care either way, but she’s definitely preferring the “boobie” over the formula now. She even prefers it fresh from the boobie over getting it from a bottle of pumped milk. 

I can’t believe it- Hailey is already a month old!! Click through for the full update.

Smiles

Hailey’s only given us a few short smiles, and we get so excited to see them! She smiles in her sleep mostly (a reflex) so if you watch her you can catch one! (There’s also a video of it on my Instagram stories). 

I can’t believe it- Hailey is already a month old!! Click through for the full update.

Songs

I like to sing “Row Your Boat” and “the wheels on the bus” to Hailey. I also looove Disney songs, so I sing them to her as lullabied, or I play a Disney playlist while doing bicycle legs with her. 

I can’t believe it- Hailey is already a month old!! Click through for the full update.

My Favorite Things

Like most babies, Hailey likes ceiling fans- she spends a lot of time laying down, and they’re the only thing up there. She likes car rides and mommy and daddy. She loves to snuggle and obviously, sleeping! Her very favorite thing is probably mommy’s boobies- they do feed her, after all! 

I can’t believe it- Hailey is already a month old!! Click through for the full update.

All in all, we love our little Hailey and we are so excited to see her grow even more!

Mix and Match Fall Baby Capsule Wardrobe 

Now that I’ve got a super cute little baby, I’m so excited for all the adorable outfits I can put her in! She’s still a little too small to really dress up, but I couldn’t resist looking! I’ve rounded up some of the cutest fall looks for your sweet little babe, which I think adds up to the perfect fall capsule wardrobe. Plus it’s a perfect mommy and me matching moment, right?! And the best part is that all these items can be found on Amazon, PLUS most of them are Prime! So what are you waiting for? Let’s go shopping!

*This post contains affiliate links.

Now that I’ve got a super cute little baby, I’m so excited for all the adorable outfits I can put her in! I’ve rounded up some of the cutest fall looks for your sweet little babe, which I think adds up to the perfect fall capsule wardrobe. The best …
  1. Aqua frilly suit- Girly and sweet, this little onesie is perfect for any fall outing or event where baby needs to be a little more glam!

  2. Star bow flats- These would add such a fun little touch to any outfit, and would also be perfect for Christmas time too!

  3. Polka dot onesie- Your baby will look adorable in this glam gold dot onesie! It has such cute trim, and would look perfect on its own, or with a pair of tights underneath. Plus it comes with a matching headband!

  4. Bear knit hat- Keep your little one warm and stylish with this super cute teddy bear hat! The pom pom ears are so fun, and the color is perfect for all of winter!

  5. Gold and pink moccasins- A slightly dressier version of the typical baby moccasin, these are extra gals with gold fringe and a tiny bow!

  6. Pink bodysuit- This sweet outfit will allow your babe to be cute and stylish without being too warm. Plus it’s perfect for layering!

  7. Floral and yellow overalls- These have such a cozy fall feel without being too cheesy in colors. It’s perfect for people who like their clothes a bit brighter! 

  8. Tan maryjanes- These look great with any outfits while adding a traditional feel! 

  9. Teal fringe bodysuit- This little bodysuit is perfectly seasonal! It would look cute on its own, or layered with a little cardigan and some pants!

  10. White ruffle onesie- Basic but still fun, this onesie is perfect for layering under a pair of overalls to keep baby warm but stylish!

  11. Maryjane socks- If your little one is too small for real shoes, give her a pair of these socks! It comes in a set of 3 colors, so it’ll match with all your Thanksgiving outfits.

  12. Yellow cardigan- Perfect for staying cozy and cute, this little cardigan is perfect for chilly fall weather!

  13. Yellow off-the-shoulder onesie- Perfect for keeping it simple, this basic onesie can be paired with any color or accessories for the look you want!

  14. Floral headband- If you want to add some seasonal fun to your outfit, grab a cute floral headband to dress up your little one! 

  15. Tan bodysuit- Slightly traditional in color, but also has a fun shade of rusty brown, plus trendy fluttery shoulders and slightly poofy sleeves!

  16. Aqua moccasins- These are perfect for the season, but super trendy by being in a fun aqua color for year-round fun!

  17. White lace bodysuit- This cute lace onesie is perfect for layering! It’s simple without being boring, and can be dressed up with some cute shoes or a headband!

  18. Yellow bodysuit- The little crochet emblem on the chest is perfect for adding a warm and cozy feel. Plus those sleeves are super fun!

  19. Pink knit overalls- These are so cute to pair over one of these onesies featured here! They look super cozy without making baby too warm, since they’re shorts!

  20. Rose gold flats- Let your little one put her best foot forward in these cute casual-but-dressy rose gold flats. If only they came in our size!

I mean... how cute are these little outfits? Don’t you just want them all?! Which is your favorite? Let me know in the comments below!

DIY Rainbow Alphabet Blocks

Call it a mother's intuition but I made this project before I even knew I was pregnant! I wanted them for an Instagram challenge I have since put aside, but hey... they're pretty cute and I've used them for a few blog posts already too! You probably saw them make a cameo in my Easter party post, my baby post and my Painted Notebook post. They're too awesome (and useful) to resist. Find out how to make a set for yourself!

Colorful rainbow alphabet baby blocks? Yes please! Find out how to make a set for yourself. Click for the full how-to!

Disclaimer: I do not have children, and therefore I do not know what age this would be for. I’m going to say 3+, but please use your discretion! Mine will be mainly for decorative purposes. I don’t want any children getting hurt with toxic paint or swallowing a loose letter. Please use caution when giving this project to children!!!

You will need:

1.5" blocks (here)
Painter’s tape 1 inch (here)
Paint in your choice of colors (similar here)*
Wood letters (from Michael’s, similar here)
Paintbrushes (similar here)
Super glue or wood glue (here)
Newspaper or similar to cover workspace

*My colors were Martha Stewart Pink Dahlia, Apple Barrel Pink Parfait, Martha Stewart Wild Salmon, Martha Stewart Yellow Jacket, Martha Stewart Diving Board, Apple Barrel Parrot Blue, Apple Barrel Bimini Blue, Craft Smart Grape Taffy

Directions:

Colorful rainbow alphabet baby blocks? Yes please! Find out how to make a set for yourself. Click for the full how-to!
  1. Pick the colors for your paint, and decide on whether you want a pattern. I wanted to do a rainbow, so I assigned each letter a color and counted out how many of each block I needed from that.

  2. Find the best side of your block to be the front, and add tape to the center as a “stripe”. I did this on two sides so that I would have the ability to add extra letters or something else to the back. Or at least, if gave me an extra option in case one side looked funky!

  3. Once you’ve taped a few (or all) of your blocks, begin painting them. Each round, I painted the “front” of the block with two stripes, 2 sides full color, and the “back” with two stripes. I did the stripes first, then the sides, and went and did a second coat on the stripes before letting it dry.

  4. Peel your tape off your blocks and save it for round 2. Make sure your blocks dry fully before doing round 2!

  5. While your blocks dry, start painting your letters. I did the front and all the sides with a few coats.

  6. Take your tape, and reposition it on the sides with the stripes, this time going the other direction to form a “border” of color around the edge. Paint the stripes on the front, back, and opposite sides. And let dry fully.

  7. Glue your letters into your blocks and let dry according to directions.

Colorful rainbow alphabet baby blocks? Yes please! Find out how to make a set for yourself. Click for the full how-to!

Alternatives:

  1. For a safer alternative, you can paint or stamp the letters onto the blocks so that there is no choking hazard

  2. Instead of matching all the blocks and letters, try mixing them up or color blocking with different shades of the same color! I tested that below.

  3. Add stamps to the sides of the blocks for extra learning fun!

  4. Add numbers for a complete block set

Colorful rainbow alphabet baby blocks? Yes please! Find out how to make a set for yourself. Click for the full how-to!

Ahhh! I mean, how stinking cute are these!? They'd also be really cute as decor with just the letters of your baby or child's name. I love love love these! Are you planning to make a set for your kids? Let me know in the comments below!