DIY Jingle Bell Christmas Tassel Earrings

As soon as it’s socially acceptable (aka, right after Thanksgiving!) I go into full-on Christmas mode. I can be found wearing a Christmas sweater, reindeer antlers, or Christmas accessory at any given moment. Sometimes, all of the above! A great way to add some Christmas spirit is to wear some holiday earring. One of my favorite types of earrings is tassel earrings! They always add such a fun pop of color to an outfit. They add a LOT of drama but weigh practically nothing. They’re perfect! Since I love decking myself out for the holidays, especially Christmas, I created this fun DIY project so you can jingle everywhere you go!

*This post contains affiliate links.

jingle-tassel-earrings-6.jpg

You will need:

Embroidery floss (similar here)
Jingle bells (similar here)
Earring hooks (similar here)
Jump rings, optional (similar here)
Jewelry tools (similar here)
Scissors (similar here)

collage.png
  1. Make your tassel earrings by following these instructions. If you want thicker tassels, follow these instructions. Also, a note: if you try to use the first method (where you use the entire spool) and it gets tangled up, you can try using the second method (where you use cardboard) instead!

  2. Brush out your tassels to give them a nice fluff. I recommend using a comb although I used what I had handy- a Barbie brush!

  3. Now that your tassels are made, it’s time to make them into earrings! Attach a jump ring to the top of your tassel by looping it through the first string you tied at the top. Then, loop your earring hook through and close it. You want to make sure that the knots are at the back, so figure that out before you put the earring hook on. You can also skip the jump ring altogether and attach the earring hook directly to the string at the top.

  4. A note: I’d recommend getting a set of these clear earring backs so you don’t lose your earrings. I sadly lost one of the Halloween ones I made!

  5. Using a piece of embroidery floss, thread on your jingle bells. You can either use floss that is the same color (or similar color) or an alternating shade.

jingle-tassel-earrings-7.jpg
Cathy-Christmas.jpg
jingle-tassel-earrings-8.jpg

These are a great stocking stuffer or even something to add to an advent calendar! If you want a fun way to display them, try this tutorial to turn them into fun ornaments!

What do you think about these tassel earrings? Will you be having a Christmas movie marathon and make them with your girlfriends? Let me know in the comments below!

DIY Halloween Tassel Earrings (with Googly Eyes!)

Eye have great news for you- Halloween is coming! Don’t turn a blind eye- add a little flair to your everyday outfits! You’ll SEE how many people enjoy it. Ok, I’m done with all the eye puns, but I have something really fun for you today! I always love adding some holiday accessories to my outfit, and it’s even better when they’re easy to make! These tassel earrings are so fun and easy that you can make a Halloween pair and then some basic ones for everyday. Don’t forget to pin them for later!

*This post contains affiliate links

LOOKING for a great halloween craft? EYE have a great one for you! These googly eye tassel earrings are the perfect halloween accessory. Plus they’re an easy craft! #halloweenearringsdiy #diytasselearrings #googlyeyecrafts

You will need:

Embroidery floss (similar here)
Beacon Gem-Tac (here)
Googly eyes (similar here and here)
Earring Hooks (similar here)
Jump ring (similar here)
Jewelry tools (similar here)
Scissors (similar here)
Toothpicks
Tweezers

LOOKING for a great halloween craft? EYE have a great one for you! These googly eye tassel earrings are the perfect halloween accessory. Plus they’re an easy craft! #halloweenearringsdiy #diytasselearrings #googlyeyecrafts

Directions:

  1. First, let’s create your tassels. For starters, pull a bit of embroidery floss out and cut 4 small-ish pieces. Mine were probably slightly longer than my pointer finger.

  2. Thread one of the strings through the loop at the top of your embroidery floss and tie a knot. I made a double knot to ensure it didn’t come loose. Repeat for the bottom.

  3. Take off the paper packaging that’s holding your embroidery floss in shape, and tie a knot at the top. Mine was about a fingertip’s width (not length) from the top. Repeat on the other bottom, making sure that they are the same size.

  4. Fold the embroidery floss in half to find the center, and then carefully cut across in a straight line to create two separate tassels.

  5. Optional: Comb out your embroidery floss so that your tassels are a little bit thinner and it looks less like embroidery floss! You can see how that looks here.

  6. Now that your tassels are made, it’s time to make the earring! Attach a jump ring to the top of your tassel by looping it through the first string you tied at the top. Then, loop your earring hook through and close it. You want to make sure that the knots are at the back, so figure that out before you put the earring hook on.

  7. Get a scrap of paper, and place some GemTac on it. Take a toothpick and place a small dab of glue on your tassels, then use tweezers to place your tiny googly eye onto your glue. Repeat until you have enough tiny google eyes to fill the top. For the larger googly eye, you can probably just use hot glue.

LOOKING for a great halloween craft? EYE have a great one for you! These googly eye tassel earrings are the perfect halloween accessory. Plus they’re an easy craft! #halloweenearringsdiy #diytasselearrings #googlyeyecrafts

So, what do you think? Can you SEE yourself wearing these earrings? Will you be making a pair for yourself and everyone you know? I made these two pairs and I’m kinda wishing one of them was orange so I could have rotating pairs! Don’t forget to pin the DIY for later or share with a friend who LOVES halloween!

DIY Snow Cone Earrings

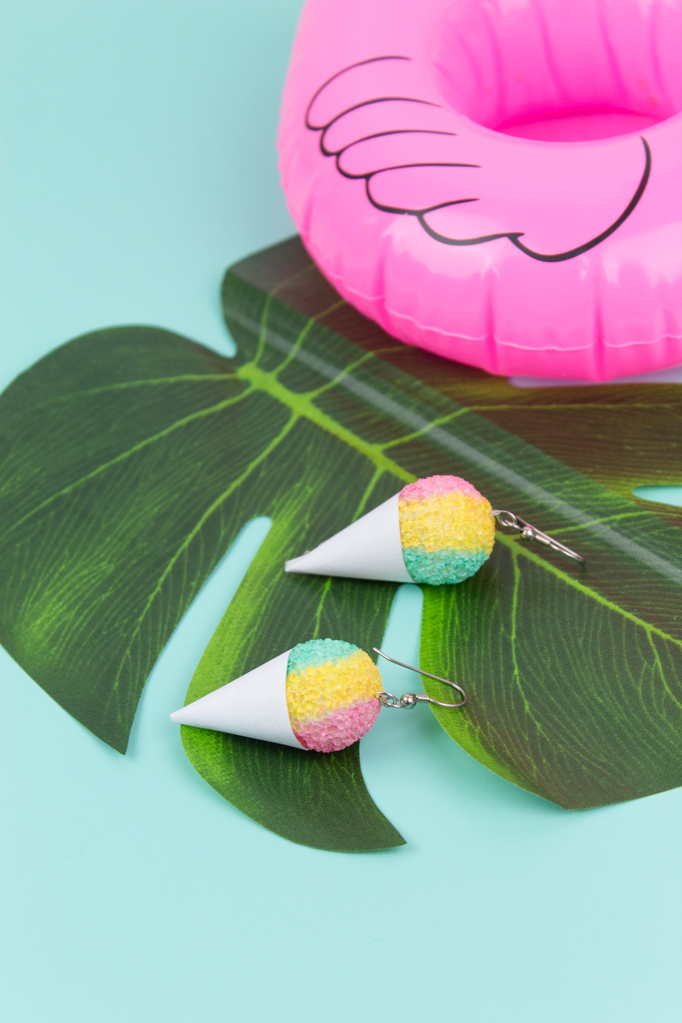
Now that I’ve officially switched over to my summer wardrobe, I’m looking for some fun accessories that can spice up my outfits. I find that a lot of times I wear the same outfit over and over, but I love to switch out my accessories in between. Since we all know I love to DIY anything I can get my hands on, I decided to make these snow cone earrings out of just printer paper and styrofoam balls! They’re great because they can be made in any color of your choosing. They can even be made for Fourth of July in red, white, and blue. They’re so fun and are sure to get the attention of everyone around you. The full DIY is over on the Giggles Galore blog so head on over there now to see it! 

Now that I’ve officially switched over to my summer wardrobe, I’m looking for some fun accessories that can spice up my outfits. I find that a lot of times I wear the same outfit over and over, but I love to switch out my accessories in between. The…

Let me give you a quick overview of the steps, because it’s extremely simple. All you’re doing is painting the Styrofoam balls, tracing the snow cone wrapper template, adding the earring pieces and gluing it all together. Easy peasy, lemon squeezy.

Now that I’ve officially switched over to my summer wardrobe, I’m looking for some fun accessories that can spice up my outfits. I find that a lot of times I wear the same outfit over and over, but I love to switch out my accessories in between. The…

This project would be so fun to make with older kids or teens, or even by gathering up your girlfriends. Grab some rosé and get to crafting! These are now some my favorite earrings that I own and I can’t wait to wear them all summer long. They’re sure to cool off a hot summer day!

DIY Disco Ball Earrings

HAPPY NEW YEAR! 

For the first DIY of the year, I really wanted to showcase something I LOVE- disco balls! I really wanted a pair of disco ball earrings that were simple, and not cheesy. So many of them go with a 70's costume and they're more groovy than classy. I love that you can wear these earrings anytime there's a party- or anytime you want to party. They're super easy to make and lightweight. Plus the pack comes with 12 mini disco balls- that's enough for 6 pairs of earrings! So pop on your earrings, grab some confetti, and party the night (or day) away! If you want a party go along with them, check out this Pink Disco Ball Party!

You can wear these earrings anytime there's a party- or anytime you want to party. They're super easy to make and lightweight. Check out the DIY now!

You will need:

Mini disco balls (here)
Jewelry tool kit (here)
Jewelry findings kit (here)
Pink seed beads (similar here)

Directions:

You can wear these earrings anytime there's a party- or anytime you want to party. They're super easy to make and lightweight. Check out the DIY now!

1. Remove the string from your mini disco balls

2. Take your pin and insert it through the center of your disco ball using the hole from the string as a guide. The flat end should be at the bottom.

3. Add a few seed beads to the top and trim if necessary.

4. Twist your pin around the edge of your round nose pliers to create a hanging hoop.

5. Attach your earring hook to your hanging hoop. Wear and enjoy!

You can wear these earrings anytime there's a party- or anytime you want to party. They're super easy to make and lightweight. Check out the DIY now!

Don't mind my crazy face- confetti makes me a little bit too excited haha. How great are these earrings?! Be sure to check out the Pink Disco Ball Party for even more pink party goodness!

Make a Statement: The Shop is LIVE!

EDIT: The shop is now closed. Read more here.

YOU GUYS! Remember back in October when I relaunched the blog as Party HarDIY? Well, I told you there were some big plans in STORE (hah, see what I did there?) and I’m sooo excited to announce the launch of our shop! I’ve always wanted to have my own shop full of cutesy things, and I’ve always had a love of jewelry! Well, now the two have come together in one magical, glimmering place.

Flower Necklace Yellow.jpg

So, what’s available?

A collection of unique and colorful jewelry, sure to add a pop of color to any outfit! The holidays are coming, and these pieces are perfect for adding some sparkle to your outfit, a fun touch of Christmas colors, or to change up an outfit that’s already been worn a bunch of times! Because let’s be real, these pieces are WAY cheaper than buying a new dress!

Um… Tell me more about this collection!

Well, ok! This all started back when I was in my favorite jewelry shop in the city. I thought, wouldn’t it be great to have a collection of fun and colorful necklaces that are affordable? There are SO many expensive jewelry shops out there, and my opinion on costume jewelry is the more, the merrier. So, I decided to curate my own collection of fun, bold, and most of all BRIGHT jewelry. There will also be some new items coming to the shop as well, but for now I decided to start small for the holiday season!

Red Tassel xmas.jpg

Where did your love of jewelry come from?

My grandma! My yiayia had the most insane collection of costume jewelry. I don’t think I ever saw her wearing real jewelry, haha! She had a bunch of bold necklaces and earrings. Fun fact- her ears weren’t pierced! She only owned clip-ons. Here's a picture of us when I was a kid. She's dressed very on brand, and I'm the one in the tutu. I took ballet for a hot minute, but I was AWFUL at it.

Grandma Inspo.jpg

Um… am I brave enough to wear this stuff?

YES! I used to be shy about wearing bright things too. I finally realized that it’s fun to be bold and daring. People notice! I get compliments on my jewelry all the time, and in a sea of people, it’s fun to stand out a bit. You can always start small with a pair of colorful studs!

Blue Square Earring auto.jpg

Ok, you’ve convinced me! What do I even wear this stuff with?

My very favorite thing to wear bold jewelry with is a basic tee! It’s really adds a pop of fun and sass to an otherwise casual item. Try pairing the Daisy Dreams Statement Necklace or the Fringe Benefits Earrings with a basic tee. Another great way to wear these is with a Christmas sweater! Try the Rudolph the Red Nosed Rhinestone Tassel Earrings with your ugly Christmas sweater, or the Worth The Tassel Earrings with a warm, cozy sweater! Heading to a holiday party? Try the Chic-a-Boo Rhinestone Earrings for some added glitz and glam, or the Dragonfruit Dilemma Earrings for a fun, unexpected touch.

Dragonfruit Earring Pink.jpg

Can I get free items?

Um, heck yea!! I’m hosting a giveaway! To enter, follow the instructions on this post on Instagram. Tag a friend for an extra entry! One winner will get all 4 jewelry ornaments- perfect for giving out as Secret Santa gifts, hanging on the tree, or keeping them all for yourself!

DIY Jewelry Ornament 12.jpg

Eek! I hope you guys are as excited about this as I am! I've been working on this for MONTHS, and I'm so happy to see the store is finally live! So, go sign up for free shipping, and enter the giveaway!