Hailey's Nursery Organization Tour (Ideas On A Budget!)

I’m so excited to finally be sharing some sneak peeks of Hailey’s room! It only took 9+ months but hey, better late than never! I want to start by talking about how I organized Hailey’s room. My goal for her room was to be girly but pretty- something she could grow up with, instead of needing a total refresh as soon as she wasn’t a baby anymore. And, I wanted it to be fully functional, organized and GORGEOUS. I wanted everything to have a place and I wanted that place to be pretty. It definitely seemed silly at the time, and my husband thought it was ridiculous. However, every person that comes into her room comments on how pretty it is, including her closet. I leave the door open- it’s THAT nice! I even open up the drawers to show people how nicely everything is folded. My husband, who thought I was taking way too long to fold her clothes, recently said he wanted me to teach him how I fold her clothes because they definitely fit better when I do it. It’s the small victories.

Looking for some nursery organization ideas? Check out this colorful and affordable nursery tour! From the closet to the dressers, I’ll show you where to store all of baby’s essentials. #nurseyorganizationideas #nurseryorganizationhacks #nurseryorga…

I mean….. LOOK AT THAT CLOSET. It’s been several months and I still swoon over it. It’s gotten fuller since I took these photos a few months ago, but it still looks great. My favorite part of her whole room is those closet doors. I wanted to add a pop of color to her room without painting everything a bright hue. Originally, we were thinking to paint an accent wall but I couldn’t figure out which wall it should be. Mostly because I didn’t think any of them would be good for it! I remembered how much I loved the beautiful doors back in Greece and I decided to gather up some courage and ask my husband if we could paint the doors. Surprisingly, he agreed! I honestly think it was the best decision I could have made, because these doors make a statement without being cheesy.

Baby Closet Storage

Let’s venture inside the closet now. Hailey received a bunch of cozy blankets, so I decided to display them on the left side by hanging them in her closet. This area was pretty high up for anything other than blankets, since everything looked comically small in that corner. I folded the blankets in thirds to make them thin, then in half so they hung nicely off the hanger. Below all the blankets, I put this amazingly adorable pom pom basket (similar here) that I couldn’t resist getting! It holds miscellaneous breastfeeding items- nursing pads, my breast pump, etc. along with the chalk markers for her monthly updates. It’s essentially a catchall basket, which helps to keep the room tidy.

Looking for some nursery organization ideas? Check out this colorful and affordable nursery tour! From the closet to the dressers, I’ll show you where to store all of baby’s essentials. #nurseyorganizationideas #nurseryorganizationhacks #nurseryorga…

See those polka dot baskets there? Those are smack dab in the middle, and they hold all of Hailey’s clothes in bigger sizes. I put her 0-3 & 3-6 month clothes in her drawers, then made one cube of 6-9 and another of 9-12. Anything over 12 months was put into a giant storage bin for later and stored in the attic. These bins made it really easy to access new clothes as Hailey got bigger. I washed everything while I was pregnant and I’m sooooo glad I did. Those tiny clothes have more little plastic attachment pieces than should be legal. Plus, I can grab things from the bins without having to wash them, which is amazing now that I have a tiny human to care for. She makes more than enough laundry as it is!

Looking for some nursery organization ideas? Check out this colorful and affordable nursery tour! From the closet to the dressers, I’ll show you where to store all of baby’s essentials. #nurseyorganizationideas #nurseryorganizationhacks #nurseryorga…

At the top right, I have some transitional pieces. We plan to put some shelves up, so right now her decor and jewelry box are up there. The piggy bank was from her Oma (grandma) and belonged to her mom before that. When you put a coin in, it plays an Irish song! The jewelry box was a gift from my sister to me. I didn’t need it anymore, so instead of tossing it I decided it would be fun for Hailey to use. I can just imagine her storing her little plastic rings in there someday, and looking into the little mirror with lipstick smeared all over her face like a beauty queen.

Looking for some nursery organization ideas? Check out this colorful and affordable nursery tour! From the closet to the dressers, I’ll show you where to store all of baby’s essentials. #nurseyorganizationideas #nurseryorganizationhacks #nurseryorga…

Below those items is her fancy clothes- dresses, little coats, and tutus. All my favorite frilly things which are gorgeous! I couldn’t resist snapping a photo of just these little dressy items, because they’re that pretty! Everything is hung on tiny pink velvet hangers.

Looking for some nursery organization ideas? Check out this colorful and affordable nursery tour! From the closet to the dressers, I’ll show you where to store all of baby’s essentials. #nurseyorganizationideas #nurseryorganizationhacks #nurseryorga…

Let’s go down to the bottom of the closet. I used a structured bin or hamper (similar here, here and here) to hold even more of Hailey’s blankets. I had 2 comforters from her bedding set, plus her muslin swaddles and handmade blankets from family members. I folded everything up nicely and placed it in this bin for safekeeping. Above it, I have some of her extra hangers ready to go.

Looking for some nursery organization ideas? Check out this colorful and affordable nursery tour! From the closet to the dressers, I’ll show you where to store all of baby’s essentials. #nurseyorganizationideas #nurseryorganizationhacks #nurseryorga…

I knew we’d have to store Hailey’s bathtub in her room, since our bathroom is extremely small. I didn't want to remove it every time I wanted to shower, so it just made sense to keep it in her room. But again, I wanted everything to be pretty and this was no exception! So, I bought this oversize fabric hamper (similar here and here) to hold it when it’s not in use. After Hailey’s bath at night, I leave it in the tub to dry. Then, I put it back in the hamper until its next use. From the front, you can barely even tell what’s in there!

Looking for some nursery organization ideas? Check out this colorful and affordable nursery tour! From the closet to the dressers, I’ll show you where to store all of baby’s essentials. #nurseyorganizationideas #nurseryorganizationhacks #nurseryorga…

Now I’ll talk about all the other random bins I didn’t mention before. The pink striped bin at the top holds extra diapers and wipes, so we never have to worry about running out while she’s naked on the changing pad. The bins underneath it are her bath toys that she won’t be needing quite yet. The wooden box holds her very small shoe collection, and the pink bin at the bottom (similar here and here) is for clothes that no longer fit her. I get so sad when something has to go in that bin, but it means she’s happy and healthy which is a GREAT thing so I get over it fairly quickly.

Looking for some nursery organization ideas? Check out this colorful and affordable nursery tour! From the closet to the dressers, I’ll show you where to store all of baby’s essentials. #nurseyorganizationideas #nurseryorganizationhacks #nurseryorga…

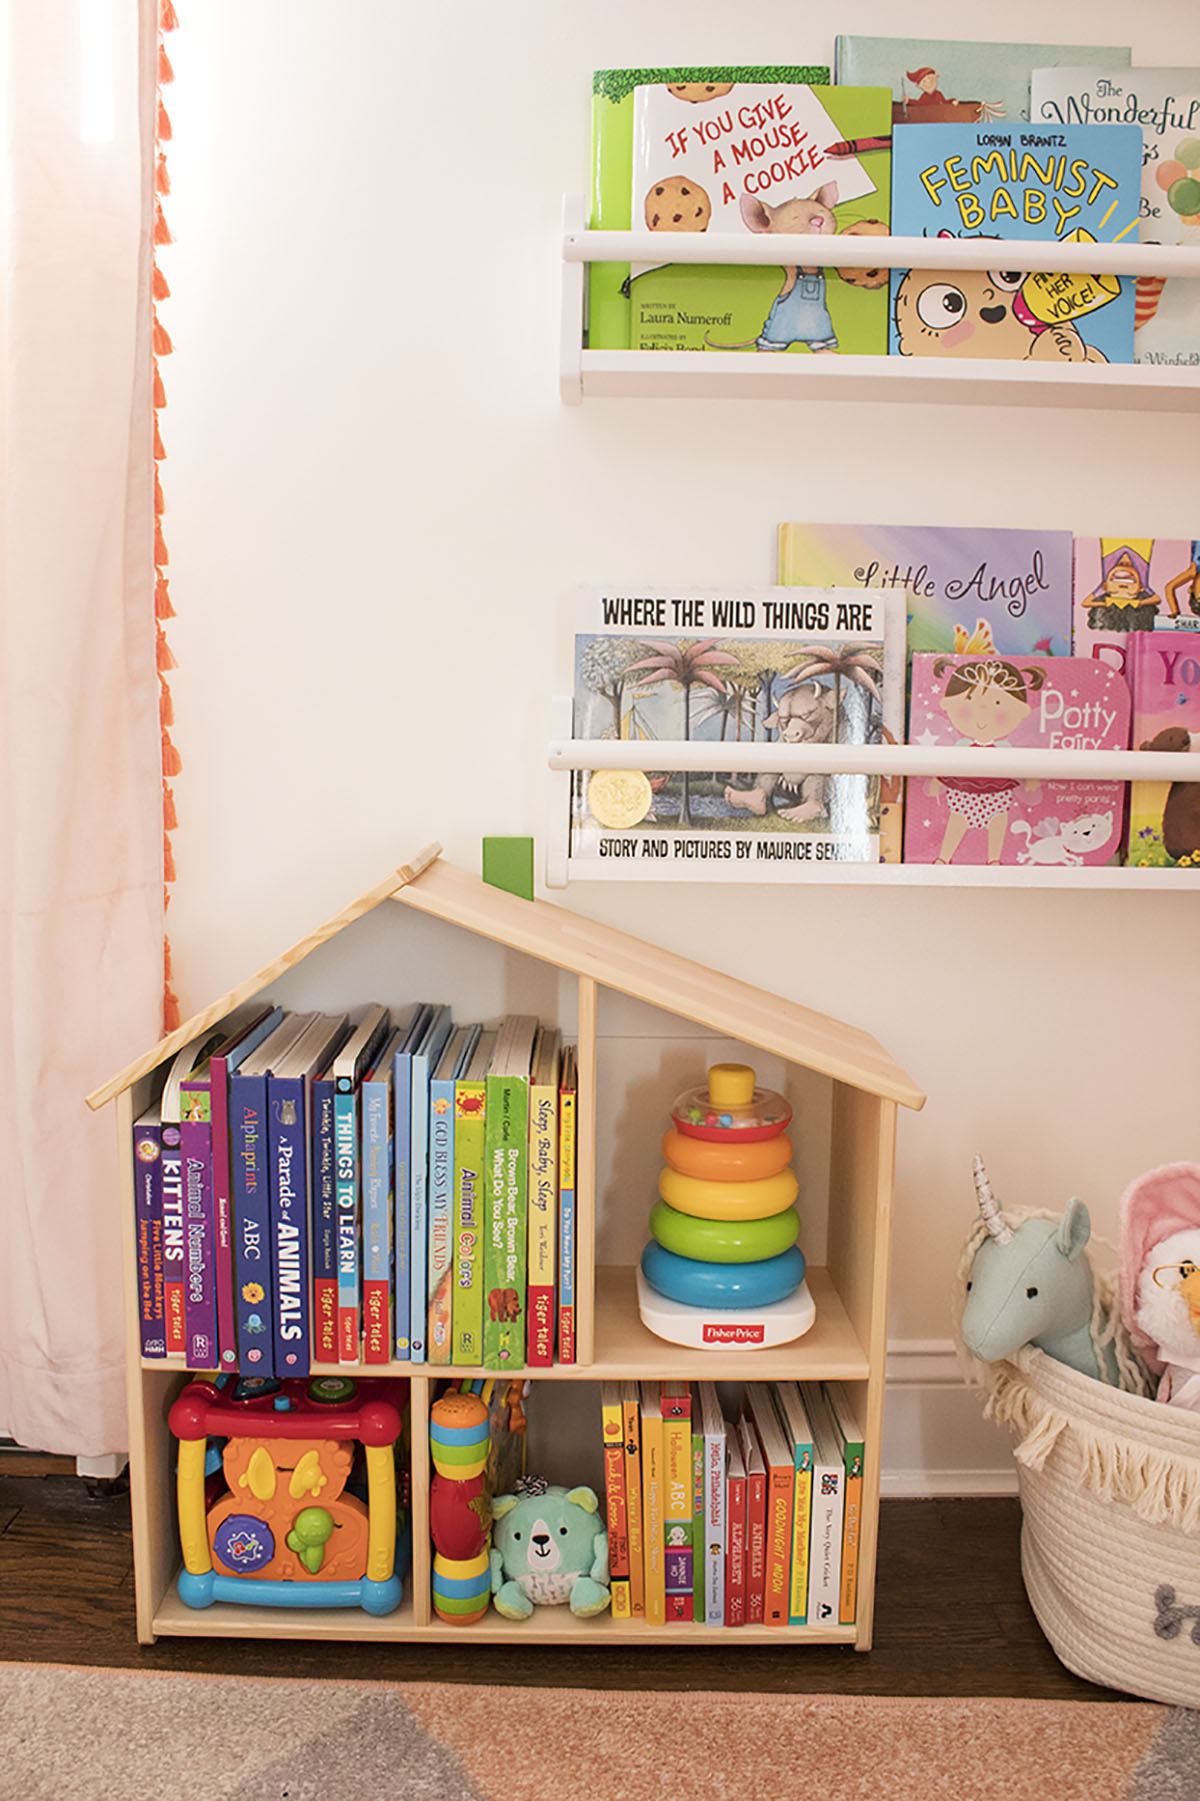
The Book Shelf Storage

Over to the left of the closet is all of Hailey’s books! After seeing everyone else’s adorable book walls, I decided I wanted one for her room too. It fit perfectly on this narrow portion of wall underneath the AC, since anything bulky would block the closet. You can see a teensy portion of the door down there!

Looking for some nursery organization ideas? Check out this colorful and affordable nursery tour! From the closet to the dressers, I’ll show you where to store all of baby’s essentials. #nurseyorganizationideas #nurseryorganizationhacks #nurserybook…

I organized all the books by rainbow order, which made it visually appealing. These wooden book shelves from Ikea were painted white so that they provided a nice, simple place to hold the books. At the bottom, I placed my dollhouse bookshelf which houses some of her smaller books and toys, again in color order. Off to the right side, I have a small basket filled with some of her stuffed toys and dolls. Hailey has quite a few unicorn toys, along with a mermaid and singing Mother Goose!

Looking for some nursery organization ideas? Check out this colorful and affordable nursery tour! From the closet to the dressers, I’ll show you where to store all of baby’s essentials. #nurseyorganizationideas #nurseryorganizationhacks #nurserybook…

I can’t wait to show you the full room reveal, because those curtains are pretty epic too! This room is my favorite in the entire house.

Baby Dresser Storage

Off to the right of the closet is Hailey’s dresser! I chose this dresser because it was wide enough for our changing pad and was still a decent height for her changing pad. PS- I love this changing pad because you just wipe it clean if there’s a mess. No laundry needed. Just go ahead and order one now- you’ll thank me later!

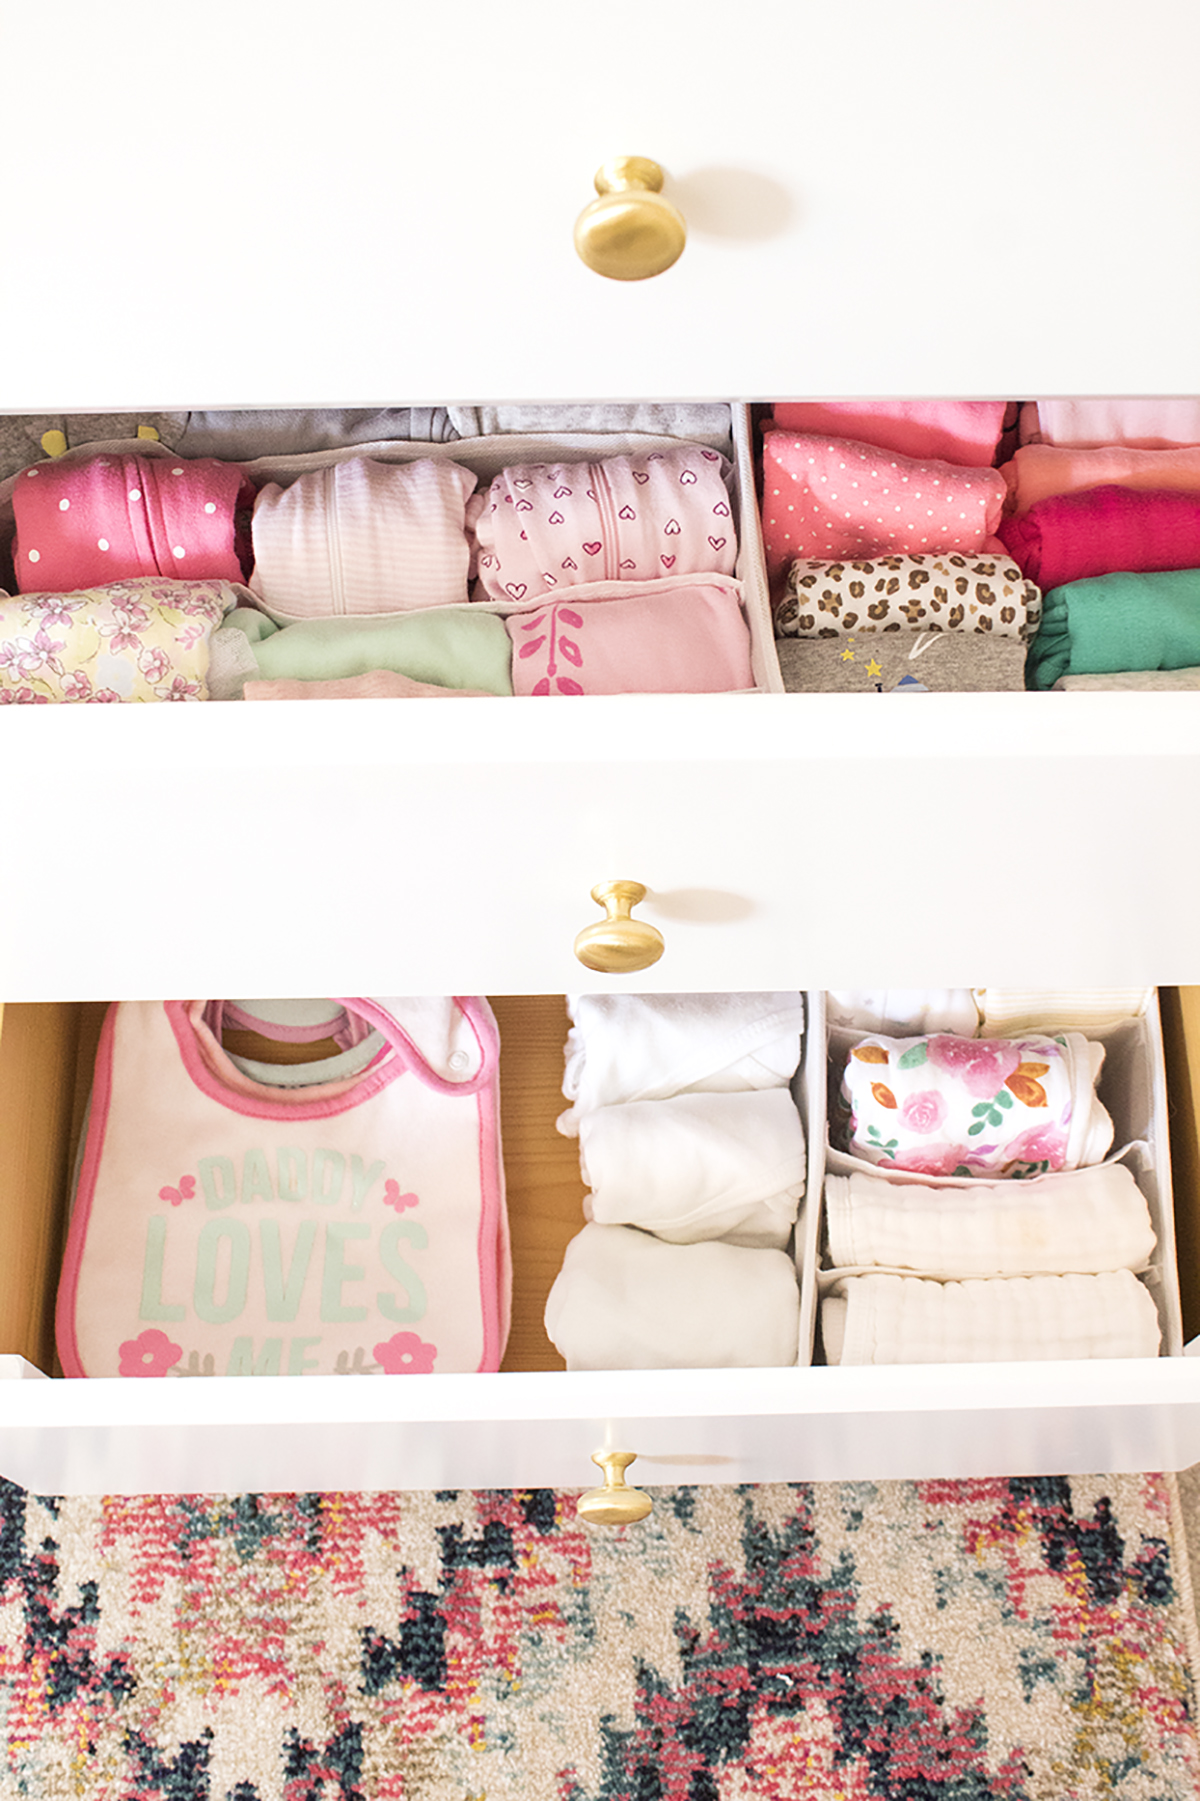
Hailey’s dresser has 6 drawers. The top left holds her hats, headbands, and mittens along with her collection of socks. I kept everything neatly organized and accessible by putting in some smaller bins to help corral everything.

Looking for some nursery organization ideas? Check out this colorful and affordable nursery tour! From the closet to the dressers, I’ll show you where to store all of baby’s essentials. #nurseyorganizationideas #nurseryorganizationhacks #nurserydres…

The top right is where all of Hailey’s diaper changing supplies go. On top of the dresser, I have an organizer that holds diapers, wet and dry wipes plus all her ointments. There’s even a drawer for her brushes and combs! We use vaseline to prevent diaper rash, and put it on using this diaper cream brush. The drawer below this organizer contains spare diapers, wipes, and body lotions.

Looking for some nursery organization ideas? Check out this colorful and affordable nursery tour! From the closet to the dressers, I’ll show you where to store all of baby’s essentials. #nurseyorganizationideas #nurseryorganizationhacks #nurserydres…

Clothes Storage and Folding

I folded all of Hailey’s clothes nicely and neatly into little cubes, and placed them into these drawer organizers to keep everything contained. Her clothes are so small that without the drawer organizers, they felt like they were flopping around in a giant drawer.

Looking for some nursery organization ideas? Check out this colorful and affordable nursery tour! From the closet to the dressers, I’ll show you where to store all of baby’s essentials. #nurseyorganizationideas #nurseryorganizationhacks #nurserydres…

The bottom 2 drawers hold Hailey’s blankets, bibs, and burp cloths. Again, I folded everything nice and neat and placed it into smaller bins. On the left side I placed all her blanket toys which she didn’t care about at first but now she LOVES them, especially the pink cat we nicknamed Kitty. Super creative, I know ;)

Looking for some nursery organization ideas? Check out this colorful and affordable nursery tour! From the closet to the dressers, I’ll show you where to store all of baby’s essentials. #nurseyorganizationideas #nurseryorganizationhacks #nurserydres…

The bottom right holds burp cloths and bins. Ironically, we got WAY too many bibs and not nearly enough burp cloths, which we definitely needed more! I ended up ordering most of them myself, so if you’re unsure what to get a new momma, try burp cloths. The bottom drawer also holds some wrap sweaters they gave us at the hospital which were essential in the chilly hospital where she only wore a swaddle. They became a little less necessary at home since she wore sleeper pajamas, but they are helpful when she’s wearing a t-shirt.

Looking for some nursery organization ideas? Check out this colorful and affordable nursery tour! From the closet to the dressers, I’ll show you where to store all of baby’s essentials. #nurseyorganizationideas #nurseryorganizationhacks #nurserydres…

Over on the other side of the room, I have fabric dresser drawer that matches the bin in her closet. It holds Hailey’s bath supplies like towels, soaps, and washcloths. It also holds all her medicines and personal care items like thermometers and nail clippers. There’s also a drawer that holds all her fitted sheets and bassinet pad covers. Can we talk about how neatly those fitted sheets are folded? Stand back folks- I’M A PROFESSIONAL!

Looking for some nursery organization ideas? Check out this colorful and affordable nursery tour! From the closet to the dressers, I’ll show you where to store all of baby’s essentials. #nurseyorganizationideas #nurseryorganizationhacks #nurserydres…

PS- I realized these pictures were taken when Hailey was only 6 weeks old. For reference, she’s now 9 months old! Look how tiny she was, my little lumpy baby.

Looking for some nursery organization ideas? Check out this colorful and affordable nursery tour! From the closet to the dressers, I’ll show you where to store all of baby’s essentials. #nurseyorganizationideas #nurseryorganizationhacks #nurserydres…

#SparkJoy: My Intro to KonMari

Anyone who knows me or my family knows we are messy. I can't remember a time that we weren't messy, dating back to when I was a small kid. And I don't mean the fake "oh no don't look at my house, it's such a mess!" but there's only 2 socks on the floor and 3 dishes in the sink. I mean the type where an entire overhaul is needed each time people come over. And I have literally (half) joked that part of the reason I like to have events at my house is that it forces me to clean it regularly. It's a lifestyle I'm used to but hate with a great passion. I'm afraid that one day, it'll all become too much and next thing I know, I'll be surrounded by far too many things. This happened in my bedroom at my parent's house, the 1-bedroom apartment John and I shared, and now it was slowly but surely happening in our house. My attic, which is one of the biggest rooms in the house (which I have all to myself for my studio) had become packed, stuffed... HOARDED. It's a word I'm familiar with and fight to my very core. But I had all the makings of a hoarder and I was heading there on local train. Sure it made stops where I could get off, but I was riding it to the end. Like magic, as soon as I got pregnant, I had enough. Call it nesting, call it a miracle, call it whatever you please but it was a long time coming and needed to happen. 

KonMari Basics Web.jpg

I had looked around my house and noticed the clutter for the last time. Finally frustrated to the point of desperation, I purchased The Life Changing Magic of Tidying Up. People were always boasting about it, mainly for closet clean outs, and I always said I'd check it out "someday" but that day never came for me. Cleaning out my closet would be cool, for sure, but I needed a whole house overhaul. I was desperate, frustrated, and honestly a little scared of what my future would hold. I purchased the book after way too much deliberation and probably years of procrastinating, and I set out to read it right away. 

The Life Changing Magic of Tidying Up

The book starts with the author, Marie Kondo, explaining her history with tidying. She had been doing it all her life, with an almost obsessive need to clean. But she always failed. She explained the reasoning for this was that she was doing it all wrong. I think that for a lot of us, a messy home is equivalent to laziness. Things we know we should have done, but we prolonged it. Well, Marie Kondo was telling us that she didn't have this laziness- but she still failed at keeping her home clean. And that's because "tidy a little a day and you'll be tidying forever". I won't get into too many specifics about the book, because honestly it's a short, easy read and I think that she does the very best job of explaining it. But I know that reading her 100% success rate had me hooked from the very beginning. If I did this process and did it RIGHT, I could have a clean home by the end of it too. 

Putting the book into practice

I decided to read the book before attempting to clean any part of my house. Having been a borderline hoarder and shopaholic all my life, I wanted to do this once, the right way. I wanted to change my life. 

I didn’t realize the impact the book had on me (before even cleaning a single thing!!) until I had a stressed-out crying session. I was stressed about a whole bunch of things, and in my husband’s attempt to console me, he had only made it worse. A few tears turned into full-on bawling. And I shouted something like, “you don’t understand! There’s just so much I need to do and I feel the weight of it all on me! I feel like I just can’t get anything done!” And it hit me... I needed to do things in my business, yes, but I also majorly needed to clean my home. And the thought of just how badly I needed to clean my home was weighing on me to the point of exhaustion. I knew this, but it’s like for the first time I actually realized it in a way that could spark change. I had finally had a breakthrough: I’m really freakin tired of being a slob, and living a life overall that I’m unhappy with. This was my start. 

As I laid in bed that night, I began to think of all the other times I felt this feeling without understanding it. I thought of all those times I was about to do something (with excitement, I might add!) before realizing I hadn’t finished something else. I couldn’t even go up and work in my attic studio, and for a good reason- all my unfinished projects, all my abandoned hobbies, all my clutter, was literally... physically... preventing me from advancing. And I thought to myself, what sparks less joy than going up to make some magic while surrounded by your failures. Of course my studio didn’t bring out the best in me. Instead of showing myself the best, all my accomplishments and the things I loved, I was crippling myself with clutter, and doubt, and neglect. These were not the feelings I wanted to invoke. Not in my studio, not in my home, and surely not in my life. I had to make changes. And I had to do it soon. 

Slow Progress

I'm now about 3 months into the KonMari method and I have to say I fell off the wagon a little bit. I know that procrastination is my biggest weakness, but I had somehow managed to procrastinate this process even further. It's funny, because you often don't notice the passage of time until you look back and realize just how much has gone by. Just like clutter. You don't realize just how much there is until you literally can't function with it anymore. I've been meaning to write this blog post since April and I'm just now getting to it. I am tired of sitting idly by, doing things that don't serve me. I am going to be proactive and set goals for myself and achieve them. And I hope that you guys can join me in doing so!

Join Me! Your Homework

If you want to join me on this insane process of cleaning my house, I urge you to buy The Life Changing Magic of Tidying Up. I only fully used the KonMari method in one room (my closet) but I gotta say that for the past 3 months, it worked. And for those of you thinking that you have a whole family or a partner that makes a mess and needs to contribute, she covers this in her book as well. I'm going to pop in here more often with before and afters, advice on my journey to a clean home, and hopefully an incredible home reveal by the end of the year. With Baby Sunshine coming at the end of September, this is no time to push this off any longer. And for once in my life, cleaning sounds WAY better than procrastinating. And that feels amazing.

So, tell me about your struggles. Have you tried cleaning before but failed? Do you truly hate cleaning? Are you messy, a hoarder, or just really great at hiding your mess? Let me know in the comments below!

How to Stay Organized During a Move

This year, my fiancé and I moved out of our one-bedroom apartment into our three-bedroom house.  Despite doing as much research as possible beforehand to ensure the process went smoothly, we still hit a few snags. Here's my advice for getting through a move the most organized way possible while keeping your sanity. 

Moving soon? Be sure to follow these 9 easy steps to stay organized and keep your sanity!

Consider making a moving binder. I decided to make a moving binder and it was SUPER helpful! I had all my labels, packing lists, receipts, etc. all in one place. This meant that if I ever needed anything, I just had to find the binder. For me, this was so important because things got chaotic and it was much easier to find an entire binder than just one piece of paper.

Get a storage unit near your new home. Since our apartment was super crowded, we knew we wouldn't have enough room to pack and pile boxes. We decided to get a storage unit near our new house.  Even though we had to drive an hour away to store the items, we were unable to fit anything more in the moving truck at our apartment and had to make a separate trip to the storage unit after unloading it. 

Label everything well. Notice I didn't just say to label everything.  It's important to be thorough! I tried so hard to do this on my recent move, and I thought I did a great job. That is, until my movers (aka my MIL and her friend) asked for coffee, and I had no idea where the sugar was. I had to open every single kitchen box until I found it for them. Do yourself a favor, and be as detailed as possible.

Be specific. This goes along with my last point. Don't write kitchen, write "plates and bowls". Don't write cups, write "drinking glasses" or "mugs". It will be extremely helpful once you're in the new home and just really want a glass of wine out of a proper glass, or need to find a scarf on a chilly day!

Face all the labels outwards. This is pretty obvious, but if you're enlisting relatives to help, make sure they are aware of this and adhere to it. Nothing like trying to rotate a 3-box-high pile to see what's in the bottom one. 

Start early. To ensure you don't go into panic mode, start packing as early as you can. Begin with things you know you won't be needing. For us, this meant books, artwork, and rarely used appliances.  This is also a great time to go through stuff and toss out trash, so be sure to leave enough time to de-clutter instead of just tossing everything in a box and moving junk you don't need. 

But don't start too early. I was so ready for this whole moving thing and we timed everything perfectly. Unfortunately, we had a delay with our mortgage bank and were unable to close on the original date. This would have been ok except that someone (cough, fiancé, cough) decided to pack all our pots and pans, most of our dry goods and our DVD player! Be sure to leave certain items out until you're 100% sure of your moving date. 

Make a first day box. We made a first day box, and packed an overnight bag with important items, toiletries, and clothes.  This was really helpful that first night when we were exhausted from the move. You'll be so glad you had everything you needed easily accessible, and this makes the first night feel kinda like a hotel stay!

Know when to wing it. On moving day, there's always those last few items that haven't been packed. Additionally, you'll feel as though everyone needs something from you and you're being pulled in all directions. At this point, it's ok to give up on being totally organized and just toss everything left over into one big box until you get to the new house. Try to label its contents, but sometimes just writing "last minute items" will have to do! 

Be sure to follow my organization Pinterest board for tons of ways to keep your new home clean and organized!

And those are my top tips for staying organized during a move! How did you stay organized for your move?

How to Organize on a Dime

Let's be honest- organizing can be expensive! All those pretty organizers can add up, especially when you've got a lot of ground to cover. Fortunately, there are a lot of affordable solutions to help get your home organized without having to dip into your kids' tuition money. Best of all- it's simple!

*Contains affiliate links

Want to organize your home without breaking the bank? Check out these 6 tips! #home #organization #konmari

1. Check out the thrift store. I've stumbled across some awesome storage solutions at the thrift store. I bought this drawer organizer from the Thrift store for just a few dollars. Keep an open mind, and try to think of alternative uses for items.

2. Go dumpster diving. Sometimes I go to throw something away, but I almost feel guilty to do so. I have a clear zippered pouch from a sheet set I use for holding fabric that I rescued from the landfills.  I also collect small boxes from shipments that I use to organize my drawers, as well as shoe boxes.  You can turn a pasta jar into crafts storage and a cereal box into a magazine holder. The possibilities are endless!

3. Check out the sales. When you're at a store and see a great sale, this is the perfect time to grab a few containers for a rainy day. This can save you money, but it can also give you a head start when you randomly decide to start organizing one day and need a place to put things.

4. Visit the dollar store. The dollar store has lots of great stuff you can use for organizing. Very often, they'll have similar items to what you can find at another store but at a cheaper price. Don't worry if things are in a kooky color- you can spray paint anything these days!  Check out this tutorial for some advice.  And, check out this post for 100 dollar store organization finds!

5. Check Pinterest- but be specific.  A simple search can have all the answers you need, if you know what to look for.  Be specific- "how to organize fabric" will lead you to exactly what you need, whereas "Craft Storage" may lead to falling down the rabbit hole and spending the next 3 hours on Pinterest.  Whether it be a DIY project or a link to an affordable product on Amazon, Pinterest almost always has the answer.

6. Use what you have. The easiest way to save money is to not spend any at all.  Take a look around the house.  There's a good chance you're using two containers where you could be using one.  It's not organization if you're hoarding clutter, so always go through your things once a year to make sure you're not holding onto (and storing) junk.

Want more great tips? Be sure to follow my organization board on Pinterest!

What are your favorite ways to save money on organizing your home or office?

How to Organize... when you weren't planning to!

So, you went into your junk drawer to grab a set of spare keys for your mother. You found birthday candles, 7 expired coupons, and that gift card you needed last month. Soon enough, you've emptied the entire contents of the drawer onto the counter and you're going through everything, trying to get rid of the junk lurking beneath the surface. You certainly didn't intend to organize the junk drawer- you were only looking for a key! Before you know it, you've taken everything out and won't rest until you've put everything back in its place.

If you're anything like me, this happens all. the. time. I didn't want to clean out the junk drawer, but somehow I'm elbows deep in junk. When you don't plan to organize, it can be hard to get the project done, and done right. Here are some suggestions to finish up the task you didn't mean to start!

8.png

*This post contains affiliate links.

1. Start a shopping list. This is oh-so-important. As you go along, you'll say, "Wow I wish I had a small box for xyz." By the end of your purge, you'll forget what you needed- and probably be ready to just flop on the couch in exhaustion and forget all about that J-U-N-K drawer. I recommend quickly jotting down what you want/need to get this space organized once-and-for-all as you go along. This way, you can hop on Amazon or head to the store when you're finished and know exactly what you need. 

2.  Grab a ruler. Creating a list is great, but having measurements for the items on your list is just as important. Otherwise, you'll end up with a box that just about fits, but doesn't. I never (always) do this.

3. Be descriptive. When you set out to purchase the items on your list, you may be left wondering what they're for. Why did I need 3 over-the-door organizers again?! When you're making your list, write down what you plan to put in each box, how many you need, or what color you want it to be. It's better to have more information than not enough when you go shopping to avoid making another trip- and buying more junk you didn't need but had to have.

4. Go dumpster diving. When you've started a project you didn't intend to, sometimes you have to improvise. Grab a cardboard box, shipping envelope, yogurt container, etc. These can be a great and affordable way to corral your items, even just temporarily. Don't worry about decoupaging your container right now. That's a task for another day!

5.  Think outside the (pretty) box. Sure, we all want our drawers and cabinets to look as gorgeous as they do in magazines. But sometimes, making it organized doesn't necessarily mean it's picture-worthy. Don't worry about having expensive containers or purchasing all new boxes for them to match perfectly. Make use of what you have. As long as you can get in and out without a headache, you're golden!

6. Label everything. Sometimes, labeling can be overkill- no need to label your label maker (unless you want to!). As a rule of thumb, anything you can't see should definitely be labeled. This prevents having to open all those pretty boxes to find what you need. Think of it this way- if you can't remember where it goes, there's a good chance it will end up somewhere else (probably in a pile).  So, invest in a label maker! I have this one and love it.

7.  Keep a few extra containers on hand. Notice I said a few containers- don't hoard them! When I'm at a store and see something I love for organization, I might grab one even if I don't know the perfect size or what will go in it. As you're re-organizing, it's great to have at least a few options for where to put your items. If the containers don't end up working, no big deal. You can always return them or try them in another room.  

8. Don't stop halfway. This one is super important- don't make what was a hidden nightmare a public menace. Put as much away as possible. For everything left, make sure you either put it in its new home or throw it away. I'm sure your husband/wife/cat won't be pleased when he/she discovers your brand-new tabletop landfill. And opening the drawer to show them how neat it is when there's a new pile of junk in plain sight won't impress them. Trust me on this one.

Want more great tips on how to be an organizing superstar? Be sure to follow my organization board on Pinterest!

I hope you found these suggestions to be helpful!  What are your tips for impromptu organizing?