Easy Colorful Thanksgiving Place Cards

You guys... Thanksgiving is next week!! I truly can't believe how quickly the months have flown by this year. It feels like just yesterday we rang in the new year, and we're about to celebrate another one! While I'm especially excited for the upcoming holiday season (and busy prepping those blog posts!) I'm featuring the one, lonely Thanksgiving craft I did this year haha. These place cards are super quick and easy to make, so you can get back to cooking everyone's favorites and setting that table.

Looking for an easy Thanksgiving place card for your guests? Well, I’ve got 3 DIY options for you! Try a fun pom pom place card, a scallop glitter place card, or a feather place card! They can be customized for your  Friendsgiving or Thanksgiving ta…

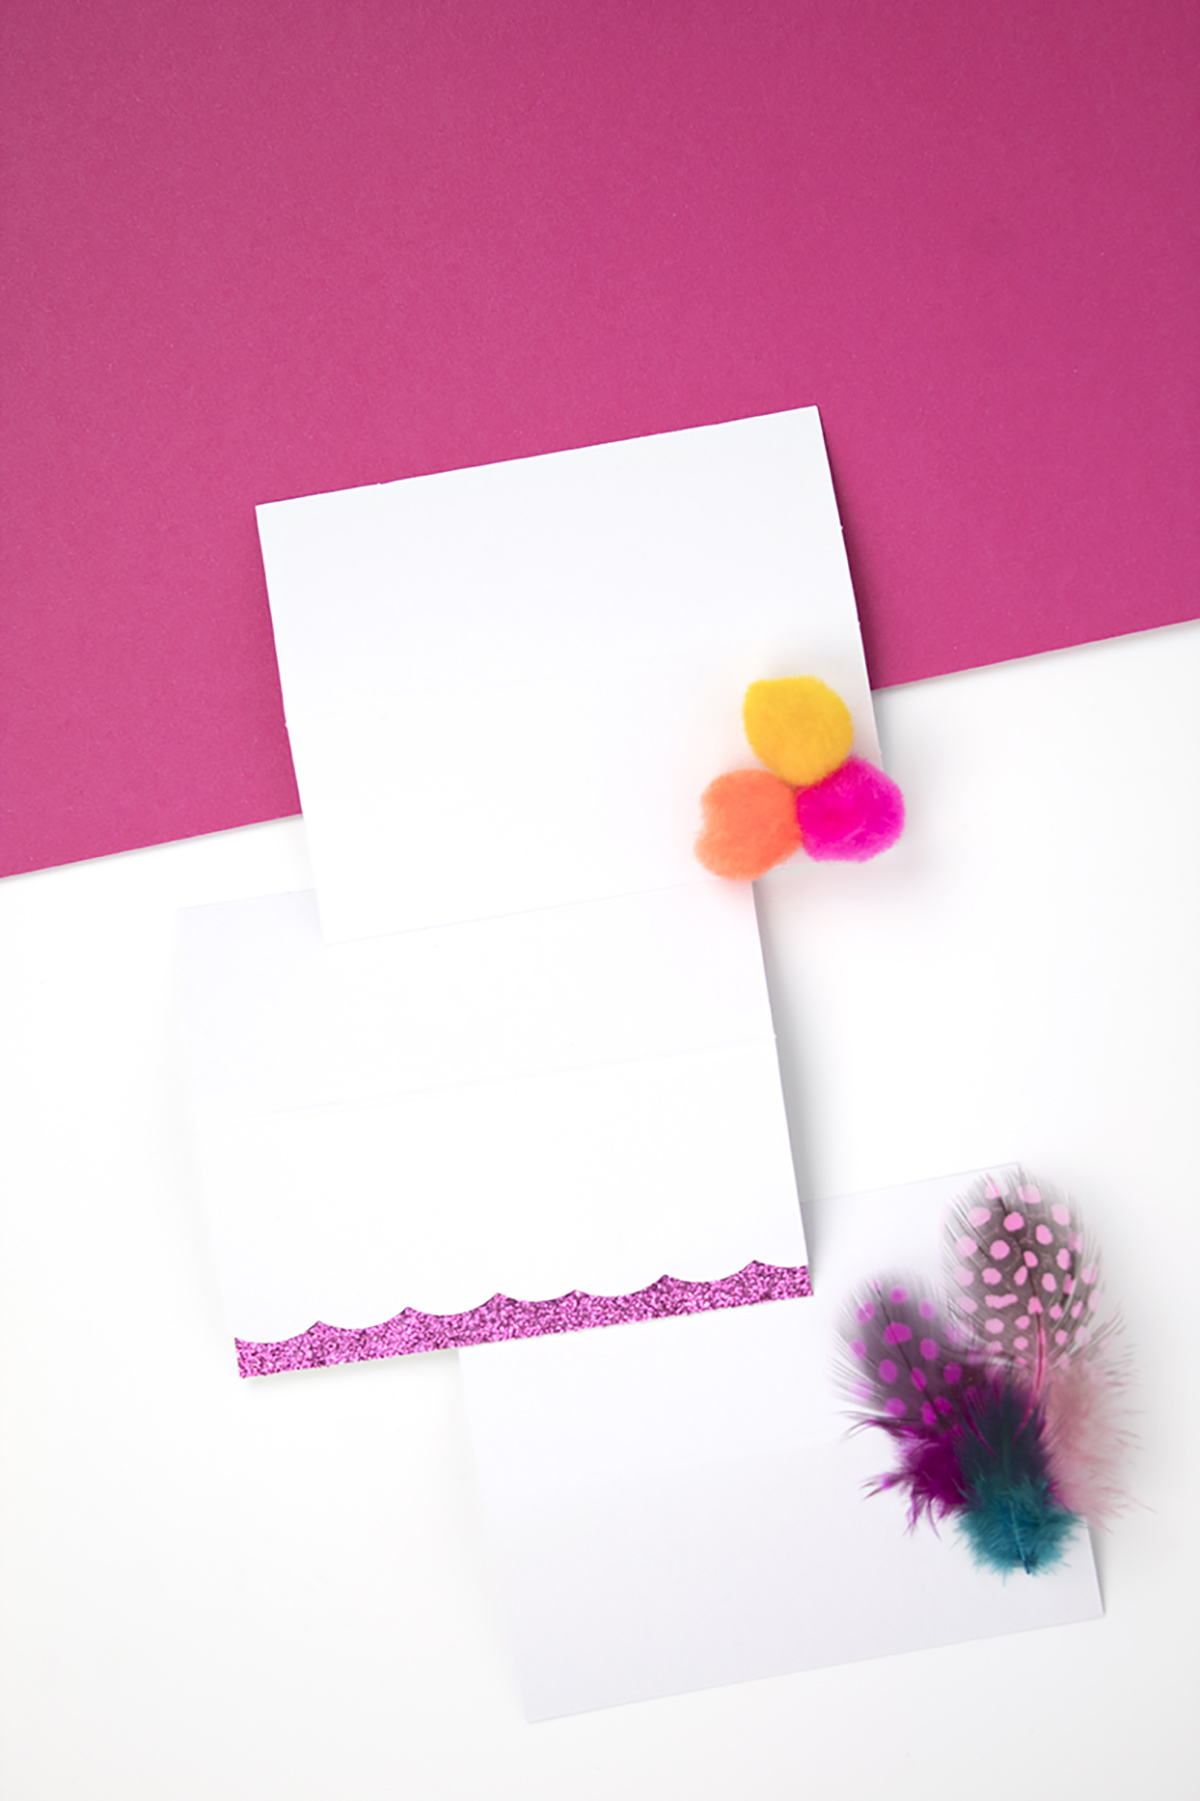
These are perfect because you can whip them up quickly with just a glue gun! There's practically no dry time, so you can even make them in the morning while you're watching the Macy's Thanksgiving Day Parade. Head on over to Giggles Galore for the full post!

Looking for an easy Thanksgiving place card for your guests? Well, I’ve got 3 DIY options for you! Try a fun pom pom place card, a scallop glitter place card, or a feather place card! They can be customized for your Friendsgiving or Thanksgiving tab…

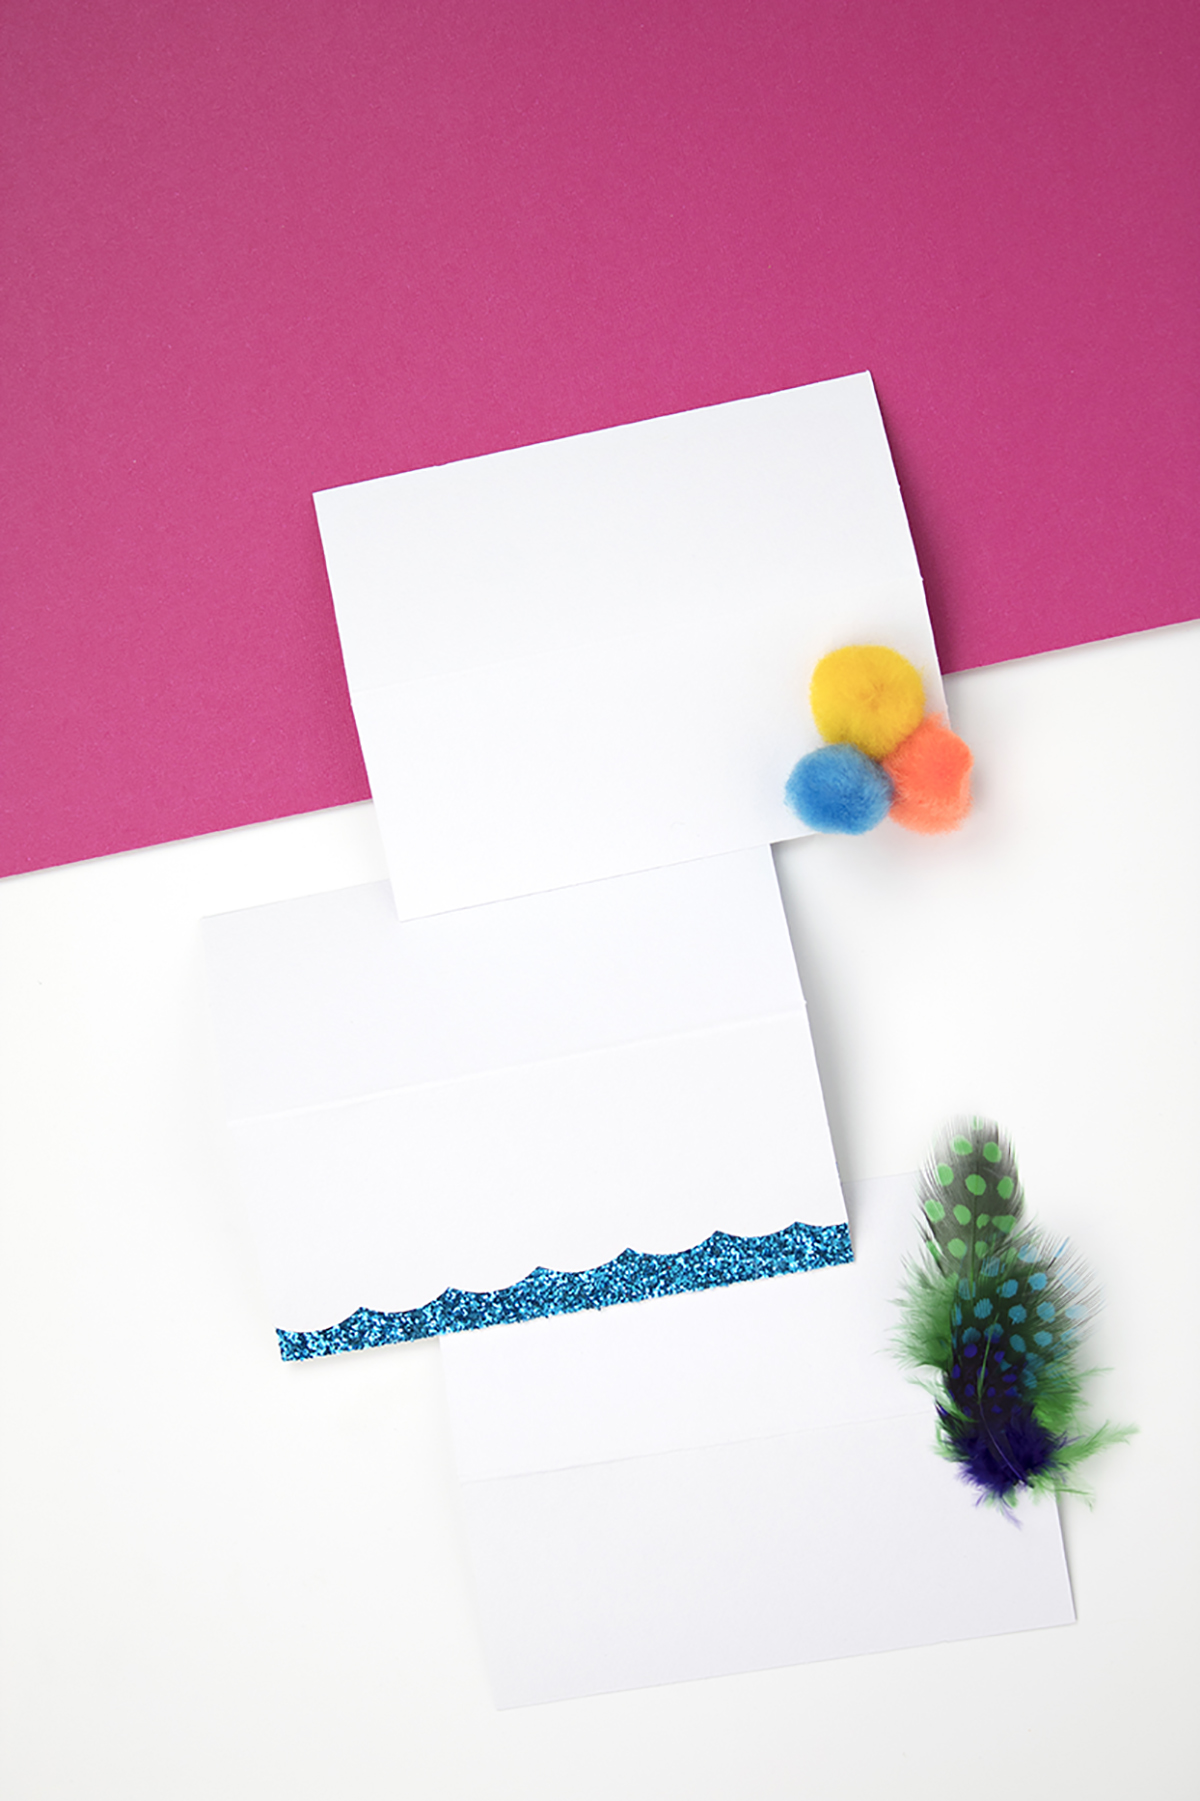
I think these glitter scallop trim ones are my favorite! My husband also liked them best. Um, he liked something with glitter? WHAT?! You can even mix and match the different designs as long as you pick a similar color palette. You can keep the colors very traditional, or go a little bit funky like I did.

Looking for an easy Thanksgiving place card for your guests? Well, I’ve got 3 DIY options for you! Try a fun pom pom place card, a scallop glitter place card, or a feather place card! They can be customized for your Friendsgiving or Thanksgiving tab…

Either way, your guests are sure to love them! So what are you waiting for? Head over to Giggles Galore for the full post!

DIY Christmas Drink Stirrers

ok, I know I'm a little ahead of the game here, but I'm just too dang excited. IT'S ALMOST CHRISTMASSSSSSSS. I've been waiting all year for the holiday season to roll around again, partly because I have all these great Christmas DIY projects I've been wanting to show you. I figured we'd start it off easy with these Christmas drink stirrers so that we can start swizzling those Christmas cocktails and get in the holiday spirit, amiright? 

These Christmas stirrers are super easy and super affordable. You can make them in your choice of colors, but I'm always a fan of pink so I chose a more modern color palette. I had actually made these last year for the blog, but the photos came out SO BAD that I couldn't bring myself to post them (see them here). So, I knew they had to be my first project this year. I gave them a slight makeover and a new color scheme, and voila! Ready to go.

Want to get into the Ho-Ho-Holiday spirit? Grab these drink stirrers for your Christmas spirits (hah, see what I did there?!) They’re really easy to make for your Christmas party or cookie exchange. Click to make your own right now! #drinkstirrers #…

You will need:

Want to get into the Ho-Ho-Holiday spirit? Grab these drink stirrers for your Christmas spirits (hah, see what I did there?!) They’re really easy to make for your Christmas party or cookie exchange. Click to make your own right now! #drinkstirrers #…

Wooden stirrers (here)
Assorted rhinestones (similar here and here)
Assorted sparkly pom poms (from Michaels, similar here)
Glue gun (similar here)
Toothpick


Rhinestone Stirrers:

Want to get into the Ho-Ho-Holiday spirit? Grab these drink stirrers for your Christmas spirits (hah, see what I did there?!) They’re really easy to make for your Christmas party or cookie exchange. Click to make your own right now! #drinkstirrers #…

Directions: Take your wooden stirrer and put a dab of glue on the end. If your glue gun puts out a thick dollop, use a toothpick to put a small amount of glue on the back of the rhinestone or onto the stirrer. Place your large rhinestone at the top. Then, put 2 more of the small rhinestones underneath it. If you want it to look less home made, flip it over and repeat for the other side.

Want to get into the Ho-Ho-Holiday spirit? Grab these drink stirrers for your Christmas spirits (hah, see what I did there?!) They’re really easy to make for your Christmas party or cookie exchange. Click to make your own right now! #drinkstirrers #…
 

Mini PomPom Stirrers:

Want to get into the Ho-Ho-Holiday spirit? Grab these drink stirrers for your Christmas spirits (hah, see what I did there?!) They’re really easy to make for your Christmas party or cookie exchange. Click to make your own right now! #drinkstirrers #…

Directions: Put a dab of glue on one end of the stirrer, and pop on your pompom. Hold in place until it dries, then repeat for the other 2 pom poms. Easy peasy!

Want to get into the Ho-Ho-Holiday spirit? Grab these drink stirrers for your Christmas spirits (hah, see what I did there?!) They’re really easy to make for your Christmas party or cookie exchange. Click to make your own right now! #drinkstirrers #…
 

Snowman Stirrers:

Want to get into the Ho-Ho-Holiday spirit? Grab these drink stirrers for your Christmas spirits (hah, see what I did there?!) They’re really easy to make for your Christmas party or cookie exchange. Click to make your own right now! #drinkstirrers #…

Directions: Glue the pompoms onto the stirrer in size order from smallest to largest. You can also glue your pompoms in the other direction if you want it to be festive instead of snowman.

Want to get into the Ho-Ho-Holiday spirit? Grab these drink stirrers for your Christmas spirits (hah, see what I did there?!) They’re really easy to make for your Christmas party or cookie exchange. Click to make your own right now! #drinkstirrers #…

And there you have it! 3 easy ways to get festive with your drink stirrers for coffee, hot cocoa, and cocktails. These are perfect for any age, and they're disposable! You could even use them as drink markers, depending on how many people you have since each one can be different. And, since you can mix and match the colors, you can make these to match any holiday or event.

Want to get into the Ho-Ho-Holiday spirit? Grab these drink stirrers for your Christmas spirits (hah, see what I did there?!) They’re really easy to make for your Christmas party or cookie exchange. Click to make your own right now! #drinkstirrers #…

I'm SO excited for all the posts coming to the blog in the next few weeks. There are some really good ones headed your way!!

So, which drink stirrer would you grab for your drink? And what drink would it be? Let me know in the comments below!

Striped Happy Halloween Sign

There's less than 2 weeks until Halloween, guys! This is not a drill!!

For some people, Halloween is a dark, spooky time of year where you get to proudly display your goriest items and scare the daylights out of people. For me, it's a time to be "spooky" by decorating with black, orange, green, purple and pink, with a touch of teal, because why not?  That's right, I'm that group that enjoys the cutesy side of Halloween- eating candy, dressing up in cute (and slightly sexy) costumes, and carving pumpkins. If you fall into that second group with me, you're going to LOVE this one!

Looking for a slightly creepy, slightly cute way to decorate for Halloween? You've got to see this striped sign! Click for the full DIY. #halloweencrafts #halloweenart #diyhalloween

I created this Striped Happy Halloween Sign for Giggles Galore and it's one of the easiest projects so far!  All you need for this DIY is a canvas, blue painter's tape, some black paint, and gold letters. It really pops in an entryway, and brings some fun, light-hearted humor to your home!

Head on over to Giggles Galore to see the full post! And, if your canvas needs a friend, try these EEK canvases too!

Looking for a slightly creepy, slightly cute way to decorate for Halloween? You've got to see this striped sign! Click for the full DIY. #halloweencrafts #halloweenart #diyhalloween

I hope you enjoyed this easy canvas DIY! Now, time for my question of the day that no one answers- what's your favorite part about Halloween? Is it dressing up, eating candy, scaring people, or staying home and hiding from everyone? Don't be shy! Let me know in the comments below.

Easy Striped Halloween Art

It's FALL!!! Halloween is almost here!!! YAYYYY!

Ok, I think I'm a little bit too excited about Halloween, but I just can't help it. Halloween is one of my favorite holidays, and fall is my favorite season! This week, I whipped out my Halloween decorations, and started to decorate. While I love the traditional black and orange, I wanted something with a little more color to add a pop to my usual Halloween decor. Lucky for me, I knew just what to do! And lucky for you, I made a DIY for ya ;)

While I love the traditional black and orange, I wanted something with a little more color to add a pop to my usual Halloween decor. Click to check out the easy DIY! #halloweenart #diyhalloween #halloweencrafts

You will need:

While I love the traditional black and orange, I wanted something with a little more color to add a pop to my usual Halloween decor. Click to check out the easy DIY! #halloweenart #diyhalloween #halloweencrafts

Square canvas (here)
Glitter Paper (from the craft store, similar here)
X-Acto Knife (here)
1" Painter's Tape (here)
T-Square or Ruler (here)
Neon Paint (similar here)
Scissors (here)
Pencil
Paint Brush

How to:

While I love the traditional black and orange, I wanted something with a little more color to add a pop to my usual Halloween decor. Click to check out the easy DIY! #halloweenart #diyhalloween #halloweencrafts

1. Using your T-Square or ruler, make lines going across the sides of your canvas at every inch. Flip it, and make lines on the other side. We are doing this so that we know where our tape needs to go without making lines on the front. We want our lines to be as straight as possible!

2. Add your tape, starting at one end, wrapping across the front, and lining up on the other side. Press it down so the paint doesn't sneak in like mine did ;)

3. Paint your canvas, making sure to get the sides too. I found the neon paint to be a bit thin, so I did a few coats. 

4. When your paint is dry, peel off the tape .

4. Create large letters on your computer and print. I did EEK because it would be easier to cut out, but you can do anything! I cut out my printed letters, traced them onto the glitter paper (BACKWARDS!) and then cut them out using scissors, and an X-Acto knife for the smaller parts. I use this cutting mat to protect my work surface and love it! 

While I love the traditional black and orange, I wanted something with a little more color to add a pop to my usual Halloween decor. Click to check out the easy DIY! #halloweenart #diyhalloween #halloweencrafts

5. Hot glue your letters onto your canvas. You'll want to make marks so it's centered, by making a very faint line on the canvas and then gluing the letter right on top.

While I love the traditional black and orange, I wanted something with a little more color to add a pop to my usual Halloween decor. Click to check out the easy DIY! #halloweenart #diyhalloween #halloweencrafts

"Eye" hope you liked this post! If you're not into the whole neon Halloween thing, you can definitely change it up to the classic black and orange. Or, if Halloween isn't your thing at all, you can make one of these and use it as a monogram decor in your home! The possibilities are endless. You can make these for every holiday! Especially if you get the canvases on sale with a coupon from Michael's (which is what I did!)

While I love the traditional black and orange, I wanted something with a little more color to add a pop to my usual Halloween decor. Click to check out the easy DIY! #halloweenart #diyhalloween #halloweencrafts

What's your favorite color combo for Halloween? Do you like to keep it classic? Try new things? Hate Halloween in general? Let me know in the comments below!

Adding a Pop of Color to Your Wedding

When you think of weddings, you think of white. While some may see that as very limiting, I see it as a blank canvas to incorporate any color you wish. Often, people add "wedding colors" and it's usually one shade of a color, like a deep purple or emerald green or blush pink. What if, instead of focusing on one color, you added shades of many colors? I think it would be a lot more fun (and a lot less stressful) to fill your wedding with complimentary hues. 

When it comes to adding some color (and fun!) to your wedding, look no further than Oriental Trading. They've got everything you need for weddings, whether you want to do a few crafts projects, get something that's personalized, or something that's ready to go out of the box. Plus, with their new Marry Me page of their website, all the wedding items are in one easy to find place. I call that a win-win.

*Note: This post is a collaboration with Oriental Trading, but all opinions are my own. My love affair with them started way back when I first got their catalogs as a kid!

Let those table numbers stand out! Click to see how I added a modern twist to this traditional wedding element, along with 2 other ideas to add a pop of color to your wedding!

Oriental Trading has everything you need to craft any project for a wedding or a party. Today, I've got 3 fun and easy projects you can make using Oriental Trading products and craft supplies. I've linked all the products I've used, so you've got everything you need in one easy-to-find place! Ok, enough with my blabbing... Let's get crafting!

Jordan Almonds 

Jordan Almonds don’t have to be boring! Click to see how I added a modern twist to this traditional wedding element, along with 2 other ideas to add a pop of color to your wedding!

You will need:

Jordan Almonds in your wedding colors (I used coral, light blue, and pink)
White Tulle (here)
Contrasting Ribbon (here)
Thank You Charms (here)
Spoon (here)

Jordan Almonds don’t have to be boring! Click to see how I added a modern twist to this traditional wedding element, along with 2 other ideas to add a pop of color to your wedding!

In many cultures, it's traditional to give out Jordan Almonds at a wedding. I'm Greek, and I can tell you for a fact that you can't attend a Greek wedding without receiving one of these bombonieres! For more info on Jordan Almonds, check this out.

How To:

Jordan-Almonds-GIF2.gif

1. Pick Jordan almonds in colors that match your theme.

2. Place 5 almonds in the tulle. I started by mixing my colors, but I realized I preferred all one color with a contrasting ribbon.

Jordan Almonds don’t have to be boring! Click to see how I added a modern twist to this traditional wedding element, along with 2 other ideas to add a pop of color to your wedding!

3. If you want the bow in the back, loop your tag onto the ribbon. If you want your tag in the front, add it as you're making the loop of the bow. Oriental Trading also offers personalized ribbon, which would be even better to add! 

4. Once you've decided how you want your bow, slide your almonds into the middle of your tulle, grab the sides, and tie your ribbon around it in a bow.

Jordan Almonds don’t have to be boring! Click to see how I added a modern twist to this traditional wedding element, along with 2 other ideas to add a pop of color to your wedding!

Table Numbers

Let those table numbers stand out! Click to see how I added a modern twist to this traditional wedding element, along with 2 other ideas to add a pop of color to your wedding!

You will need:

White Table Numbers (here)
Paint or Spray Paint (here)
Paint Brushes and Palette (similar here and here)
Gold Foil (here)
Gold Foil Adhesive (I used this one)
Gold Glitter (here)
Mod Podge (here)

Let those table numbers stand out! Click to see how I added a modern twist to this traditional wedding element, along with 2 other ideas to add a pop of color to your wedding!

People need to know where they're sitting, right? Why not lead them there in the brightest, glitziest way possible?!

How To:

1. Paint or spray paint your table numbers, but leave the edges blank. Do 2 coats, or as many as it takes to get smooth coverage, and let dry. (FYI- I used paint).

2. Paint the white edges of your numbers with foil adhesive. Work carefully so that you don't get it off the white edge. It sticks to anything with adhesive, so heed my warning and be careful!

3. Wait about 20 minutes for it to cure and be slightly tacky. Fun fact- this stuff dries sticky, so even if you wait a little too long, it'll still be sticky for the foil.

Let those table numbers stand out! Click to see how I added a modern twist to this traditional wedding element, along with 2 other ideas to add a pop of color to your wedding!

4. Take your foil and cut/rip to size, then attach it to the edges of the numbers. Take your stiff brush and brush off any extra foil. This stuff gets messy, so put a paper or a plate underneath so you don't make a huge mess :)

5. To do the glitter edge, mix gold glitter with mod podge. Using a paintbrush, paint the mixture onto the edges in small sections. Before the mixture dries, sprinkle some glitter onto the wet glue to cover any bald spots. Continue until you've done the whole perimeter, then go back and fill in any bare spots.

6. To travel to the venue, wrap each with white tissue paper to prevent scratches. Do not assemble them until you arrive, as they are fragile and may snap in transit. 

Let those table numbers stand out! Click to see how I added a modern twist to this traditional wedding element, along with 2 other ideas to add a pop of color to your wedding!


Welcome Basket

Your welcome basket doesn’t have to be formal! Click to see how I added a modern twist to this traditional wedding element, along with 2 other ideas to add a pop of color to your wedding!

You will need:

Wooden box (I used this one, but this one is better!)
Acrylic Paints (here)
Paint Brushes and Palette (similar here and here)
Self Adhesive Letters (here)

Your welcome basket doesn’t have to be formal! Click to see how I added a modern twist to this traditional wedding element, along with 2 other ideas to add a pop of color to your wedding!

Show your friends and family that this is bright occasion from the start with this fun welcome basket! You can also re-use it after the wedding to hold mail or greet guests in your entryway!

How To:

1. Take your letters and put your message on the box. I chose to keep it simple and write "Hi!" You can also do the couple's initials or a monogram.

2. Mix up your paints until they are the right color. Use a toothpick or a thin paintbrush to stir. If the paint is too light, it'll make it hard to read the Hi, so be aware of that when painting your box.

Your welcome basket doesn’t have to be formal! Click to see how I added a modern twist to this traditional wedding element, along with 2 other ideas to add a pop of color to your wedding!

3. Carefully paint your basket. I did a different color for each bar to keep it interesting.

4. While your paint is still wet, carefully peel off your stickers using tweezers. If your box is like mine, I recommend you actually don't paint the inside of the box. It got really tricky with all the little rungs. Especially since I made my own colors, because I found that I would run really low and have to try really hard not to run out before I finished. 

5. Place your box on your welcome table and fill it with pashminas, ceremony programs, or bubbles!

Your welcome basket doesn’t have to be formal! Click to see how I added a modern twist to this traditional wedding element, along with 2 other ideas to add a pop of color to your wedding!

With a little bit of crafting, and a whole lot of imagination, you too can make your wedding unique with a fun pop of color. I've got a follow-up post coming with ideas for getting your gals together for a fun crafternoon, so stay tuned!

Be sure to visit Oriental Trading and their Marry Me page to start customizing your own wedding!

So what do you think? Will you be adding a pop of color to your wedding? How do you plan to do it? Let me know in the comments below!